
The 30-Minute Cinnamon Roll Miracle You Need in Your Life
Some mornings just call for warm, gooey cinnamon rolls fresh from the oven—but who has time for yeast dough that needs hours to rise? Enter these ridiculously easy Bisquick cinnamon rolls that go from craving to table in about half an hour flat. No waiting, no complicated techniques, no stand mixer required. Just soft, pillowy rolls swirled with sweet cinnamon sugar and drizzled with vanilla glaze, ready to make your morning (or afternoon, or midnight snack) absolutely magical.
These are the cinnamon rolls you make on a lazy Sunday when you want something special but don't want to spend all day in the kitchen. They're the ones you whip up when unexpected guests show up for coffee. They're your secret weapon for winning over picky eaters and impressing brunch guests who have no idea how truly simple they are. And the best part? They taste like you spent hours on them when really, you barely broke a sweat.
Why You'll Love This Recipe
- Ready in 30 minutes or less—no yeast, no rising, no waiting around
- Only 3 ingredients for the dough—Bisquick makes it almost foolproof
- Soft, tender texture that rivals traditional cinnamon rolls
- Warm cinnamon-sugar filling in every spiral
- Sweet vanilla glaze that melts into all the nooks and crannies
- Perfect for busy mornings, last-minute brunches, or weekend treats
- Kid-friendly and beginner-approved—even first-time bakers will nail these
- Uses pantry staples you probably already have on hand
- Customizable with your favorite spices, nuts, or glaze flavors
Ingredients
For the Dough:
- 2 cups Bisquick mix
- 2/3 cup milk
- 2 tablespoons melted butter, plus more for greasing
For the Filling:
- 1/4 cup packed light brown sugar
- 1 tablespoon ground cinnamon
- 2 tablespoons melted butter
For the Glaze:
- 1/2 cup powdered sugar
- 1-2 tablespoons milk
- 1/4 teaspoon vanilla extract (optional)
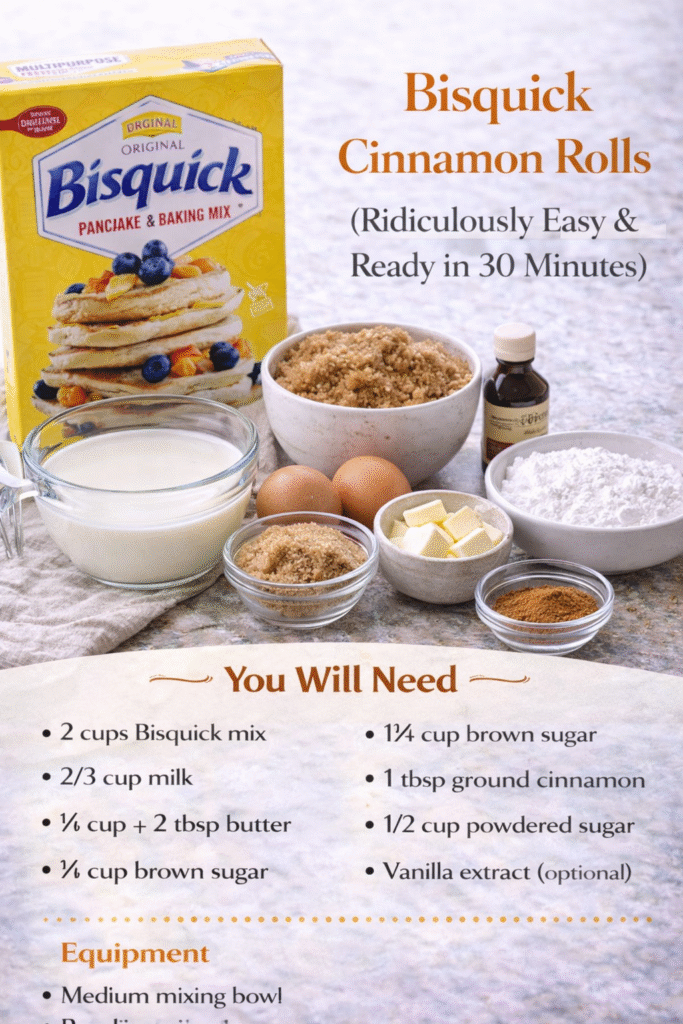
Equipment
- Medium mixing bowl
- Small bowl (for filling and glaze)
- Rolling pin (or clean hands for patting)
- Pastry brush
- Sharp knife or unflavored dental floss
- 9-inch round baking dish or baking sheet
- Parchment paper (optional)
- Measuring cups and spoons
- Whisk or fork
Step-by-Step Instructions
Step 1: Make the Dough
Preheat your oven to 400°F (200°C). In a medium bowl, stir together the Bisquick mix and milk until they just come together into a soft, slightly sticky dough. The key word here is "just"—stop mixing as soon as you don't see any more dry flour. Overmixing makes the rolls tough instead of tender, and we definitely don't want that.
Step 2: Shape the Dough
Lightly dust a clean countertop or cutting board with a bit of Bisquick mix or flour. Turn your dough out onto the surface and gently pat or roll it into a rectangle about 8x10 inches. Don't stress about getting it perfectly even—rustic is beautiful, and these rolls are forgiving.
Step 3: Brush with Butter
Using a pastry brush (or the back of a spoon), spread those 2 tablespoons of melted butter evenly over the entire surface of your dough rectangle. Make sure you get all the way to the edges so every bite has that buttery goodness.
Step 4: Add the Cinnamon-Sugar Magic
In a small bowl, stir together the brown sugar and cinnamon until they're well mixed. Sprinkle this sweet, fragrant mixture evenly over the buttered dough, leaving just a tiny border (about half an inch) around the edges. This helps the rolls seal properly when you roll them up.
Step 5: Roll It Up
Starting from one of the long sides, carefully roll the dough up into a tight log, working slowly and keeping the roll as even as possible. When you get to the end, pinch the seam gently to seal it closed so your rolls don't unravel while baking.
Step 6: Slice into Rolls
Using a sharp knife (dipped in a bit of flour to prevent sticking) or a piece of unflavored dental floss, cut your log into 8-10 equal slices. The dental floss trick is genius if you want super clean cuts without squashing the rolls—just slide it under the log, cross the ends over the top, and pull tight.
Step 7: Prep for Baking
Lightly grease a 9-inch round baking dish with butter, or line a baking sheet with parchment paper. Arrange your cinnamon roll slices in the dish or on the sheet, leaving a little breathing room between them—they'll puff up and touch as they bake, which is exactly what you want. If you're feeling extra indulgent, brush the tops with a tiny bit more melted butter.
Step 8: Bake to Golden Perfection
Slide your rolls into the preheated oven and bake for 12-15 minutes, keeping an eye on them after the 10-minute mark. They're done when they're golden brown on top and cooked through in the center. Your kitchen will smell absolutely incredible.
Step 9: Make the Glaze
While the rolls are baking, whisk together the powdered sugar, 1 tablespoon of milk, and vanilla extract (if using) in a small bowl. Add more milk a teaspoon at a time until you reach your perfect drizzling consistency—thick enough to coat the rolls but thin enough to pour easily.
Step 10: Glaze and Devour
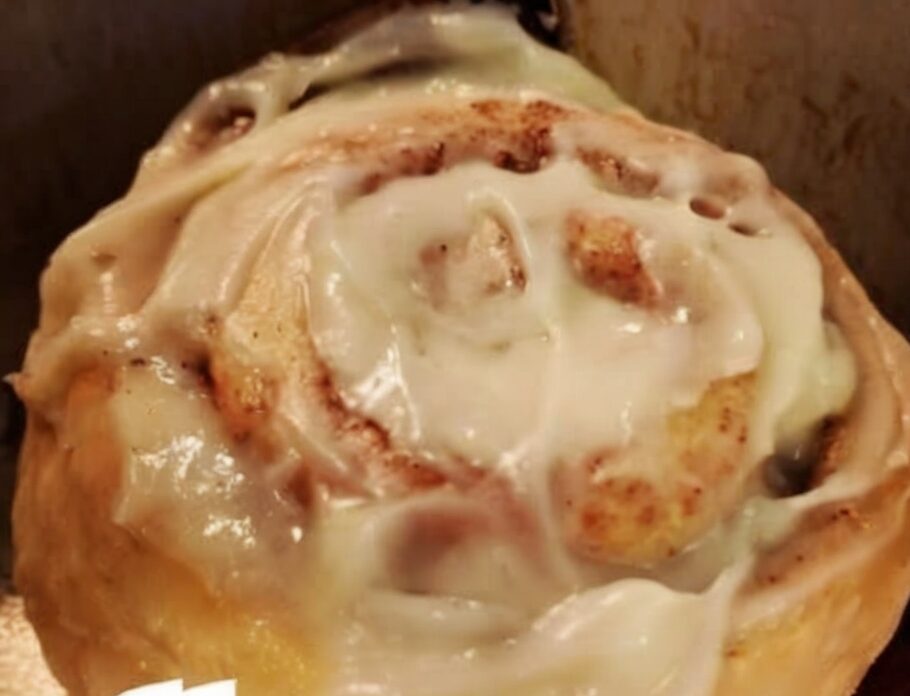
Let the rolls cool for just 2-3 minutes out of the oven—you want them warm but not scorching hot. Drizzle that gorgeous glaze all over them, letting it pool in the swirls and drip down the sides. Serve immediately while they're still warm and gooey. Try not to eat all of them in one sitting (no judgment if you do).
Pro Tips
- Don't overmix the dough. Stir just until the dry ingredients disappear. A slightly lumpy, shaggy dough is perfect—it means you haven't overdeveloped the gluten, which keeps the rolls tender.
- Keep your hands lightly floured. This dough is a bit sticky, which is good for soft rolls, but it can stick to everything. A light dusting of flour on your hands and work surface makes handling much easier.
- Use a bench scraper for easy rolling. If your dough wants to stick to the counter while rolling, slide a bench scraper or thin spatula underneath to release it.
- Dental floss gives the cleanest cuts. If you don't have floss, wipe your knife blade clean between cuts and dip it in flour to minimize squashing.
- Make them ahead for busy mornings. Cut the rolls, place them in your baking dish, cover tightly with plastic wrap, and refrigerate overnight. In the morning, let them sit at room temperature for 10 minutes while the oven preheats, then bake as directed.
- Double the glaze if you love it extra sweet. There's no such thing as too much glaze in my book.
Variations & Substitutions
- Make them cream cheese rolls: Mix 4 ounces of softened cream cheese with 1/4 cup powdered sugar and 1/2 teaspoon vanilla, then spread this over the dough before adding the cinnamon sugar.
- Add nuts: Sprinkle 1/3 cup of chopped pecans or walnuts over the filling before rolling up.
- Try different spices: Add a pinch of nutmeg or cardamom to your cinnamon sugar for a warm, complex flavor.
- Make them apple cinnamon rolls: Scatter 1/2 cup of finely diced apples tossed with a little lemon juice over the filling.
- Go chocolate: Replace half the cinnamon with cocoa powder and add 1/3 cup mini chocolate chips to the filling.
- Make them pumpkin spice: Swap the cinnamon for pumpkin pie spice and add 2 tablespoons of pumpkin puree to the dough.
- Try a maple glaze: Use real maple syrup instead of milk in your glaze for a rich, maple-flavored topping.
- Make them dairy-free: Use your favorite plant-based milk and vegan butter throughout the recipe.
Serving, Pairing & Storage
How to Serve:
These are best served warm, right out of the oven with the glaze freshly drizzled. They're perfect on their own, but also amazing alongside scrambled eggs, fresh fruit, crispy bacon, or a steaming cup of coffee or hot chocolate.
What It Pairs Well With:
Serve these at brunch with quiche, fruit salad, and mimosas. They're also perfect for a cozy breakfast in bed, an after-school snack, or a sweet midnight treat with a glass of cold milk.
Storage:
Store leftover rolls in an airtight container at room temperature for up to 2 days. They lose a bit of their softness over time, but they're still delicious.
Freezing Instructions:
These freeze beautifully! Bake them, let them cool completely (don't glaze them yet), then wrap individually in plastic wrap and store in a freezer bag for up to 2 months. Thaw at room temperature, warm in the microwave for 15-20 seconds, then add fresh glaze.
Reheating Tips:
Warm individual rolls in the microwave for 10-15 seconds, or reheat the whole batch covered with foil in a 300°F oven for about 5-8 minutes.
FAQ
Can I make these without a rolling pin?
Absolutely! Just use your hands to gently pat and stretch the dough into a rectangle. It doesn't have to be perfect—rough edges add character.
Can I use a different baking mix?
Bisquick works best because of its specific formula, but other all-purpose baking mixes should work in a pinch. Results may vary slightly in texture.
Why are my rolls tough?
The most common culprit is overmixing the dough. Mix just until combined, handle the dough gently, and don't overwork it while rolling.
Can I make these dairy-free?
Yes! Use plant-based milk and vegan butter throughout the recipe. The texture will be slightly different but still delicious.
Can I double the recipe?
Sure! Just make the dough in two separate batches rather than one giant batch—it's easier to handle that way.
How do I know when they're done?
They should be golden brown on top and spring back lightly when touched. If you're unsure, a toothpick inserted in the center should come out clean.
Bisquick Cinnamon Rolls
Ingredients
Equipment
Method
- Preheat oven to 400°F (200°C).
- In a medium bowl, stir together Bisquick mix and milk until just combined into a soft dough. Don't overmix.
- Lightly flour a clean surface. Turn dough out and gently pat or roll into an 8x10 inch rectangle.
- Brush 2 tablespoons melted butter evenly over the dough rectangle.
- In a small bowl, mix together brown sugar and cinnamon. Sprinkle evenly over the buttered dough, leaving a small border around the edges.
- Starting from the long side, carefully roll up the dough into a log. Pinch the seam closed gently.
- Using a sharp knife or dental floss, cut the log into 8-10 equal slices.
- Lightly grease a 9-inch baking dish or line a baking sheet with parchment paper. Place cinnamon roll slices in the dish or on the sheet, leaving space between them.
- Bake for 12-15 minutes until golden brown and cooked through.
- While rolls bake, whisk together powdered sugar, 1 tablespoon milk, and vanilla extract in a small bowl until smooth. Add more milk as needed for drizzling consistency.
- Let rolls cool for 2-3 minutes, then drizzle glaze generously over the warm rolls. Serve immediately.
Notes
Lightly flour your hands and work surface to prevent sticking.
For cleanest cuts, use unflavored dental floss instead of a knife. Slide it under the log, cross the ends over the top, and pull tight.
Make ahead: Cut rolls, place in baking dish, cover, and refrigerate overnight. Let sit at room temperature 10 minutes before baking.
Store in an airtight container at room temperature for up to 2 days.
Freeze baked, unglazed rolls wrapped individually in plastic wrap for up to 2 months. Thaw, warm, and add fresh glaze before serving.
Reheat individual rolls in microwave for 10-15 seconds or warm entire batch covered in foil at 300°F for 5-8 minutes.
Double the glaze recipe if you love extra-sweet, extra-gooey rolls.
These are best served warm when the glaze is freshly drizzled and the rolls are at their softest.