The Appetizer That Will Ruin Your Dinner Plans
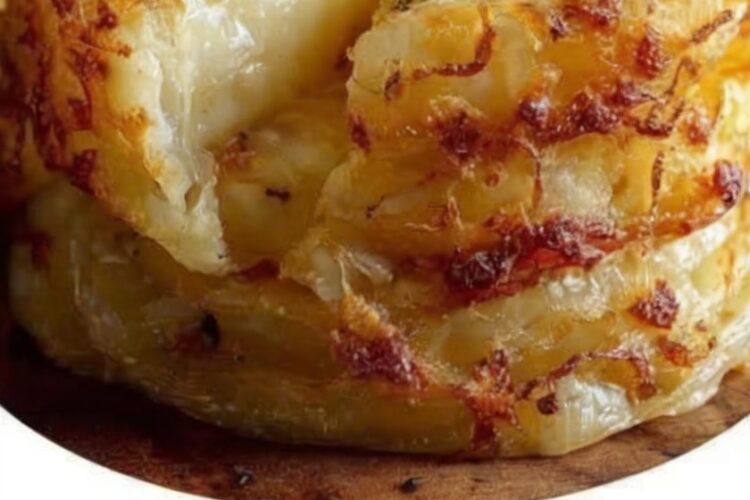
Fair warning: once you make these Tennessee Cheesy Onions, you might find yourself "accidentally" eating half the pan before dinner even starts. They're that dangerously delicious. Sweet, caramelized onions swimming in melted butter and spices, then buried under a blanket of sharp cheddar and creamy Monterey Jack that bakes up bubbly and golden—it's the kind of appetizer that stops conversations mid-sentence and has people hovering around the dish like moths to a flame.
What makes these so utterly irresistible is the perfect marriage of sweet and savory. The onions soften and caramelize in the oven, losing their sharp bite and turning mellow and almost candy-like, while the cheese gets all melty and gooey with crispy golden edges. Add a hint of garlic, a whisper of cayenne for warmth, and a sprinkle of fresh chives, and you've got something that looks fancy but comes together with barely any effort. Whether you're hosting a party, attending a potluck, or just treating yourself on a random Tuesday, these cheesy onions are about to become your new obsession
Why You'll Love This Recipe
- Ridiculously easy with just a handful of simple ingredients
- Ready in under 45 minutes from start to finish
- Crowd-pleasing flavor that appeals to everyone
- Sweet caramelized onions that practically melt in your mouth
- Double cheese situation for maximum gooeyness
- Perfect party appetizer that looks impressive but requires minimal effort
- Versatile serving options—eat it with crackers, bread, or straight from the pan
- Customizable heat level depending on your spice preference
- Budget-friendly using everyday ingredients
- Dangerously addictive—seriously, consider yourself warned
Ingredients
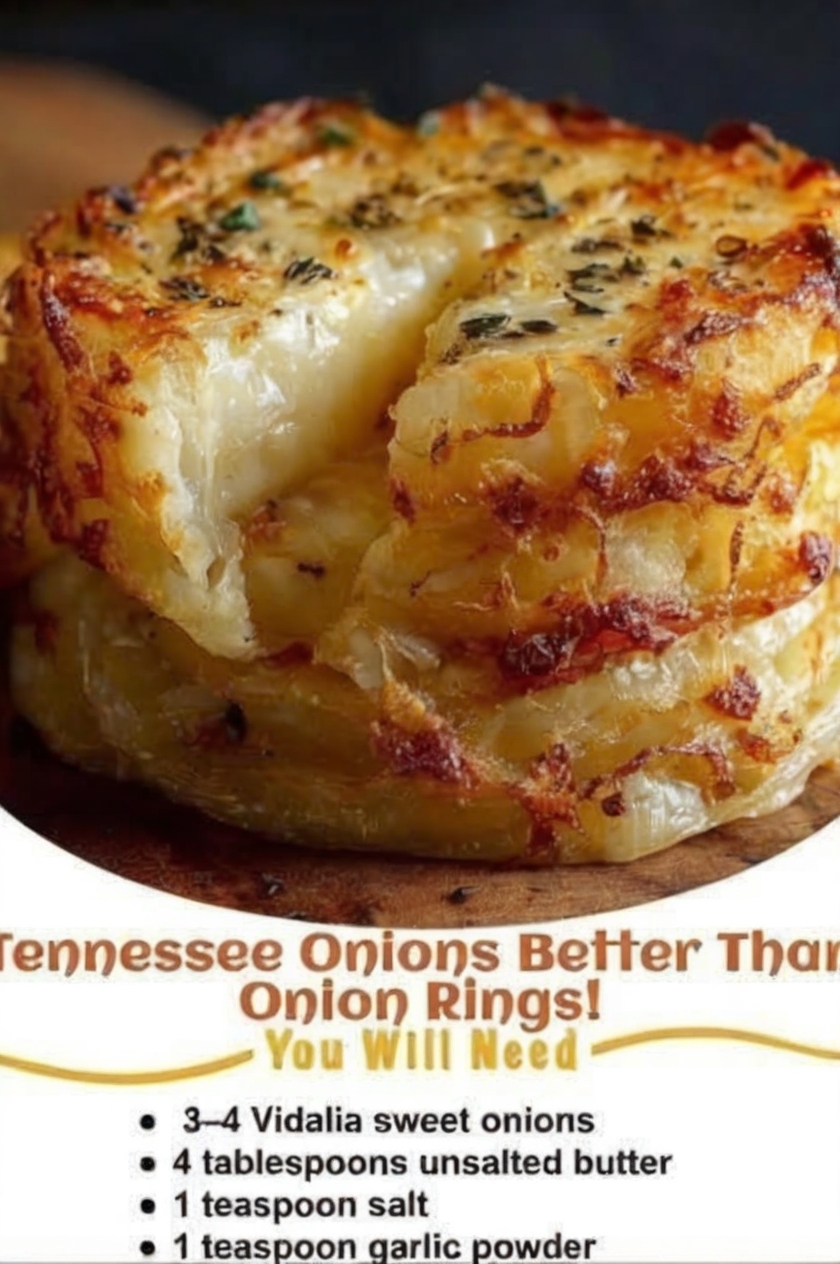
- 2 large yellow onions (about 1 lb total)
- 1/4 cup melted butter
- 1 teaspoon garlic powder
- 1/2 teaspoon onion powder
- 1/4 teaspoon cayenne pepper (optional, for a little kick)
- 1 cup shredded sharp cheddar cheese
- 1/2 cup shredded Monterey Jack cheese
- 1/4 cup chopped fresh chives or green onions, for garnish
Equipment
- 9x13 inch baking dish
- Medium mixing bowl
- Whisk
- Sharp knife
- Cutting board
- Measuring cups and spoons
- Cheese grater (if grating fresh cheese)
- Oven mitts
Step-by-Step Instructions
Step 1: Preheat and Prep
Get your oven heating to 375°F (190°C) so it's nice and hot when you're ready. Take your large yellow onions and slice them into rings about 1/4-inch thick—not too thin or they'll disappear, not too thick or they won't get tender enough. Gently separate the rings with your fingers, creating individual hoops of onion goodness.
Step 2: Make Your Butter Mixture
In a medium bowl, whisk together the melted butter, garlic powder, onion powder, and cayenne pepper if you're using it. This buttery, garlicky mixture is what transforms ordinary onions into something extraordinary, so make sure everything is well combined and the spices aren't clumping.
Step 3: Coat Those Onions
Add all your onion rings to the bowl with the butter mixture. Using your hands or a spoon, gently toss them around until every ring is glistening with that seasoned butter. Take your time here—you want each ring coated so every bite is packed with flavor.
Step 4: Arrange in Your Baking Dish
Spread the buttered onion rings out in your 9x13 inch baking dish in a fairly even layer. They can overlap a bit—in fact, they probably will—and that's totally fine. They'll all cook down and get tender together, and those overlapping spots create little pockets where the cheese gets extra melty.
Step 5: Shower with Cheese
Now for the best part. Sprinkle both the sharp cheddar and Monterey Jack cheeses evenly over the top of the onions, making sure you get good coverage across the whole dish. Don't be shy—you want a generous blanket of cheese that will melt down into all those onion layers.
Step 6: Bake to Bubbly Perfection
Slide your dish into the preheated oven and bake for 25-30 minutes. You're looking for tender onions that have softened and started to caramelize around the edges, and cheese that's completely melted, bubbling away, and starting to turn golden brown in spots. The smell will be absolutely intoxicating.
Step 7: Garnish and Devour
Carefully remove the dish from the oven—it'll be piping hot and bubbling. Sprinkle fresh chopped chives or green onions over the top for a pop of color and fresh flavor that cuts through the richness. Let it cool for just 2-3 minutes so you don't burn your mouth, then dive in while it's still warm and gooey.
Pro Tips
- Use sweet onions for an even sweeter result. Vidalia or Walla Walla onions work beautifully if you can find them, though regular yellow onions are perfect too.
- Shred your own cheese for better melting. Pre-shredded cheese contains anti-caking agents that can make it grainy and prevent it from melting as smoothly. Freshly grated cheese melts like a dream.
- Don't skip the onion powder. Yes, you're using actual onions, but the onion powder adds an extra concentrated onion flavor that makes these even more addictive.
- Adjust the cayenne to your taste. If you love heat, bump it up to 1/2 teaspoon. If you're feeding kids or spice-sensitive folks, leave it out entirely—they'll still be delicious.
- Watch the cheese during the last few minutes. If it's browning too quickly, tent the dish loosely with foil to prevent burning while the onions finish softening.
- Serve immediately for the best texture. These are at their absolute best when the cheese is still gooey and the onions are tender-crisp. They're still good at room temperature, but warm is where the magic happens.
Variations & Substitutions
- Try different cheese combinations: Gruyère and fontina make it fancy, pepper jack adds serious heat, or go all cheddar if that's what you have.
- Add bacon: Because everything's better with bacon. Crumble 4-6 strips of cooked bacon over the cheese before baking.
- Make it loaded: Top with crumbled blue cheese and a drizzle of balsamic glaze after baking for a gourmet twist.
- Add fresh herbs: Stir some fresh thyme or rosemary into the butter mixture for an herby, aromatic version.
- Make it a side dish: Serve this alongside grilled steak, roasted chicken, or burgers instead of as an appetizer.
- Try sweet onions or red onions: Each brings a slightly different flavor profile—sweet onions are milder, red onions are a bit sharper.
- Make it dairy-free: Use vegan butter and dairy-free cheese shreds for a plant-based version.
- Add a crunchy topping: Before the last 10 minutes of baking, sprinkle with crushed Ritz crackers or panko breadcrumbs tossed in melted butter.
Serving, Pairing & Storage
How to Serve:
These are perfect served straight from the baking dish while they're still warm and bubbly. Set out crackers, crostini, or sliced baguette for scooping, or just provide forks and let people dig in. They're also incredible served over grilled chicken, steak, or burgers as a fancy topping.
What It Pairs Well With:
Serve as an appetizer before grilled meats, barbecue, or a hearty soup dinner. They're perfect for game day spreads, holiday parties, or potlucks. Pair with beer, wine, or your favorite cocktail.
Storage:
Store leftovers covered in the refrigerator for up to 3 days. The onions will soften more as they sit, and while they won't be quite as perfect as when fresh, they're still tasty.
Freezing Instructions:
These don't freeze particularly well due to the high water content in onions, which makes them watery when thawed. Best to make only what you'll eat within a few days.
Reheating Tips:
Reheat in a 350°F oven for about 10-15 minutes until warmed through and the cheese is melty again. You can also microwave individual portions for 1-2 minutes, though the texture won't be quite as good.
FAQ
Can I make these ahead of time?
You can prep them up to step 5 (assembled but not baked), cover tightly with foil, and refrigerate for up to 24 hours. When ready to serve, let sit at room temperature for 15 minutes, then bake as directed, possibly adding 5 extra minutes to the baking time.
Can I use a different type of onion?
Absolutely! Sweet onions like Vidalia make these even sweeter and milder. Red onions add a bit more sharpness and a beautiful color. White onions work too, though they're slightly more pungent.
Why are my onions still crunchy?
They need more time in the oven. Cover with foil and bake for another 5-10 minutes until they reach your desired tenderness. Slicing them a bit thinner also helps them cook faster.
Can I use pre-sliced onions?
Sure, though fresh-sliced onions give you more control over thickness and tend to have better texture. If using pre-sliced, just make sure they're not too thin.
What can I serve this with?
Crackers, toasted baguette slices, pita chips, tortilla chips, or even just forks for eating straight from the dish. It's also amazing spooned over grilled chicken or steak.
Can I double this recipe?
Yes! Use two 9x13 inch dishes or one very large roasting pan. Everything else stays the same—just make sure your onions are in a fairly even layer so they cook uniformly.
Tennessee Cheesy Onions
Ingredients
Equipment
Method
- Preheat oven to 375°F (190°C).
- Slice onions into 1/4-inch thick rings and gently separate them.
- In a medium bowl, whisk together melted butter, garlic powder, onion powder, and cayenne pepper (if using).
- Add onion rings to the butter mixture and toss gently to coat evenly.
- Arrange buttered onion rings in a single layer in a 9x13 inch baking dish. Overlapping is fine.
- Sprinkle shredded cheddar and Monterey Jack cheeses evenly over the onions.
- Bake for 25-30 minutes, until onions are tender and cheese is melted, bubbly, and lightly golden.
- Remove from oven and sprinkle with fresh chives or green onions. Serve immediately.
Notes
Sweet onions like Vidalia or Walla Walla make these even sweeter and milder. Red onions add more sharpness and beautiful color.
Adjust cayenne to taste. Use 1/2 teaspoon for more heat, or omit entirely for a mild version that's kid-friendly.
Don't skip the onion powder even though you're using real onions—it adds concentrated onion flavor that makes these extra addictive.
If cheese is browning too quickly, tent loosely with foil during the last 10 minutes of baking.
These are best served immediately while warm and gooey, but still good at room temperature.
Make ahead: Assemble through step 6, cover tightly with foil, and refrigerate up to 24 hours. Let sit at room temperature 15 minutes before baking, adding 5 extra minutes to baking time if needed.
Add 4-6 strips of crumbled cooked bacon over the cheese before baking for loaded cheesy onions.
Try different cheese combos: Gruyère and fontina for sophistication, pepper jack for heat, or all cheddar for simplicity.
Serve with crackers, toasted baguette slices, or as a topping for grilled steak or chicken.
Store leftovers covered in refrigerator for up to 3 days. Reheat in 350°F oven for 10-15 minutes.
These don't freeze well due to high water content in onions.