The Summer Dessert That Made Me Understand Why Potluck Classics Become Classics
There are fruit desserts that come from a box with instant pudding and pre-made whipped topping, and then there's this Banana Strawberry Pudding—the one where you make real vanilla pudding from scratch by tempering egg yolks and stirring until it thickens into silky custard, then layer it with vanilla wafers, fresh banana slices, and sweet strawberries in a baking dish until you have this creamy, crunchy, fruity dessert that tastes like summer picnics and family gatherings and the kind of comfort food that makes everyone come back for seconds. No instant pudding packets. No shortcuts. Just the genuine article that proves homemade really does taste different.
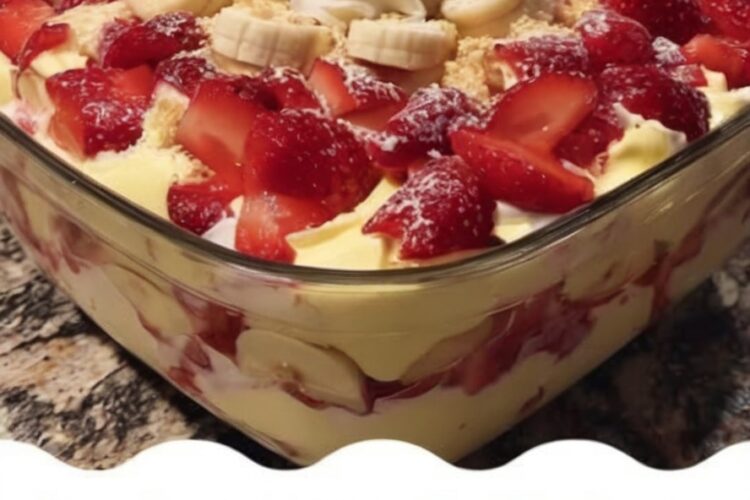
What makes this recipe genuinely brilliant is how those layers work together—the vanilla wafers soften slightly from the pudding but keep some crunch, the bananas add creamy sweetness, the strawberries provide bright, fresh tartness, and that homemade vanilla pudding ties everything together with rich, custard-y smoothness you can't get from a box. The tempering technique—slowly adding hot milk to egg yolks—prevents scrambling and creates that luxurious texture. And chilling for at least four hours allows all the flavors to meld and the wafers to reach that perfect not-quite-soft, not-quite-crunchy texture. This is the dessert that feeds a crowd, the potluck contribution that gets you requests to bring it every time, the recipe that becomes part of your family's story.
Why You'll Love This Recipe
- Real homemade vanilla pudding that tastes incredible
- Fresh fruit layers add brightness and sweetness
- Vanilla wafers provide texture contrast
- Perfect for feeding a crowd from one 9x13 dish
- Great make-ahead dessert for parties or potlucks
- Tastes like summer and happy memories
- Beautiful layers when you scoop it out
- No baking required beyond stovetop pudding
- Classic Southern comfort food
- The kind of dessert people remember
Ingredients
Serves 12-15
For the Homemade Vanilla Pudding:
- 4 cups whole milk
- 1 cup granulated sugar
- ½ cup cornstarch
- 4 large egg yolks
- 2 tablespoons butter
- 2 teaspoons vanilla extract
For the Layers:
- 2 boxes (11 oz each) vanilla wafers
- 6-8 ripe but firm bananas, sliced
- 1 pint (2 cups) fresh strawberries, hulled and sliced
Equipment
- Medium saucepan
- Whisk
- Medium mixing bowl
- 9x13-inch baking dish
- Plastic wrap
- Measuring cups and spoons
- Sharp knife and cutting board
- Ladle or large spoon
Step-by-Step Instructions
Step 1: Prepare the Pudding Base
In a medium saucepan, whisk together the milk, sugar, and cornstarch until the cornstarch is completely dissolved with no lumps. The mixture should be smooth and uniform. This is your pudding base.
Step 2: Temper the Egg Yolks
In a separate medium bowl, whisk the egg yolks until smooth. This tempering step is crucial to prevent scrambled eggs: Place the saucepan with the milk mixture over medium heat. Once it's warm (not boiling yet), slowly ladle about 1 cup of the warm milk mixture into the bowl with the egg yolks while whisking constantly. This gradually raises the temperature of the yolks without cooking them. Whisk until completely combined.
Step 3: Cook the Pudding
Pour the tempered egg mixture back into the saucepan with the remaining milk mixture, whisking constantly as you pour. Place the saucepan back over medium heat and cook, stirring constantly with a whisk or wooden spoon, until the pudding thickens significantly and comes to a gentle boil. This takes about 8-12 minutes—don't rush it, and don't stop stirring or the bottom will scorch. Once it reaches a boil, let it boil for 1 minute while continuing to stir. The pudding should coat the back of a spoon thickly.
Step 4: Finish the Pudding
Remove from heat immediately. Stir in the butter and vanilla extract until the butter is completely melted and incorporated, creating a smooth, glossy pudding. The pudding will be quite thick.
Step 5: Start Layering
Working quickly while the pudding is still warm (warm pudding spreads more easily), arrange a single layer of vanilla wafers across the bottom of your 9x13-inch baking dish. You'll use about a third of one box. Layer sliced bananas over the wafers, covering them completely. Then layer the sliced strawberries over the bananas.
Step 6: Add Pudding and Repeat
Pour about one-third of the warm pudding over the fruit layer, using a spoon or ladle to spread it evenly and coax it into all the corners. Repeat the entire layering process two more times: wafers, bananas, strawberries, pudding. You should end with a final layer of pudding on top. Use all the pudding and fruit.
Step 7: Prevent Skin Formation
Press a piece of plastic wrap directly onto the surface of the top pudding layer. This prevents a skin from forming as it chills. Make sure the plastic wrap touches the entire surface with no air gaps.
Step 8: Chill Completely
Refrigerate for at least 4 hours, or preferably overnight. This chilling time is essential—it allows the pudding to set completely, the wafers to soften to the perfect texture, and all the flavors to meld together beautifully.
Step 9: Serve
Remove the plastic wrap and scoop out generous portions, making sure each serving gets all the layers. Serve cold. Watch it disappear.
Pro Tips
- Stir constantly while cooking pudding. This prevents scorching and ensures smooth texture.
- Don't skip tempering the eggs. Adding cold eggs directly to hot liquid will scramble them.
- Use ripe but firm bananas. Too-ripe bananas get mushy and brown; underripe bananas are too firm.
- Slice bananas just before assembling. This prevents browning.
- Work quickly with warm pudding. It spreads more easily when warm.
- Press plastic wrap directly on pudding. This prevents that tough skin from forming.
- Chill at least 4 hours. Overnight is even better for flavor and texture.
Variations & Substitutions
- Classic banana pudding: Omit strawberries and use only bananas for traditional banana pudding.
- Add whipped cream: Top with fresh whipped cream before serving.
- Use different fruit: Try blueberries, raspberries, or sliced peaches instead of strawberries.
- Chocolate version: Replace vanilla wafers with chocolate wafers and add cocoa powder to the pudding.
- Add coconut: Sprinkle toasted coconut between layers.
- Make it boozy: Add 2 tablespoons of rum or bourbon to the finished pudding.
- Individual servings: Layer in mason jars or parfait glasses for single servings.
- Lighter version: Use 2% milk and reduce sugar to ¾ cup.
Serving, Pairing & Storage
How to Serve:
Serve cold, scooping deep to get all the layers in each serving. This is perfect as-is or with a dollop of whipped cream on top.
What It Pairs Well With:
Coffee, iced tea, cold milk, or as a refreshing dessert after BBQ, fried chicken, or any summer meal.
Storage:
Keep covered in the refrigerator for up to 3 days. The wafers will continue softening as it sits.
Freezing Instructions:
Not recommended. The pudding and fruit don't freeze and thaw well—texture becomes watery and separated.
Make-Ahead:
This is perfect for making ahead! In fact, it's better when made a day ahead so the flavors meld and the wafers reach perfect texture.
FAQ
Can I use instant pudding instead?
You can for convenience, but homemade tastes infinitely better with richer, creamier texture.
Why did my pudding have lumps?
Either the cornstarch wasn't dissolved completely at the start, or you didn't stir constantly while cooking.
My bananas turned brown—what went wrong?
Bananas oxidize when exposed to air. Slice them just before assembling, and consider tossing them gently with a bit of lemon juice.
Can I use a different type of cookie?
Vanilla wafers are traditional, but graham crackers or shortbread cookies work in a pinch.
How do I know when the pudding is thick enough?
It should coat the back of a spoon thickly and hold its shape when you run your finger through it.
Can I make this gluten-free?
Yes! Use gluten-free vanilla wafers or cookies.
The pudding is too thin—what do I do?
Cook it longer, stirring constantly, until it thickens more. It should thicken significantly as it cools too.

Banana Strawberry Pudding
Ingredients
Equipment
Method
- In medium saucepan, whisk together milk, sugar, and cornstarch until cornstarch completely dissolved with no lumps. Should be smooth and uniform. This is pudding base.
- Critical tempering step to prevent scrambled eggs: In separate medium bowl, whisk egg yolks until smooth. Place saucepan with milk mixture over medium heat. Once warm (not boiling yet), slowly ladle about 1 cup warm milk mixture into bowl with egg yolks while whisking constantly. Gradually raises temperature of yolks without cooking them. Whisk until completely combined.
- Pour tempered egg mixture back into saucepan with remaining milk mixture, whisking constantly as pour. Place back over medium heat and cook, stirring constantly with whisk or wooden spoon, until pudding thickens significantly and comes to gentle boil. Takes about 8-12 minutes—don't rush it, don't stop stirring or bottom will scorch. Once reaches boil, let boil 1 minute while continuing to stir. Pudding should coat back of spoon thickly.
- Remove from heat immediately. Stir in butter and vanilla extract until butter completely melted and incorporated, creating smooth, glossy pudding. Will be quite thick.
- Working quickly while pudding still warm (warm pudding spreads more easily), arrange single layer vanilla wafers across bottom of 9x13-inch baking dish. Use about third of one box. Layer sliced bananas over wafers, covering completely. Then layer sliced strawberries over bananas.
- Pour about one-third warm pudding over fruit layer, using spoon or ladle to spread evenly and coax into all corners. Repeat entire layering process two more times: wafers, bananas, strawberries, pudding. Should end with final layer pudding on top. Use all pudding and fruit.
- Press piece plastic wrap directly onto surface of top pudding layer. Prevents skin from forming as chills. Make sure plastic wrap touches entire surface with no air gaps.
- Refrigerate at least 4 hours, or preferably overnight. Essential chilling time—allows pudding to set completely, wafers to soften to perfect texture, and all flavors to meld together beautifully.
- Remove plastic wrap and scoop generous portions, making sure each serving gets all layers. Serve cold.
Notes
Don't skip tempering eggs—adding cold eggs directly to hot liquid will scramble them.
Use ripe but firm bananas—too-ripe get mushy and brown, underripe too firm.
Slice bananas just before assembling—prevents browning.
Work quickly with warm pudding—spreads more easily when warm.
Press plastic wrap directly on pudding—prevents tough skin from forming.
Chill at least 4 hours—overnight even better for flavor and texture.
Classic banana pudding: Omit strawberries and use only bananas for traditional banana pudding.
Add whipped cream: Top with fresh whipped cream before serving.
Different fruit: Try blueberries, raspberries, or sliced peaches instead of strawberries.
Chocolate version: Replace vanilla wafers with chocolate wafers and add cocoa powder to pudding.
Add coconut: Sprinkle toasted coconut between layers.
Make it boozy: Add 2 tablespoons rum or bourbon to finished pudding.
Individual servings: Layer in mason jars or parfait glasses for single servings.
Lighter version: Use 2% milk and reduce sugar to ¾ cup.
Instant pudding instead: Can for convenience but homemade tastes infinitely better with richer, creamier texture.
Pudding has lumps: Either cornstarch wasn't dissolved completely at start, or didn't stir constantly while cooking.
Bananas turned brown: Oxidize when exposed to air. Slice just before assembling, consider tossing gently with bit lemon juice.
Different cookie: Vanilla wafers traditional but graham crackers or shortbread work in pinch.
Know when pudding thick enough: Should coat back of spoon thickly and hold shape when run finger through.
Gluten-free: Yes! Use GF vanilla wafers or cookies.
Pudding too thin: Cook longer, stirring constantly, until thickens more. Should thicken significantly as cools too.
Keep covered in fridge up to 3 days. Wafers continue softening as sits.
Don't freeze—pudding and fruit don't freeze and thaw well. Texture becomes watery and separated.
Make ahead: Perfect for making ahead! In fact, better when made day ahead so flavors meld and wafers reach perfect texture.
Serve: Cold, scooping deep to get all layers in each serving. Perfect as-is or with dollop whipped cream on top.
Pairs with: Coffee, iced tea, cold milk, or as refreshing dessert after BBQ, fried chicken, or any summer meal.