The Fried Chicken That Made Me Stop Going to the Drive-Thru
There are fried chicken recipes that require brining overnight and complicated technique and perfect temperature control, and then there's this KFC-Style Fried Chicken—the one where you coat chicken pieces in a blend of herbs and spices mixed with flour, double-dredge them for extra crunch, and fry until you have impossibly crispy, golden, savory chicken with juicy meat inside that tastes like you cracked some kind of secret code when you actually just followed good technique. No pressure fryer required. No vault-guarded recipe. Just a well-seasoned coating, proper frying temperature, and the patience to let it cook until that crust is shatteringly crisp and the meat is cooked through.
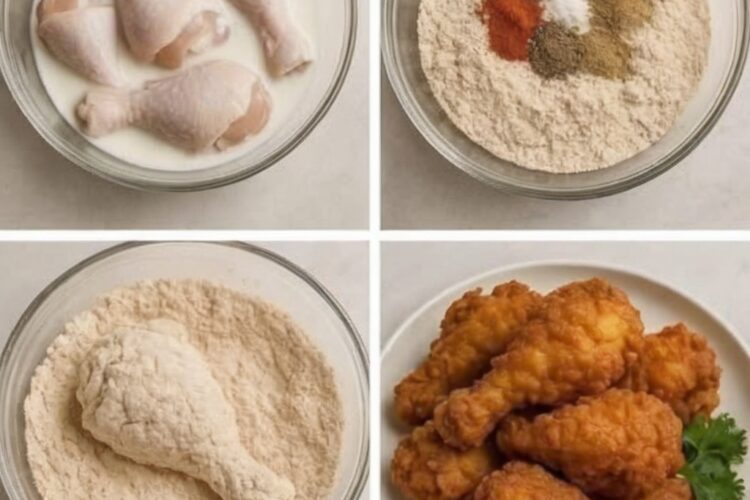
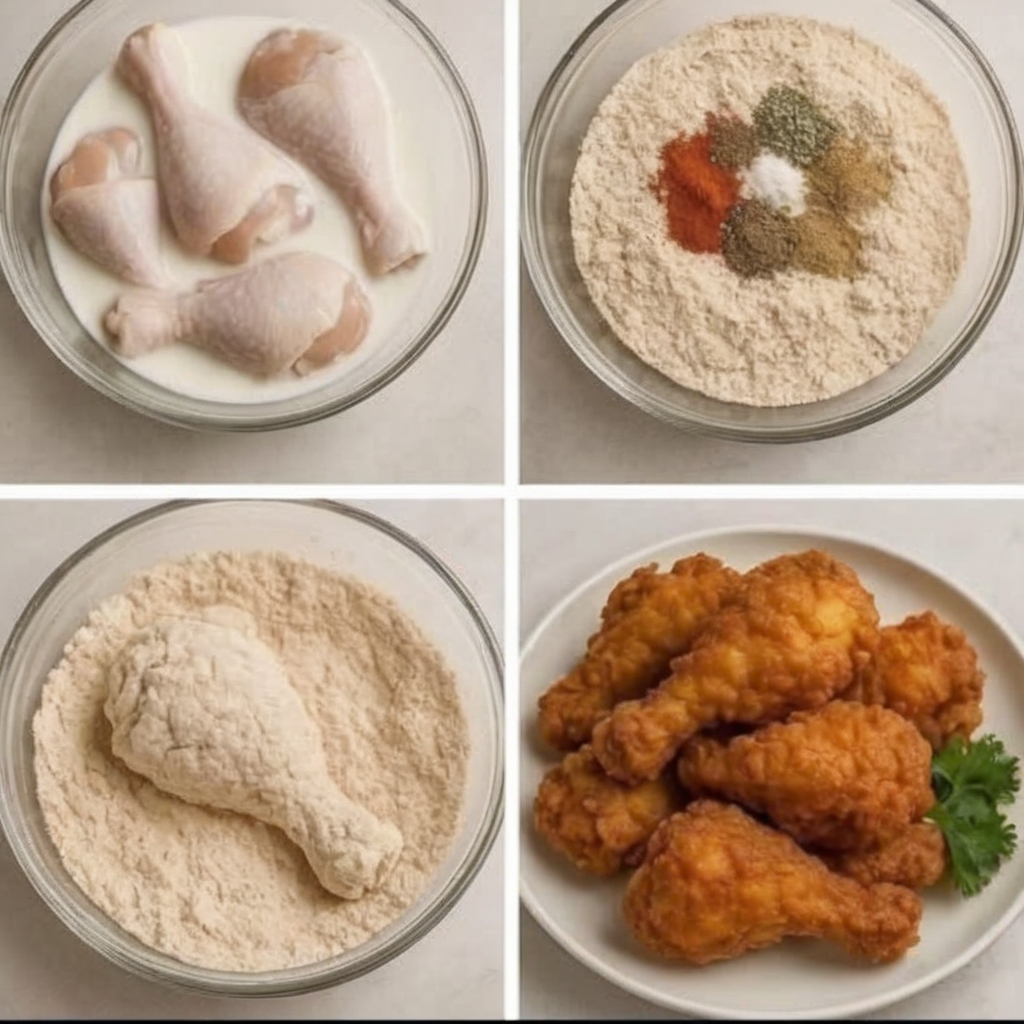
What makes this recipe genuinely brilliant is how the double-dredging technique—dipping in buttermilk, coating in seasoned flour, dipping again, coating again—creates those signature craggy, extra-crispy bits that make fried chicken irresistible. The blend of paprika, black pepper, white pepper, garlic salt, and herbs creates layers of savory flavor without any single spice dominating. And frying at 325°F instead of higher temperatures gives the chicken time to cook through completely while developing that deep golden crust. This is the fried chicken that makes you realize you can cook restaurant-quality food at home, the recipe that feeds a crowd for a fraction of takeout prices, the dinner that proves sometimes the best comfort food is made in your own kitchen.
Why You'll Love This Recipe
- Extra-crispy coating from double-dredging technique
- Savory, well-seasoned flavor in every bite
- Juicy meat that stays moist inside
- Golden, crunchy crust that shatters when you bite in
- Feeds a crowd for much less than takeout
- Oven-baked option for less mess
- Great for meal prep or leftovers
- Simple pantry spices create complex flavor
- Perfect for picnics or potlucks
- The kind of fried chicken that makes you proud
Ingredients
Serves 6-8
For the Spice Blend:
- 2 tablespoons paprika
- 2 teaspoons garlic salt
- 1½ teaspoons black pepper
- 1 teaspoon white pepper
- 1 teaspoon dried basil
- 1 teaspoon dried thyme
- ½ teaspoon dried oregano
- 1 teaspoon ground ginger
- 1 teaspoon dry mustard powder
- 1 teaspoon celery salt
For the Chicken:
- 3-4 lbs chicken pieces (legs, thighs, breasts, wings—bone-in, skin-on)
- 2 cups all-purpose flour
- 1 tablespoon baking powder (for extra crispness)
- 1½ cups buttermilk
- 2 eggs
- Oil for frying (peanut, canola, or vegetable oil—about 2 quarts)
Equipment
- Large mixing bowl
- Medium mixing bowl
- Whisk
- Large heavy pot or Dutch oven (for frying)
- Deep-fry thermometer or instant-read thermometer
- Tongs
- Wire cooling rack set over baking sheet
- Paper towels
- Measuring cups and spoons
Step-by-Step Instructions
Step 1: Mix Your Spice Blend
In a small bowl, whisk together all the spices: paprika, garlic salt, black pepper, white pepper, basil, thyme, oregano, ginger, dry mustard, and celery salt until evenly combined. This blend is your flavor foundation.
Step 2: Season the Chicken
Pat the chicken pieces completely dry with paper towels—this helps the coating stick. Sprinkle about 2 tablespoons of your spice blend directly onto the chicken pieces, rubbing it into all surfaces. Let the seasoned chicken sit at room temperature for 20-30 minutes, or refrigerate for up to 2 hours. This allows the seasonings to penetrate the meat.
Step 3: Prepare Your Dredging Station
In a large bowl, whisk together the flour, baking powder, and the remaining spice blend. In a medium bowl, whisk together the buttermilk and eggs until well combined. Set up your workspace: seasoned chicken, buttermilk mixture, seasoned flour mixture, and a wire rack for the coated pieces.
Step 4: Double-Dredge for Maximum Crunch
This is the key technique: Dip a chicken piece into the buttermilk mixture, making sure it's completely coated. Let excess drip off. Dredge it in the seasoned flour, pressing firmly to coat all surfaces. Shake off excess. Dip it back into the buttermilk mixture for a second time. Dredge it in the flour mixture again, pressing firmly to create a thick, craggy coating. Place on the wire rack. Repeat with all chicken pieces.
Step 5: Let the Coating Set
Let the coated chicken rest on the rack for 10-15 minutes. This crucial step allows the coating to hydrate and adhere better, preventing it from falling off during frying.
Step 6: Heat Your Oil
In a large, heavy pot or Dutch oven, heat about 2-3 inches of oil to 325°F (163°C). Use a thermometer to monitor—this temperature is crucial. Too hot and the outside burns before the inside cooks; too cool and the coating gets soggy instead of crispy.
Step 7: Fry in Batches
Working in batches to avoid crowding (which drops the oil temperature), carefully lower chicken pieces into the hot oil using tongs. Don't crowd the pot—leave space between pieces. Fry for 12-18 minutes depending on the size of the pieces, turning occasionally for even browning. Dark meat (thighs, legs) takes longer than white meat (breasts). The chicken is done when it's deep golden brown and reaches an internal temperature of 165°F (74°C) when you insert a thermometer into the thickest part without touching bone.
Step 8: Drain and Rest
Remove the fried chicken to a wire rack set over a baking sheet (not paper towels, which can make the bottom soggy). Let the oil temperature return to 325°F before adding the next batch. Let the finished chicken rest for 5 minutes before serving—this allows the juices to redistribute and the coating to set to maximum crispiness.
Pro Tips
- Use bone-in, skin-on chicken. The bones add flavor and the skin gets incredibly crispy.
- Don't skip the double-dredge. This is what creates that extra-crunchy coating with all those craggy bits.
- Maintain oil temperature. Use a thermometer and adjust heat as needed to stay at 325°F.
- Don't crowd the pot. Frying too many pieces at once drops the oil temperature and makes soggy chicken.
- White pepper is important. It adds heat without dark specks and creates that signature flavor.
- Let the coating rest. Those 10-15 minutes make the difference between coating that sticks and coating that falls off.
Oven-Baked Option (Less Mess, Still Delicious)
Step 1: Preheat oven to 400°F (200°C). Line a baking sheet with foil and place a wire rack on top. Spray the rack with cooking spray.
Step 2: Follow all the coating steps exactly as written (double-dredging is still key).
Step 3: Place coated chicken pieces on the rack, not touching. Spray the tops lightly with cooking spray.
Step 4: Bake for 45-55 minutes, flipping halfway through, until golden brown and internal temperature reaches 165°F. The texture won't be quite as crispy as fried, but it's still delicious and much easier.
Variations & Substitutions
- Make it spicy: Add 1-2 teaspoons of cayenne pepper to the flour mixture.
- Nashville hot style: Toss fried chicken in a mixture of hot sauce and the frying oil.
- Buttermilk brine: Soak chicken in buttermilk with hot sauce overnight for extra tenderness.
- Gluten-free: Use gluten-free all-purpose flour blend in place of regular flour.
- Add more herbs: Mix in fresh chopped parsley or chives to the flour mixture.
- Lemon pepper: Add 2 tablespoons of lemon pepper seasoning to the flour mixture.
- Make chicken tenders: Use chicken tenderloins and reduce frying time to 6-8 minutes.
- Air fryer method: Cook at 375°F for 25-30 minutes, flipping halfway through.
Serving, Pairing & Storage
How to Serve:
Serve hot or at room temperature (fried chicken is great cold too). This is perfect for picnics, potlucks, or Sunday dinner.
What It Pairs Well With:
Coleslaw, mashed potatoes and gravy, mac and cheese, biscuits, corn on the cob, potato salad, collard greens, or watermelon.
Storage:
Store leftover chicken in an airtight container in the refrigerator for up to 4 days. The coating softens in storage but can be re-crisped.
Freezing Instructions:
Freeze cooked chicken in freezer bags for up to 2 months. Thaw overnight in the refrigerator.
Reheating Tips:
Reheat in a 375°F oven for 15-20 minutes to restore crispiness. Don't microwave—it makes the coating soggy.
FAQ
Can I use boneless chicken?
You can, but bone-in chicken stays juicier and has better flavor. If using boneless, reduce frying time to 8-10 minutes.
Why is my coating falling off?
Either you didn't let it rest after coating, the oil temperature was wrong, or you didn't press the flour firmly enough into the chicken during dredging.
My chicken is burning on the outside but raw inside—why?
Your oil is too hot. Maintain 325°F—use a thermometer to be sure.
Can I reuse the frying oil?
Yes, strain it through a fine-mesh sieve, store in an airtight container, and reuse 2-3 times for frying.
What's the difference between black and white pepper?
White pepper is milder and adds heat without visible black specks. Using both creates layered flavor.
Do I have to use buttermilk?
Regular milk works, but buttermilk adds tang and helps tenderize. Make "buttermilk" by adding 1 tablespoon vinegar to 1 cup milk and letting it sit for 5 minutes.
How do I know when it's done?
Use a meat thermometer—165°F in the thickest part without touching bone is safe and done.
KFC-Style Fried Chicken
Ingredients
Equipment
Method
- In small bowl, whisk together all spices: paprika, garlic salt, black pepper, white pepper, basil, thyme, oregano, ginger, dry mustard, and celery salt until evenly combined. This blend is flavor foundation.
- Pat chicken pieces completely dry with paper towels—helps coating stick. Sprinkle about 2 tablespoons spice blend directly onto chicken pieces, rubbing into all surfaces. Let seasoned chicken sit room temp 20-30 minutes, or refrigerate up to 2 hours. Allows seasonings to penetrate meat.
- In large bowl, whisk together flour, baking powder, and remaining spice blend. In medium bowl, whisk together buttermilk and eggs until well combined. Set up workspace: seasoned chicken, buttermilk mixture, seasoned flour mixture, and wire rack for coated pieces.
- Key technique—double-dredge: Dip chicken piece into buttermilk mixture, completely coated. Let excess drip off. Dredge in seasoned flour, pressing firmly to coat all surfaces. Shake off excess. Dip back into buttermilk mixture second time. Dredge in flour mixture again, pressing firmly to create thick, craggy coating. Place on wire rack. Repeat with all chicken pieces.
- Let coated chicken rest on rack 10-15 minutes. Crucial step—allows coating to hydrate and adhere better, preventing falling off during frying.
- In large, heavy pot or Dutch oven, heat about 2-3 inches oil to 325°F (163°C). Use thermometer to monitor—this temperature crucial. Too hot and outside burns before inside cooks; too cool and coating gets soggy instead of crispy.
- Working in batches to avoid crowding (drops oil temperature), carefully lower chicken pieces into hot oil using tongs. Don't crowd pot—leave space between pieces. Fry 12-18 minutes depending on size, turning occasionally for even browning. Dark meat (thighs, legs) takes longer than white meat (breasts). Chicken done when deep golden brown and reaches internal temp 165°F (74°C) when insert thermometer into thickest part without touching bone.
- Remove fried chicken to wire rack set over baking sheet (not paper towels—makes bottom soggy). Let oil temp return to 325°F before adding next batch. Let finished chicken rest 5 minutes before serving—allows juices to redistribute and coating to set to maximum crispiness.
Notes
Don't skip double-dredge—creates extra-crunchy coating with all those craggy bits.
Maintain oil temp—use thermometer and adjust heat as needed to stay at 325°F.
Don't crowd pot—frying too many pieces at once drops oil temp and makes soggy chicken.
White pepper important—adds heat without dark specks and creates signature flavor.
Let coating rest—10-15 minutes makes difference between coating that sticks and coating that falls off.
Oven-baked option: Preheat oven to 400°F. Line baking sheet with foil and place wire rack on top. Spray rack with cooking spray. Follow all coating steps (double-dredging still key). Place coated chicken on rack, not touching. Spray tops lightly with cooking spray. Bake 45-55 minutes, flipping halfway, until golden brown and internal temp 165°F. Texture won't be quite as crispy as fried but still delicious and much easier.
Make it spicy: Add 1-2 teaspoons cayenne to flour mixture.
Nashville hot: Toss fried chicken in mixture of hot sauce and frying oil.
Buttermilk brine: Soak chicken in buttermilk with hot sauce overnight for extra tenderness.
Gluten-free: Use GF all-purpose flour blend.
Add more herbs: Mix in fresh chopped parsley or chives to flour mixture.
Lemon pepper: Add 2 tablespoons lemon pepper seasoning to flour mixture.
Chicken tenders: Use tenderloins and reduce frying to 6-8 minutes.
Air fryer: Cook at 375°F for 25-30 minutes, flipping halfway.
Boneless chicken: Can but bone-in stays juicier and has better flavor. If boneless, reduce frying to 8-10 minutes.
Coating falling off: Didn't let rest after coating, oil temp wrong, or didn't press flour firmly enough during dredging.
Burning outside but raw inside: Oil too hot. Maintain 325°F—use thermometer.
Reuse frying oil: Yes, strain through fine-mesh sieve, store airtight, and reuse 2-3 times for frying.
Black vs white pepper: White pepper milder and adds heat without visible black specks. Using both creates layered flavor.
Have to use buttermilk: Regular milk works but buttermilk adds tang and helps tenderize. Make "buttermilk" by adding 1 tablespoon vinegar to 1 cup milk and sit 5 minutes.
Know when done: Use meat thermometer—165°F in thickest part without touching bone is safe and done.
Store leftovers airtight in fridge up to 4 days. Coating softens in storage but can be re-crisped.
Freeze cooked chicken in freezer bags up to 2 months. Thaw overnight in fridge.
Reheat at 375°F for 15-20 minutes to restore crispiness. Don't microwave—makes coating soggy.
Serve: Hot or room temp (fried chicken great cold too). Perfect for picnics, potlucks, or Sunday dinner.
Pairs with: Coleslaw, mashed potatoes and gravy, mac and cheese, biscuits, corn on the cob, potato salad, collard greens, watermelon.