
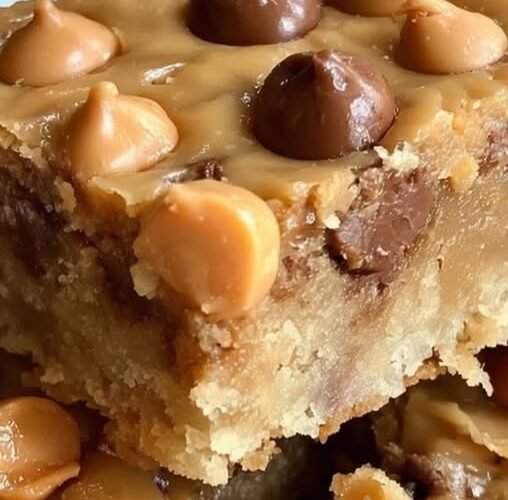
Peanut Butter Butterscotch Bars – Soft, Chewy, Ridiculously Rich Bars with Melted Chocolate Pockets (Gluten-Free & Reduced-Sugar Versions)
The Bars That Pull You In From Three Rooms Away
My mom used to make something like this every year around the holidays, and I swear the smell alone could pull you into the kitchen from three rooms away. That warm, buttery peanut butter sweetness mixed with caramelized butterscotch... it's the kind of thing you eat standing at the counter because you can't wait long enough to sit down. I made these last weekend on a rainy Saturday, and they disappeared so fast I didn't even get a chance to hide a few for myself. My husband kept sneaking back into the kitchen pretending he was "just getting water." Sure, babe. Sure. These bars are soft, chewy, ridiculously rich, and dangerously easy to make. The peanut butter base is buttery and dense in the best way — thick, glossy, and just sweet enough — and those little pockets of melted butterscotch and chocolate are pure comfort in every bite. No corn syrup, no pastry dough, no chilling, no rolling: mix, spread, bake, and let the oven do the rest. They're also the kind of recipe that quietly serves a whole household. Peanut butter brings real plant protein and heart-healthy monounsaturated fats, so a couple of bars genuinely registers as a satisfying snack rather than empty sugar. A cup-for-cup gluten-free flour swap makes the whole batch safe for gluten-free tables. Swapping in reduced-sugar chips trims the sugar load for blood-sugar-conscious eaters. And at roughly a quarter to thirty cents a bar against two to four dollars at a bakery, homemade is the budget-friendly win that fills lunchboxes, potlucks, holiday trays, and game-day spreads for pocket change.
Why You'll Love This Recipe
- Soft, chewy, and dense: that perfect bake-shop middle ground — never cakey, never dry
- Butter and peanut butter richness: an impossibly smooth, glossy base that melts in your mouth
- Pockets of melted butterscotch and chocolate: warm, gooey chips scattered through every bite
- Easy enough for a rainy afternoon: one bowl, one pan, no mixer required
- High in protein: peanut butter brings real plant protein — about 4g per bar — making these a genuinely satisfying snack
- Heart-healthy fats: the monounsaturated fats in peanut butter, plus magnesium and vitamin E from the peanuts
- Gluten-free option: a cup-for-cup 1:1 gluten-free flour swap makes the whole batch safe for gluten-free tables
- Reduced-sugar option: sugar-free butterscotch and chocolate chips dial down the sugar without losing the flavor
- Portion-friendly: cut into 24 clean bars and one is truly enough — a diet-friendly dessert that works
- Budget-friendly: about $0.25–0.30 per homemade bar versus $2–4 at a bakery
- Meal-prep and freezer friendly: bake once, slice, and stash a week of lunchbox or snack-ready bars
- Kid-approved and lunchbox ready: the after-school snack that hands out like currency
- Perfect for every occasion: potlucks, holiday trays, game days, and quiet coffee breaks
- Comfort food royalty: peanut butter, caramelized butterscotch, and chocolate — childhood in bar form
Why This Recipe Works
This recipe is a careful balancing act where every ingredient has a job, and the chemistry is what creates that soft, chewy bite. Melted butter and creamy peanut butter do the heavy lifting as the recipe's moisture and fat — together they make the base dense, rich, and tender instead of crumbly. The peanut butter especially is doing more than adding flavor: its richly textured fats trap air and hold moisture, which is why these bars stay soft for days. Brown and granulated sugar split the sweetening duty the way they always do. Brown sugar brings moisture, softness, and that molasses depth that pairs so beautifully with peanut butter, while granulated sugar contributes clean sweetness and helps the edges turn deeply golden. Eggs add structure and richness, and vanilla bridges everything into the warm, toasty profile you expect. The flour and leavener keep things honest. All-purpose flour gives the bars enough structure to slice cleanly while staying tender, and baking powder provides exactly enough lift to keep them soft without turning cakey. The butterscotch and chocolate chips are the payoff: they soften into molten pockets during baking while holding their shape enough to give you those little surprises in every bite. The key rule is to fold gently and stop at "just combined" — overmixing develops gluten and turns chewy bars tough, and crushed chips lose the pockets you're after.
Ingredient Breakdown
Unsalted Butter (½ cup, melted) – richness and moisture. Melting the butter makes the batter glossy and easier to stir, and it's what gives the bars that dense, fudgy edge. Creamy Peanut Butter (1 cup) – the flavor heart and the protein boost. Natural-style no-stir peanut butter works beautifully here; avoid the kind that's separated and watery, which can change the texture. Beyond flavor, peanut butter is where the recipe earns its protein and heart-healthy monounsaturated fats. Brown Sugar (1 cup, packed) – deep, molasses-like sweetness and that soft, chewy texture. Granulated Sugar (¼ cup) – clean sweetness and golden browning at the edges. Large Eggs (2) – structure, richness, and that glossy sheen. Vanilla Extract (1 teaspoon) – rounds out the buttery, nutty, caramel flavors. All-Purpose Flour (1½ cups) – the structure. To make these gluten-free, swap in a cup-for-cup 1:1 gluten-free all-purpose blend — it works with minimal change in texture for chewy bars. Baking Powder (1 teaspoon) – gentle lift that keeps them soft rather than dense. Salt (¼ teaspoon) – the flavor amplifier that makes peanut butter and butterscotch pop. Butterscotch Chips (1 cup) – caramelized sweetness in molten pockets. Reduced-sugar and sugar-free butterscotch chips exist if you're trimming sugar. Chocolate Chips (½ cup, optional but highly recommended) – the classic, rich contrast to the butterscotch. Semi-sweet or dark both work.
Kitchen Equipment
A 9x13-inch baking dish, parchment paper or nonstick spray, a large mixing bowl, a whisk, and a spatula. A separate small bowl for whisking dry ingredients is handy. No stand mixer, no special pans — this is a genuinely one-bowl, rainy-afternoon project.
Step-by-Step Instructions
- Preheat the oven to 350°F. Grease a 9x13-inch baking dish, or line it with parchment paper, leaving a little overhang for easy removal.
- Whisk the wet base. In a large bowl, whisk together the melted butter, creamy peanut butter, brown sugar, and granulated sugar until smooth and glossy — about a minute of whisking until the mixture looks like thick, shiny caramel. It should smell warm and toasty already.
- Beat in the eggs and vanilla. Add the eggs and vanilla and beat until everything is silky and fully combined. The batter will look rich and unified.
- Whisk the dry ingredients. In a separate bowl, whisk the flour, baking powder, and salt.
- Fold, don't mix. Gently fold the dry ingredients into the wet mixture until just combined — you should still see no dry flour, but stop the moment it comes together.
- Fold in the chips. Add the butterscotch and chocolate chips and fold gently so they're evenly scattered but not crushed.
- Spread the batter evenly into the prepared pan. It'll be thick and a little sticky — that's exactly right. Press it gently into the corners.
- Bake for 25–30 minutes, until the edges are deeply golden and a toothpick inserted in the center comes out with a few moist crumbs. The kitchen will start smelling like peanut butter cookies and caramel — your cue that good things are happening. Don't overbake; you want chewy, not cakey.
- Cool completely in the pan before slicing into bars. I know it's hard to wait, but they slice so much cleaner when cool.
- Slice and serve. Use the parchment to lift the whole slab, then cut into 24 bars with a sharp knife. Wipe the blade between cuts for neat edges.
Expert Tips
- Use no-stir, natural-style peanut butter for the smoothest, most consistent batter — separated, oily peanut butter changes the texture
- Fold gently and stop at just combined: overmixing develops gluten and turns these soft bars tough
- Don't overbake: pull them at "a few moist crumbs" on the toothpick, not clean, or the chewy texture becomes cakey and dry
- Cool completely before slicing: warm bars crumble; cool bars cut into clean, beautiful squares
- Spread the batter patiently into the corners so every bar bakes evenly
- Use parchment with an overhang to lift the whole slab out before slicing
- Wipe the knife between cuts for presentable edges
- Let them rest overnight: these bars taste even better on day two, once the flavors settle and the chips re-harden into those perfect pockets
- Chill briefly before slicing if you want absolutely perfect squares
Common Mistakes to Avoid
- Overmixing the batter — the #1 way to turn soft bars into tough, dry bricks
- Overbaking until the toothpick comes out clean — chewy becomes cakey becomes crumbly, in that order
- Cutting while warm — beautiful flavor, messy piles; wait for cool
- Using separated, oily peanut butter — it can make the batter greasy and unstable
- Crushing the chips by overmixing — you want intact pockets, not chocolate mud
- Skipping the grease or parchment — bars that stick wrestle back
- Using a cold-baked, too-big pan — a pan that's too large bakes the bars thin and dry
- Substituting margarine for butter — the texture and flavor both suffer
Ingredient Substitutions
- Peanut butter: any no-stir creamy peanut butter works; some use crunchy for extra texture. Sunflower seed butter works for a nut-free version (flavor shifts slightly)
- Flour: a cup-for-cup 1:1 gluten-free all-purpose blend gives a texture very close to the original
- Butterscotch chips: toffee bits, white chocolate chips, or more chocolate chips all stand in happily
- Chocolate chips: semi-sweet or dark for a deeper bite; sugar-free chips for the reduced-sugar version
- Sugar: a portion of the sugar can be replaced with a sugar-free brown sugar substitute or allulose if you're trimming sugar (check your brand's conversion)
- Butter: melted coconut oil works in a pinch, though the flavor shifts
Recipe Variations
- Salted caramel finish: a light sprinkle of flaky sea salt on top before baking balances the sweetness beautifully
- Dark chocolate swap: use dark chocolate chips and cut the butterscotch in half for a deeper, less sweet bar
- Peanut swirl: dollop extra peanut butter on top and swirl before baking for dramatic marbling
- Oatmeal PB bar: stir in ½ cup rolled oats with the dry ingredients for extra texture and fiber
- S'mores style: mini marshmallows scattered on top in the final 3 minutes of baking
- Holiday spice: add ½ teaspoon cinnamon to the dry ingredients for warmth
- Banana PB bar: fold in ½ cup mashed ripe banana for moisture and a gentle fruity sweetness
- Mini bars: bake in a smaller pan or muffin tin for built-in portion control (adjust bake time)
Make It Healthier (Honestly)
These are an indulgent, comfort-first bar — but they're a friendlier indulgent than they look, and there are real, honest levers to dial them in. Peanut butter is doing genuinely good work here: it contributes plant protein (about 4g per bar in this recipe), heart-healthy monounsaturated fats, fiber, magnesium, and vitamin E. That protein and fat are exactly why two bars actually satisfy a craving instead of sending you back to the pantry twenty minutes later. For blood-sugar-conscious and diabetic-friendly tables, the honest moves are: swap in reduced-sugar or sugar-free butterscotch and chocolate chips to substantially cut the added sugar, replace part of the sugar with a brown-sugar substitute, and keep the portion sensible. Pairing a bar with a glass of milk or some fruit adds protein and fiber that help the sweetness land more gently — the classic trick for making a sweet snack work with blood sugar management. For weight management, portion control is simply built in: cut the pan into 24 clean bars, keep to one or two, and freeze the rest individually so the pan disappears at your pace, not at 8pm-you's pace. A gluten-free swap widens the table for GF friends, and because they're dense and satisfying, a single bar genuinely registers as enough. As always, what fits your personal plan is best confirmed with your healthcare provider.
Meal Prep Tips
This recipe is built for make-ahead living. Bake a batch on Sunday, cool completely, slice into bars, and you have a week of lunchbox fillers, work snacks, and after-school moments in one pan. They hold beautifully in an airtight container for days, making them the effortless meal-prep dessert that asks nothing of you on busy mornings. For an even leaner week, portion the baked, sliced bars into zip-top bags — grab-and-go snack prep at its simplest.
Storage
Store sliced bars in an airtight container at room temperature for up to 5 days. They stay soft and chewy with parchment between layers, since the chips can soften and mark the bars underneath. They're often at their absolute best on day two, once the flavors settle and those chocolate pockets firm back into place.
Freezing
These bars freeze beautifully. Cut them into bars, freeze in a single layer on a parchment-lined tray until firm, then transfer to a sealed container with parchment between layers. Properly wrapped, they keep for up to 3 months. Thaw at room temperature for a few minutes or overnight in the fridge — texture stays shockingly close to fresh.
Reheating
They're wonderful at room temperature exactly as they are. For a warm dessert moment, microwave a single bar for 8–12 seconds until the chips soften but the bar isn't hot and greasy — or warm briefly in a low oven. A warm bar with a scoop of vanilla ice cream is genuinely dessert-worthy.
What to Serve With It
Cold milk is the classic companion — the cool washes against the warm peanut butter, and childhood nostalgia does the rest. A bar with coffee or espresso makes a great morning or mid-afternoon moment, and warm, with vanilla ice cream, it becomes a real dessert. On a party table, they sit happily next to brownies and cookies, and they disappear first from lunchboxes.
Beverage Pairings
Cold milk is the timeless pairing, but a medium-roast coffee, a latte, or a glass of iced chai all cut the richness beautifully. For grown-up evenings, a small pour of bourbon or a dessert wine picks up the caramel and butterscotch notes. Keep the drink simple — these bars are the confident star of the duo.
Frequently Asked Questions
Are these gluten-free? Not as written — they use all-purpose flour. But a cup-for-cup 1:1 gluten-free all-purpose blend swaps in cleanly, and the bars stay soft, chewy, and sliceable. A genuinely simple way to make them safe for gluten-free tables. Can I make a reduced-sugar version? Yes. Reduced-sugar and sugar-free butterscotch and chocolate chips are widely available, and you can replace part of the sugar with a brown-sugar substitute or allulose. That meaningfully trims added sugar while keeping the flavor and texture. How much protein is in one bar? About 4g per bar in the standard 24-bar pan, coming mostly from the peanut butter. The protein plus the healthy fats are exactly why two bars feel like a real snack rather than empty sugar. Are these good for blood-sugar-conscious eating? They're a treat, so they're for enjoyment in moderation. The reduced-sugar chip swap, a sensible portion, and pairing a bar with milk or fruit all help it land more gently. What fits your personal plan is best confirmed with your healthcare provider. Can I eat these while managing my weight? Yes, with portion control as the lever — cut 24 clean bars, keep to one or two, and freeze the rest so the pan doesn't disappear in an afternoon. Can I use natural, separated peanut butter? Use a no-stir natural peanut butter. Separated, oily peanut butter needs thorough stirring first and can still make the batter greasy; no-stir keeps the texture reliable. Can I swap the butterscotch chips? Yes — toffee bits, white chocolate, or extra chocolate chips all work, and all look gorgeous in the finished bar. Why do my bars turn out tough? Almost always overmixing after adding the flour, or overbaking. Fold only until combined and pull them at "a few moist crumbs." How do I get perfectly clean squares? Cool completely (or chill briefly), use parchment with overhang to lift the slab, and wipe the knife between cuts. How long do they keep? About 5 days in an airtight container at room temperature, and often better on day two. They freeze up to 3 months. Are these good for lunchboxes? Excellent — they pack well, stay soft, and hold together, which makes them the kind of homemade snack kids actually trade for. How much do they cost per bar? Roughly $0.25–0.30 each at home versus $2–4 for a comparable bakery or café bar. Serious budget-friendly savings, made with ingredients you already keep on hand. Can I double the recipe? Yes — use a larger dish and adjust the bake time, watching for the same golden edges and moist-crumb toothpick test.
Nutrition Information
Estimated per bar (1 of 24, classic version):
| Nutrient | Amount |
|---|---|
| Calories | ~225 |
| Protein | 4g |
| Carbohydrates | 23g |
| Fiber | 1.5g |
| Sugar | 16g |
| Total Fat | 12g |
| Saturated Fat | 5g |
| Sodium | 120mg |
| Reduced-sugar version lowers sugar totals; gluten-free version is nearly identical. Values are estimates and vary by product and bar size. |
These Peanut Butter Butterscotch Bars are everything you want from the word "homemade": soft, chewy, rich, and dangerously easy, with molten pockets of butterscotch and chocolate in a buttery peanut butter base that tastes like childhood but better. They're the bars my mom made and the bars I now reach for on rainy Saturdays, both for the baking and for the way they pull the whole house into the kitchen. And they serve everyone: gluten-free friends with one flour swap, blood-sugar-conscious eaters with reduced-sugar chips, weight-conscious snackers with built-in portion control, and budget-minded families who get four dozen homemade bars for what three bakery bars would cost. Bake them for potlucks, pack them in lunchboxes, or keep them around for the moments when the sweet tooth needs a hug — and hide them if you want to keep any for yourself. I hope you make these the next time the house needs to smell like comfort. I hope the edges turn deeply golden, the centers stay impossibly soft, and your family pretends to fetch water just to sniff the kitchen. From my kitchen to yours — soft, chewy, and gone before it cools.
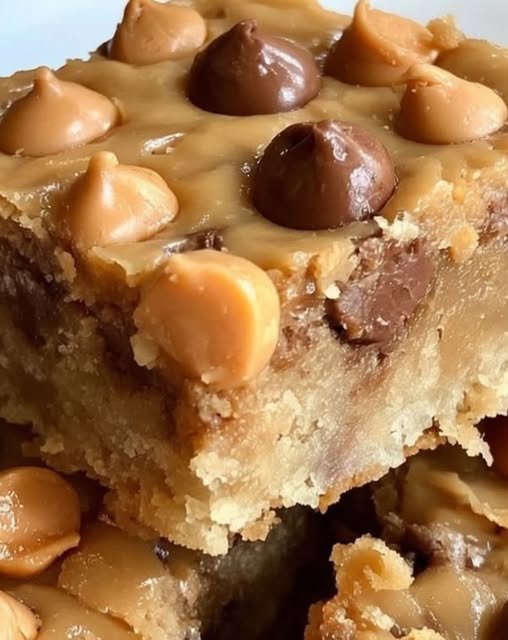
Peanut Butter Butterscotch Bars
Ingredients
Equipment
Method
- Preheat the oven to 350°F. Grease a 9x13-inch baking dish or line with parchment, leaving overhang.
- In a large bowl, whisk the melted butter, peanut butter, brown sugar, and granulated sugar until smooth and glossy.
- Beat in the eggs and vanilla until silky.
- In a separate bowl, whisk the flour, baking powder, and salt.
- Fold the dry ingredients into the wet until just combined — don't overmix.
- Gently fold in the butterscotch and chocolate chips.
- Spread the thick, sticky batter evenly into the pan.
- Bake 25–30 minutes until the edges are deeply golden and a toothpick comes out with a few moist crumbs.
- Cool completely in the pan before slicing into 24 bars, wiping the knife between cuts.
Notes
Reduced-sugar: sugar-free butterscotch/chocolate chips; part of the sugar may be swapped for a brown-sugar substitute.
Don't overmix or overbake — soft and chewy is the goal.
Storage: airtight at room temperature up to 5 days (best on day two); freeze up to 3 months.
Budget: roughly $0.25–0.30 per bar.