Caramel Chocolate Crunch Bars – Gooey, Buttery, Chocolatey Layers in One Pan (The Beginner-Baker Dessert That Becomes a Family Tradition)
The Bar That Turns Hallway Openings Into Recipe Requests
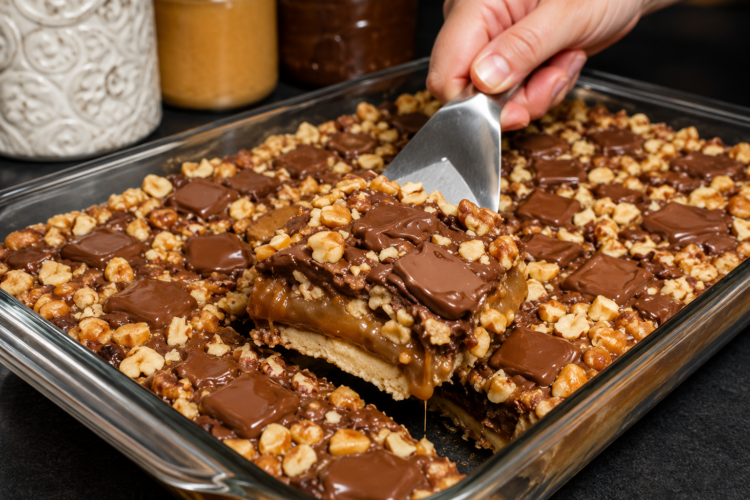
Some desserts become family traditions after just one bite, and these Caramel Chocolate Crunch Bars are one of those unforgettable recipes. They're the kind of dessert that disappears before you've put the serving plate away. Every square combines a buttery shortbread crust, silky caramel, crunchy toasted nuts, and two irresistible layers of rich chocolate — beautifully balanced, sweet without being overwhelming, crisp yet gooey, elegant enough for a holiday gathering and simple enough for an ordinary weekend. I first made these bars when I wanted something easier than brownies but just as satisfying — layers, texture, and that homemade-bakery feel without hours of decorating or frosting. After the first batch, everyone asked for the recipe before the pan was even empty. Since then they've become my go-to for birthdays, cookie exchanges, potlucks, bake sales, and those cozy evenings when chocolate is the only sensible option. Here's the honest part I love most: this recipe is forgiving in a way that welcomes beginners. There are no complicated techniques, no decorating skills, no fragile assembly. A few pantry staples and less than an hour of active baking produce a dessert that looks like it came straight from a professional bakery — all while every ingredient does a clear, deliberate job. The buttery crust is the foundation, the caramel creates the luxurious middle, the toasted nuts bring the crunch, and the chocolate melts into every bite for the finish. It travels well, stores for days, freezes beautifully, and cuts into picture-perfect squares with a hot knife. It's also a dessert you can feel reasonably good about sharing, with the honest story intact: a rich, dark chocolate layer brings real cocoa antioxidants, the nuts bring heart-friendly fats, fiber, and protein, and because you built it at home with quality ingredients, you've skipped the shelf of additives that comes with store-bought bars. Serve it chilled, at room temperature, or warmed under a scoop of vanilla ice cream — these bars deliver pure comfort no matter the temperature.
Why You'll Love This Recipe
- Rich, buttery shortbread crust — tender and melt-in-your-mouth
- Thick, gooey caramel center — a true distinct layer, not a soaked-in puddle
- Double layers of chocolate — chunks melted through the middle, chips glazing the top
- Crunchy toasted nuts — pecans, walnuts, or almonds add texture that contrasts the silky center
- Easy enough for beginner bakers — no complex techniques, no decorating skills
- Simple pantry ingredients — a baking-cupboard shopping list
- Perfect for holidays, bake sales, and potlucks — travels beautifully without falling apart
- Stores for days and freezes exceptionally well — dessert insurance whenever you need it
- Customizable every which way — chocolates, nuts, toffees, and toppings all welcome
- Beautiful presentation, very little effort — glossy chocolate, even squares, bakery energy
- Every bite balanced — buttery, sweet, crunchy, and creamy in perfect proportion
- The recipe people ask for before the pan is empty — every single time
Why This Recipe Works
This is a dessert built like a good building: every layer working, no part optional. The all-purpose flour crust creates a sturdy foundation strong enough to hold the rich caramel yet tender enough to melt in your mouth — and because the butter is melted rather than cut in, it's genuinely simple to make. The brown sugar does double work: its natural molasses content gives the crust a subtle caramel flavor that complements the filling and creates a soft, delicate crumb that balances the gooey layers above. The caramel is the luxurious centerpiece, and thickness is its secret. A thick, high-quality caramel sauce stays gloriously gooey instead of soaking into the crust, so every bite gets a distinct, silky caramel layer. The chocolate chunks melt into generous pockets that soften while keeping some texture — larger than chips, so they hold their ground through the bake. The toasted nuts provide the audible crunch that contrasts beautifully with the caramel and chocolate, and toasting ahead deepens their flavor into something warm and nutty. The final layer is the polish: chocolate chips sprinkled over the hot bars melt from the residual heat into a glossy topping, giving the dessert that bakery-style shine with zero extra effort. And the flaky sea salt — optional but never skip it — balances the whole sweet stack, brightens the caramel, and makes the chocolate taste richer. Every ingredient has a job, and the sum is a bar that's impossible to stop at one.
Ingredient Breakdown
All-Purpose Flour – the sturdy structure. Measure correctly: spoon it into the cup and level with a knife; scooping packs in too much flour and dries the crust. Brown Sugar – sweetness plus subtle caramel flavor from its molasses content. Light brown gives a delicate caramel taste; dark brown goes deeper and richer. Unsalted Butter – the rich, tender heart of the shortbread. Quality butter matters here, because the crust is butter-forward. Thick Caramel Sauce – the gooey middle. It needs to be thick enough to coat the back of a spoon — a thin sauce soaks into the crust instead of forming a layer. Chocolate Chunks – generous pockets of melted chocolate that keep some texture through the bake. Chopped Nuts (Pecans, Walnuts, or Almonds) – the crunch. Pecans are buttery, walnuts earthy, almonds firm. Toast them first for deeper flavor. Chocolate Chips – the glossy finish, melted by the residual heat of the baked bars. Flaky Sea Salt – optional but essential-feeling: a light sprinkle balances the sweetness and enhances the caramel.
Kitchen Equipment
A 9x13-inch baking dish, parchment paper, a large mixing bowl, a silicone spatula, measuring cups and spoons, an optional offset spatula for spreading, a cooling rack, and a sharp chef's knife for slicing. Lining the pan with parchment — with overhang on both sides — makes removing and slicing the finished bars genuinely effortless.
Step-by-Step Instructions
Step 1: Prepare the pan. Preheat the oven to 350°F (175°C). Line a 9x13-inch baking dish with parchment paper, leaving enough overhang on both sides to lift the finished dessert out later. Lightly grease the parchment so no caramel sticks. Step 2: Make the shortbread crust. In a large bowl, combine the flour, brown sugar, and melted butter. Mix with a fork or silicone spatula until all the flour is moistened. The mixture should resemble damp sand with small buttery crumbs — avoid overmixing, which creates a dense crust. Step 3: Press the crust. Transfer the mixture to the prepared dish. Using your hands or the bottom of a measuring cup, firmly press the crumbs into an even layer. Take extra time around the edges and corners for uniform thickness. Step 4: Bake the crust. Bake for 10–12 minutes until the edges are lightly golden and the center stays pale. You'll get that wonderful buttery aroma. Don't overbake — the crust returns to the oven later. Step 5: Add the caramel. Remove the hot crust from the oven and immediately pour the caramel over it, spreading gently into an even layer with an offset spatula or the back of a spoon. The warmth of the crust helps the caramel spread silky-smooth. Step 6: Add the chocolate and nuts. Sprinkle the chocolate chunks evenly over the caramel, then scatter the chopped nuts across the surface so every future bar gets plenty of both. Step 7: Bake again. Return to the oven for another 10 minutes. The caramel should gently bubble around the edges while the chocolate softens into glossy pools. Watch the final minutes closely to avoid overheating the chocolate. Step 8: Add the final chocolate layer. Remove from the oven and immediately sprinkle the chocolate chips over the hot surface. Let them sit 1–2 minutes until softened. Leave them whole for a rustic look, or gently spread them into one smooth layer for a bakery-style finish. Sprinkle with flaky sea salt while the chocolate is still soft, if you like. Step 9: Cool completely. Cool the bars completely at room temperature, then refrigerate for at least one hour. This lets the caramel set and the chocolate firm so the bars slice cleanly. Step 10: Slice and serve. Lift the bars out with the parchment. Run a sharp knife under hot water, wipe it dry, and cut into squares, cleaning the knife between cuts for clean edges. Serve chilled, at room temperature, or slightly warmed for extra gooeyness.
Expert Tips
- Use premium chocolate for the richest flavor — it's the biggest ingredient upgrade you can make
- Toast the nuts before adding them — a few minutes transforms their flavor
- Chill thoroughly before slicing — the single biggest trick for clean squares
- Clean the knife after every cut — neat edges, every single time
- Don't overbake the crust — lightly golden edges are the done-signal
- Spread each layer evenly — consistent layers mean balanced bites
- Cool completely before refrigerating — rushing it traps steam and softens the caramel layer
- Sprinkle flaky sea salt while the chocolate is soft — it only adheres while it's still warm
Common Mistakes to Avoid
- Using thin caramel sauce — it soaks into the crust instead of forming that distinct gooey layer; choose thick, quality caramel or make your own
- Overbaking the crust — past lightly golden, it turns dry and crumbly instead of buttery
- Skipping the parchment paper — lining the dish is what makes clean removal and even slices possible
- Cutting while warm — warm caramel stays soft; cool fully, then refrigerate before slicing
- Uneven layers — rushing the spreads means some bites get all caramel and no crunch
- Scooping flour — the crust turns dry and dense; spoon-and-level instead
- Burning the chocolate layer — watch the second bake closely; pools of gloss are the goal, not scorch
Ingredient Substitutions
- Flour → a quality gluten-free all-purpose blend
- Butter → plant-based butter for a dairy-free version
- Chocolate → dairy-free chips and chunks, white chocolate for a sweeter turn, peanut butter or butterscotch chips for richer twists
- Nuts → chopped pretzels for salty crunch, toasted coconut flakes for a tropical turn, hazelnuts or macadamia nuts for gourmet feel
- Caramel → a thick salted caramel sauce, or make your own if you have one
- Sea salt → salted butter works, just skip the finishing salt (or keep it — no one minds)
Recipe Variations
- Salted caramel crunch: a generous sprinkle of flaky sea salt over the melted chocolate — the sweet-salt classic
- Peanut butter chocolate: scatter peanut butter chips with the chocolate chunks
- Triple chocolate: a mix of dark, milk, and white chocolate for beautiful contrast
- Espresso chocolate: a teaspoon of instant espresso powder in the crust deepens the chocolate flavor
- Holiday bars: crushed peppermint candies, festive sprinkles, or chopped toffee over the melted chocolate
- S'mores version: miniature marshmallows toasted in the last few minutes before the final chocolate layer
- Nut-free version: skip the nuts entirely, or swap in toasted rice cereal for crunch
Make It Healthier (Honestly)
These bars are an indulgence, and I'll always be honest about that — but there's a genuinely pleasant story to tell. Dark chocolate brings real cocoa antioxidants, and a 70%+ bar makes that both honest and delicious; the toasted nuts add heart-friendly fats, fiber, and plant protein; and a homemade batch means quality ingredients you chose yourself, without the shelf of additives found in packaged chocolate bars. That's a real upgrade, stated plainly. The honest levers: use dark chocolate with at least 70% cocoa, trim the chocolate portion slightly, pile on the almonds or walnuts for the healthy-fat crunch, cut smaller portions, and serve them alongside fresh berries — or a dollop of Greek yogurt — for a balanced dessert moment. Baked at home with good ingredients, these bars can absolutely fit into a balanced lifestyle when enjoyed in moderation. The gooey center, the glossy top, and the crunch have never had to apologize for being a treat you made yourself.
Meal Prep Tips
These bars are an excellent make-ahead dessert. Bake them the day before serving and refrigerate overnight — the flavors deepen, the caramel firms to the perfect consistency, and slicing becomes effortless. They travel beautifully for birthday parties, holiday dessert tables, cookie exchanges, bake sales, picnics, and neighborhood gatherings, and the recipe doubles easily into two pans when you're feeding a crowd.
Storage
Cool completely before storing. Place in an airtight container with parchment between layers. They stay fresh at room temperature for up to 3 days, or in the refrigerator for up to 1 week. For best flavor, let refrigerated bars sit at room temperature about 10 minutes before serving.
Freezing
These bars freeze exceptionally well. Wrap each square individually in plastic wrap before placing them in a freezer-safe container or bag, and freeze for up to 3 months. To serve, thaw overnight in the refrigerator or let them sit at room temperature for about 30 minutes.
Reheating
Served at room temperature they're perfect, but slightly warmed they become gloriously gooey. Microwave one square for 8–10 seconds — the chocolate softens beautifully while the caramel turns creamy without melting into a puddle.
What to Serve With Them
These rich bars love simple accompaniments: vanilla ice cream, fresh whipped cream, strawberries, raspberries, sliced bananas, a drizzle of warm caramel, toasted pecans, or fresh mint. They also shine on dessert platters beside brownies, cookies, cheesecake bites, and chocolate truffles, and box up wonderfully for gifting in tins and bakery boxes.
Beverage Pairings
Because the bars are rich and chocolatey, they pair with hot and cold alike. Hot: fresh-brewed coffee, espresso, a cappuccino or café latte, hot chocolate, or chai tea. Cold: cold brew, whole milk, an iced latte, chocolate milk, or sparkling water with lemon. For adults, they're especially delicious with a glass of tawny port, Merlot, Cabernet Sauvignon, or a rich dessert wine.
Frequently Asked Questions
Can I make these bars ahead of time? Yes — in fact they taste even better the next day after the caramel has fully set, which makes them perfect for make-ahead hosting. Which caramel works best? A thick homemade caramel or a premium store-bought caramel sauce. Thin caramel soaks into the crust and ruins the layers. Can I leave out the nuts? Absolutely. The bars stay wonderfully rich and delicious, or swap in toasted rice cereal for crunch. Can I use salted butter? Yes — just reduce or skip the flaky sea salt garnish. Can I use white chocolate? Definitely. White chocolate makes an even sweeter, prettier bar, especially paired with dark. Why did my caramel sink into the crust? Almost always the caramel was too thin. Choose a thicker sauce so it forms a distinct gooey layer. Can I double the recipe? Yes — use two separate pans rather than one extra-thick pan so everything bakes evenly. How do I get perfectly clean slices? Chill completely, then cut with a large knife dipped in hot water and wiped dry between each cut. Are these bars suitable for gifting? Very — they package beautifully in decorative tins, bakery boxes, or holiday gift bags, and they travel well. Can children help make this recipe? Yes. Kids can mix the crust, press the crumbs, and sprinkle the toppings and final chips under adult supervision — a lovely shared-memory recipe. Are they gluten-free or dairy-free friendly? With a gluten-free flour blend, they're gluten-free; with plant-based butter and dairy-free chocolate, they're dairy-free. Both swap cleanly. How many bars does this make? About 24 squares from one 9x13 pan — a full dessert tray, easily doubled.
Nutrition Information
Estimated per serving (based on 24 bars):
| Nutrient | Amount |
|---|---|
| Calories | 325 |
| Total Fat | 19g |
| Saturated Fat | 10g |
| Carbohydrates | 37g |
| Fiber | 2g |
| Sugar | 24g |
| Protein | 3g |
| Sodium | 95mg |
| Calcium | 35mg |
| Iron | 2mg |
| Values are estimates and vary by chocolate, caramel, nuts, and portion. Dark chocolate and extra nuts improve the nutrient story; smaller slices keep the joy in balance. |
Some desserts earn a place in the family forever because they're beautiful, and others because they're easy — these Caramel Chocolate Crunch Bars somehow manage to be both. Buttery shortbread, silky caramel, rich melted chocolate, and crunchy toasted nuts come together in perfect harmony, from a single pan and a forgiving, beginner-friendly method that looks bakery-professional on the table. Whether you're baking for the holidays, bringing dessert to a neighborhood gathering, preparing treats for a bake sale, or simply satisfying a chocolate craving at home, this recipe never disappoints. It stores, it freezes, it travels, it gifts — and it disappears before the serving plate hits the counter. The combination of crisp crust, gooey caramel, creamy chocolate, and crunchy nuts is simply impossible to resist. Make a batch this week, whether you need an occasion or not. When the pan empties and the recipe requests start, you'll know exactly why you're bringing these to every future celebration. From my kitchen to yours — buttery, gooey, chocolatey, and gone long before dessert was officially served.
- Nutrition (per bar, 1 of 24): 325 calories, 3g protein, 37g carbs, 2g fiber, 19g fat, 95mg sodium — estimates only.
Caramel Chocolate Crunch Bars
Ingredients
Equipment
Method
- Preheat oven to 350°F (175°C) and line a 9×13-inch baking dish with parchment paper.
- Combine flour, brown sugar, and melted butter until crumbly.
- Press firmly into the prepared pan.
- Bake for 10–12 minutes until lightly golden.
- Spread caramel evenly over the warm crust.
- Sprinkle chocolate chunks and chopped nuts over the caramel.
- Bake for another 10 minutes until bubbly.
- Remove from the oven and immediately sprinkle chocolate chips over the top.
- Let the chips soften, then spread if desired.
- Sprinkle with flaky sea salt if using.
- Cool completely.
- Refrigerate for at least 1 hour before slicing.
Notes