
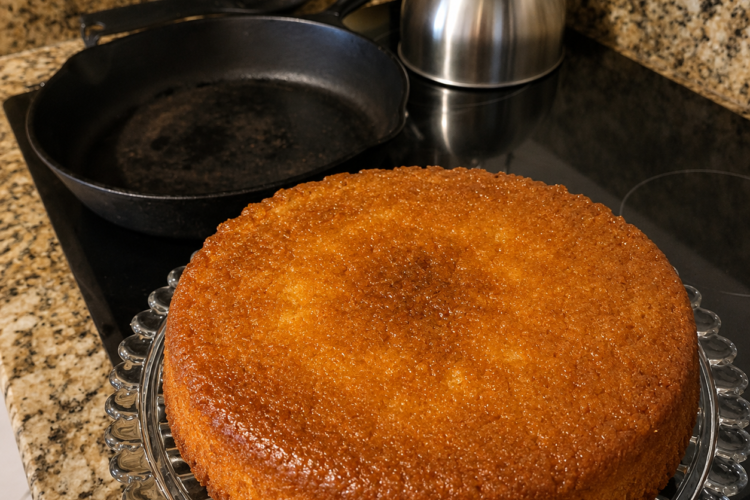
Cast Iron Pineapple Upside Down Cake
Some recipes carry more than flavor. They carry the sound of an old kitchen, the weight of a well-loved skillet, and the kind of family stories that somehow get sweeter every time they are told.
Pineapple upside down cake is one of those recipes.
There is something deeply comforting about a cake that begins on the stovetop in a cast iron skillet. Before the batter ever goes in, the kitchen already smells like butter and brown sugar melting together into that glossy, caramel-like layer that makes everybody wander closer. Then comes the pineapple, bright and sweet, soaking into the warm sugar until every bit of fruit is coated and shining.
This version is especially charming because it is made with crushed pineapple instead of the traditional rings. And honestly, that little change solves one of the oldest family dessert problems: who gets the biggest pineapple ring?
Anyone who grew up around classic pineapple upside down cake knows exactly how serious that could become. The corner with the cherry. The slice with the full ring. The piece with the most caramel. Children notice these things. Adults pretend they do not, but they absolutely do.
Using crushed pineapple gives everyone the good part. Every bite gets buttery brown sugar glaze, tender pineapple, and soft golden cake. No arguing over rings, no carefully cutting around fruit, no one quietly eyeing someone else’s plate. Just a warm, old-fashioned cake where the pineapple is spread through the entire top like a sticky, jewel-gold blanket.
And when that cake is baked in a well-seasoned cast iron skillet, it gets even better. The edges turn a little deeper and more caramelized. The bottom, which becomes the top after flipping, has that rich, buttery sweetness that tastes like something your grandmother might have brought to a church supper, a Sunday dinner, or a summer cookout.
This is the kind of dessert that does not need frosting, filling, or decoration. It has everything it needs already: butter, brown sugar, pineapple, tender yellow cake, and a little bit of kitchen bravery when it is time to flip.
Why You’ll Love This Recipe
This cast iron pineapple upside down cake is old-school comfort at its best.
It uses crushed pineapple so every bite has fruit and caramel.
The cast iron skillet helps create beautifully browned, buttery edges.
It works with homemade yellow cake batter or a boxed cake mix.
It is simple enough for a weeknight dessert and special enough for holidays.
It tastes nostalgic, bright, buttery, and rich without being complicated.
It is perfect for Sunday dinner, potlucks, family reunions, church suppers, cookouts, and old-fashioned dessert tables.
It is served warm, which makes it feel extra cozy.
It is forgiving. If a little topping sticks to the skillet, you can patch it right back onto the cake.
Why This Recipe Works
Pineapple upside down cake depends on two important things: caramelization and moisture balance.
The butter and brown sugar melt together in the skillet to create the topping. As the brown sugar dissolves, it becomes glossy and smooth instead of grainy. When baked, that mixture thickens into a syrupy glaze that coats the pineapple and soaks lightly into the cake.
Crushed pineapple is smaller and more evenly distributed than rings. That means the pineapple flavor spreads across the whole cake instead of sitting in isolated circles. It also helps the cake slice more evenly because there are no large fruit pieces pulling away from the crumb.
Draining the pineapple matters. If too much liquid goes into the skillet, the topping can become watery and the cake may bake unevenly. You want juicy pineapple, but not a puddle of syrup.
Cast iron is excellent for this recipe because it holds heat evenly. It helps the brown sugar layer stay hot and bubbly while the cake bakes, giving you a deeper caramel flavor around the edges. A well-seasoned skillet also releases the cake more easily when flipped.
The timing of the flip is important. If you flip the cake while it is too hot, the topping can run. If you wait until it is completely cold, the caramel can stick firmly to the pan. The sweet spot is warm, when the skillet handle is cool enough to manage safely but the topping is still soft.
Ingredient Breakdown
Crisco or Shortening
Shortening helps coat the skillet and encourages a clean release. Even a well-seasoned cast iron skillet benefits from a little extra insurance, especially with sticky brown sugar involved.
Purpose: Prevents sticking and protects the cake during flipping.
Buying advice: Use plain vegetable shortening.
Storage advice: Keep covered in a cool pantry.
Substitutions: Butter can be used, but shortening is often more reliable for release. Baking spray with flour can also work.
Butter
Butter is the base of the caramel topping. It melts with the brown sugar and gives the cake its rich, classic flavor.
Purpose: Adds flavor, moisture, and richness.
Flavor: Buttery, creamy, and slightly nutty once warmed.
Texture: Helps create a glossy, syrupy topping.
Buying advice: Use real butter for best flavor. Salted or unsalted both work, but unsalted gives more control.
Storage advice: Keep refrigerated and use by the date on the package.
Substitutions: Margarine can work in a pinch, though the flavor will not be as rich.
Brown Sugar
Brown sugar creates the caramel-like glaze. Its molasses content gives the topping a deeper flavor than white sugar.
Purpose: Sweetens and forms the sticky upside down topping.
Flavor: Warm, caramel-like, slightly molasses-rich.
Texture: Melts into butter and thickens during baking.
Buying advice: Light brown sugar is classic. Dark brown sugar gives a deeper flavor.
Storage advice: Store airtight so it does not harden.
Substitutions: Dark brown sugar, coconut sugar, or a mix of brown and white sugar.
Crushed Pineapple
Crushed pineapple gives this cake its signature flavor and solves the “who got the biggest ring” problem beautifully.
Purpose: Adds fruit, moisture, sweetness, and tang.
Flavor: Bright, tropical, sweet-tart.
Texture: Soft and juicy, with pineapple in every bite.
Buying advice: Use a 20-ounce can of crushed pineapple. Drain it well before adding.
Storage advice: Store unopened cans in the pantry. Refrigerate leftovers after opening.
Substitutions: Pineapple tidbits can work if chopped smaller. Rings can be used for the classic look.
Yellow Cake Batter
The cake layer can be homemade or made from a boxed yellow cake mix. Both work because the topping is the star.
Purpose: Provides the soft, tender cake base.
Flavor: Vanilla-rich, buttery, and mild enough to let the pineapple shine.
Texture: Fluffy, moist, and golden.
Buying advice: If using box mix, choose a good yellow cake mix and prepare according to package directions.
Storage advice: Store cake mix in a dry pantry.
Substitutions: Homemade yellow cake, butter cake, vanilla cake, or even spice cake for a fall version.
Optional Cherries
The original recipe uses crushed pineapple only, but maraschino cherries can be added if you love the old-fashioned look.
Purpose: Adds color and nostalgic sweetness.
Substitutions: Fresh cherries, candied cherries, or skip entirely.
Kitchen Equipment
Cast Iron Skillet
A well-seasoned cast iron skillet is the heart of this recipe. It melts the butter and sugar on the stovetop, then goes straight into the oven.
A 10-inch or 12-inch skillet works well depending on the amount of batter. A larger skillet gives a thinner cake; a smaller skillet gives a taller cake.
Wooden Spoon or Heatproof Spatula
Use this to stir the brown sugar into the melted butter until smooth.
Can Opener
Needed for the canned pineapple.
Fine Mesh Strainer
Helpful for draining crushed pineapple well.
Mixing Bowl
Use a bowl to prepare homemade cake batter or boxed cake mix.
Butter Knife
A butter knife is used to loosen the cake around the edges before flipping.
Large Serving Platter
Choose a platter wider than the skillet. It needs to cover the skillet completely before flipping.
Oven Mitts
Cast iron holds heat for a long time. Use thick oven mitts when handling the skillet.
Spatula
If any pineapple topping sticks, a spatula helps lift it from the skillet and smooth it back over the cake.
Step-by-Step Instructions
Step 1: Preheat the Oven
Preheat your oven to 350°F.
A fully preheated oven helps the cake rise evenly and keeps the topping from sitting too long before baking.
Step 2: Prepare the Skillet
Use a well-seasoned cast iron skillet. Coat the inside with Crisco or shortening.
Pay attention to the sides as well as the bottom. The cake will rise, and the edges need help releasing cleanly.
Visual cue: The skillet should have a thin, even sheen.
Step 3: Melt the Butter
Place 1 stick of butter in the skillet and melt it over low heat.
Low heat matters here. Butter can brown or burn if rushed.
The butter should be fully melted and gently bubbling, not sizzling hard.
Step 4: Add Brown Sugar
Stir 1 cup of brown sugar into the melted butter.
Keep the heat low and stir until the sugar melts into the butter and no longer feels grainy.
The mixture should look glossy, thick, and caramel-like. It will smell rich and buttery with a molasses sweetness.
Common mistake: Stopping too soon while the sugar is still gritty. Give it time to smooth out.
Step 5: Add Crushed Pineapple
Drain the 20-ounce can of crushed pineapple, then stir it into the butter and brown sugar mixture.
The pineapple should be evenly coated and spread across the bottom of the skillet.
Do not add all the pineapple juice unless your cake batter specifically needs it. Too much liquid can make the topping loose.
Step 6: Add Cake Batter
Prepare your yellow cake batter, either homemade or from a box mix.
Pour the batter gently over the pineapple topping. Spread it evenly without stirring it into the pineapple.
The batter should cover the fruit completely.
Step 7: Bake
Bake at 350°F for 35 to 40 minutes.
The cake is done when the top is golden, the center springs back lightly, and a toothpick inserted into the cake layer comes out clean or with a few moist crumbs.
If using a deeper skillet or thicker batter, it may need a few extra minutes.
Step 8: Cool Briefly
Let the cake cool until the skillet handle is safe enough to hold with protection, but the cake is still warm.
This is the perfect flipping window. The caramel is thickened but not hardened.
Step 9: Loosen the Edges
Run a butter knife carefully around the edges of the skillet.
This helps release any sticky spots and gives the cake a cleaner flip.
Step 10: Flip the Cake
Place a large platter over the skillet.
Using oven mitts, hold the platter and skillet tightly together. Flip in one confident motion.
Let the skillet sit upside down over the platter for a minute so the topping can release.
Lift the skillet gently.
If any pineapple or caramel stays behind, scoop it out with a spatula and smooth it over the cake. That is not a mistake. That is just old-school baking.
Expert Tips
Use a well-seasoned cast iron skillet for best release.
Grease the skillet even if it is seasoned.
Melt the brown sugar until it is no longer grainy.
Drain the crushed pineapple well.
Do not stir the cake batter into the pineapple topping.
Use a platter larger than the skillet.
Flip the cake while it is still warm.
Let the skillet rest upside down for a minute before lifting.
Use oven mitts because cast iron stays hot.
Use light brown sugar for classic flavor or dark brown sugar for deeper caramel.
Check the center of the cake, not just the edges.
Patch any stuck topping with a spatula.
Serve warm for the best texture.
Add whipped cream only if you want, but the cake does not need it.
Common Mistakes to Avoid
Using an unseasoned skillet can cause sticking.
Skipping the shortening makes release harder.
Heating the sugar too fast can make the topping uneven.
Leaving the sugar grainy affects the caramel texture.
Not draining the pineapple can make the cake soggy.
Using too much batter for the skillet can cause overflow.
Flipping too soon can make the topping run.
Waiting too long to flip can make the topping stick.
Using a platter that is too small can make a mess.
Forgetting oven mitts can be dangerous with cast iron.
Cutting the cake before it settles can make slices messy.
Assuming all cake mixes bake at the same speed can lead to underbaking.
Ingredient Substitutions
Use pineapple rings for the traditional look.
Use pineapple tidbits for more texture.
Use dark brown sugar for a stronger caramel flavor.
Use salted butter for a sweet-salty balance.
Use homemade yellow cake batter instead of box mix.
Use butter cake mix for a richer version.
Use spice cake mix for a fall-style cake.
Use coconut oil instead of shortening for greasing, though release may vary.
Add maraschino cherries for a classic diner-style look.
Add chopped pecans to the topping for crunch.
Recipe Variations
Classic Ring Pineapple Upside Down Cake
Use pineapple rings and cherries instead of crushed pineapple.
Cherry Pineapple Skillet Cake
Add maraschino cherries over the crushed pineapple before adding batter.
Pecan Pineapple Upside Down Cake
Sprinkle chopped pecans into the caramel topping.
Coconut Pineapple Cake
Add shredded coconut to the topping or batter.
Rum-Style Pineapple Cake
Add a small splash of rum extract to the cake batter.
Dark Brown Sugar Cake
Use dark brown sugar for a deeper molasses flavor.
Spice Cake Pineapple Upside Down Cake
Use spice cake batter for a warm, cozy version.
Mini Skillet Cakes
Divide topping and batter among small cast iron skillets.
Peach Upside Down Cake
Use drained canned peaches instead of pineapple.
Apple Upside Down Cake
Use thin apple slices with cinnamon.
Cranberry Pineapple Cake
Add cranberries for a tart holiday version.
Extra Caramel Pineapple Cake
Increase the brown sugar slightly for a thicker topping.
Make It Healthier
This is a classic dessert, so the goal is balance rather than removing everything that makes it special.
Use crushed pineapple packed in juice instead of heavy syrup.
Use a smaller slice and serve with fresh fruit.
Use a homemade cake batter so you can control the sugar.
Replace some of the oil in boxed cake mix with unsweetened applesauce if the mix allows.
Add chopped nuts for healthy fats and texture.
Enjoy it mindfully while warm, because a truly satisfying dessert does not need to be oversized.
Meal Prep Guide
This cake is best made the day you serve it, especially if you want the topping glossy and fresh.
You can drain the pineapple ahead of time and prepare your cake batter ingredients in advance.
If using homemade batter, measure dry ingredients the night before.
For gatherings, bake the cake a few hours ahead and keep it loosely covered at room temperature.
Serve slightly warm or at room temperature.
Storage
Store leftover cake covered at room temperature for 1 day or in the refrigerator for up to 4 days.
Because the pineapple topping is moist, refrigeration is best after the first day.
Use an airtight container to keep the cake from drying out.
Freezing
You can freeze pineapple upside down cake, though the topping may become softer after thawing.
Wrap slices tightly in plastic wrap, then place in a freezer-safe container.
Freeze for up to 2 months.
Thaw overnight in the refrigerator.
Reheating
Microwave
Warm individual slices for 15 to 25 seconds.
Oven
Place slices in a baking dish, cover loosely with foil, and warm at 300°F until heated through.
Skillet
Warm a slice gently in a covered skillet over low heat for a few minutes.
Air Fryer
Reheat slices at 300°F for 2 to 4 minutes, checking carefully so the topping does not burn.
What to Serve With It
Vanilla ice cream
Whipped cream
Hot coffee
Fresh berries
Toasted pecans
Caramel drizzle
Cold milk
Sweet tea
Holiday ham dinner
Sunday pot roast
Grilled chicken cookout
Brunch spread
Beverage Pairings
Hot coffee
Iced coffee
Sweet tea
Unsweetened iced tea
Cold milk
Vanilla latte
Black tea
Pineapple iced tea
Sparkling water with lemon
Warm cinnamon tea
Frequently Asked Questions
Can I use crushed pineapple instead of rings?
Yes. Crushed pineapple gives you pineapple in every bite and makes the cake easier to slice.
Do I have to use cast iron?
No, but cast iron gives wonderful caramelized edges. You can use a 9-inch cake pan or baking dish, but melt the topping separately first.
What size skillet should I use?
A 10-inch or 12-inch cast iron skillet works well. Make sure it is deep enough for the batter.
Can I use a boxed cake mix?
Yes. Yellow cake mix works beautifully and is a great shortcut.
Should I drain the pineapple?
Yes. Drain it well so the topping does not become watery.
When should I flip the cake?
Flip while the cake is still warm, but cool enough to handle safely.
What if topping sticks to the skillet?
Use a spatula to lift it out and smooth it back onto the cake.
Why did my cake stick?
The skillet may not have been greased enough, or the cake may have cooled too long before flipping.
Can I add cherries?
Yes. Cherries are classic and add color.
Can I make this ahead?
Yes, but it is best served the same day. You can bake a few hours ahead.
Can I use fresh pineapple?
Yes, but canned pineapple gives the most classic texture and sweetness.
How do I know the cake is done?
The top should be golden and a toothpick inserted into the cake should come out clean.
Can I use butter instead of Crisco to grease the pan?
Yes, but shortening often gives a better release.
Does it need frosting?
No. The caramelized pineapple topping acts like frosting.
Can I make it less sweet?
Use pineapple packed in juice and a homemade cake batter with less sugar.
Nutrition Information
Estimated per serving, based on 10 slices:
Calories: 385
Protein: 3g
Carbohydrates: 58g
Fat: 17g
Fiber: 1g
Sugar: 42g
Sodium: 310mg
Nutrition values are estimates and will vary depending on cake batter, brand, skillet size, and serving size.
Final Thoughts
Cast Iron Pineapple Upside Down Cake is the kind of dessert that feels like it came from a handwritten recipe card tucked into an old kitchen drawer. It is buttery, golden, sticky, sweet, and full of pineapple in every bite.
Using crushed pineapple makes it practical, family-friendly, and wonderfully nostalgic. And baking it in a cast iron skillet gives it that old-fashioned charm that never really goes out of style.
Serve it warm, flip it with confidence, and do not worry if a little topping sticks. Grandma would have fixed it with a spatula and never said a word.
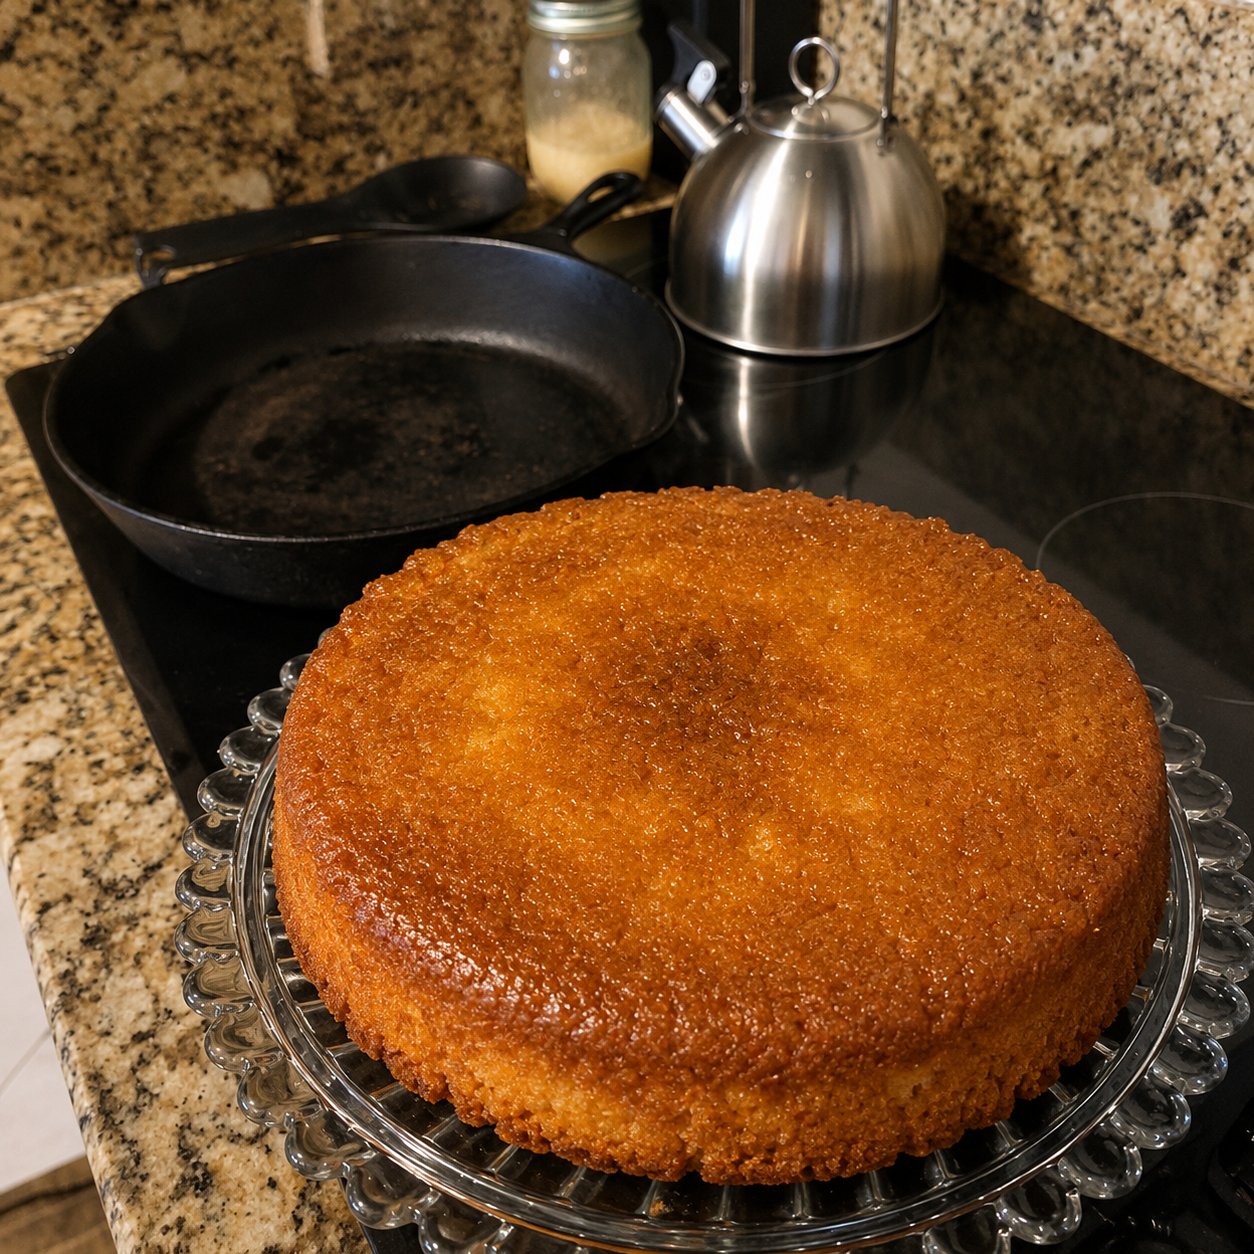
Cast Iron Pineapple Upside Down Cake
Ingredients
Equipment
Method
- Use crushed pineapple for pineapple in every bite.
- Drain pineapple well to prevent a soggy topping.
- Flip while the cake is still warm so the caramel releases.
- A well-seasoned cast iron skillet gives the best flavor and release.
Notes