
Chocolate Peanut Butter Caramel Bars – Four Ingredients, Pure Magic
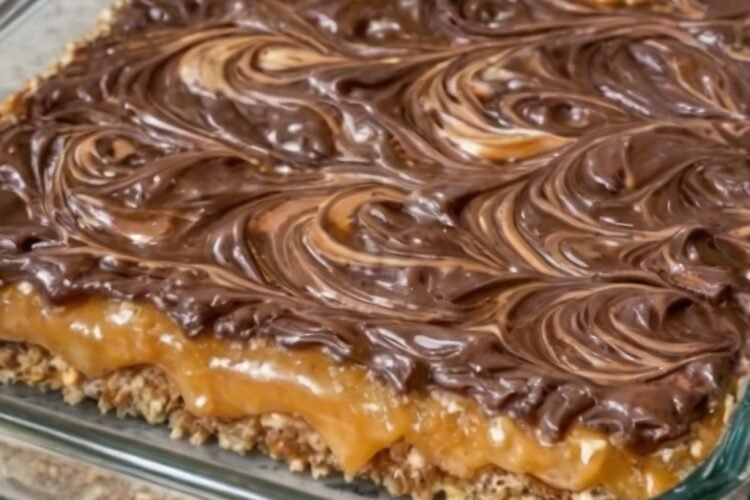
I finally understood why my grandma refused to share this recipe until I promised to make it for every family gathering. She'd bring it to church potlucks in the '90s and people would literally hover around the dessert table waiting for her to set it down. It's only four ingredients. Four. And it tastes like something you'd pay $8 a slice for at a fancy bakery. The magic is in the layers. You've got that buttery graham cracker crust on the bottom, then this thick glossy caramel layer that stays perfectly gooey even after it sets, and then the most beautiful swirled chocolate-peanut butter topping that somehow tastes both rich and light at the same time. The sweet and salty thing is so perfectly balanced you can't stop going back for "just one more bite." I made this last weekend and my husband ate three pieces before dinner. No shame. He said it reminded him of those expensive candy bars but better because you get that crumbly crust with every bite. A simple graham crust, a can of sweetened condensed milk, melted chocolate, and peanut butter create a no-bake layered dessert that feels luxurious and disappears fast.Why You'll Love This Recipe
You will love these chocolate peanut butter caramel bars because they deliver bakery-level flavor with only four ingredients and almost no effort. A buttery graham cracker crust forms the base. Sweetened condensed milk creates a thick, glossy, caramel-like layer that stays pleasantly gooey. A swirled chocolate-peanut butter topping adds rich, salty-sweet contrast. The result is layered, balanced, and completely addictive. You will love how practical they are. Everything comes together in minutes with a mixing bowl, a microwave, and a 9x13 pan. There is no baking, no candy thermometer, and no complicated technique. They only need time in the refrigerator to set. Perfect for potlucks, holidays, last-minute desserts, or anytime you want something impressive without the stress. You will love the texture and flavor. The crust is buttery and slightly crunchy. The middle layer is thick, sweet, and caramel-like. The topping is smooth, chocolatey, and peanut-buttery with beautiful swirls. Every bite has sweet, salty, rich, and crumbly elements in perfect balance. Most of all, you will love the reactions. These are the bars that make people hover around the dessert table. They are the ones that earn "we're making these every gathering" status. In a world of complicated desserts, four-ingredient chocolate peanut butter caramel bars this good are pure simple magic.- Ridiculously budget-friendly: about fifty cents a bar. For the cost of one fancy bakery slice, you make a full pan.
- A little protein for a dessert: the peanut butter and condensed milk add a few grams of protein per bar, which helps make a small serving feel more satisfying.
- Wonderful for sharing with older family and friends: the soft, layered texture is easy to enjoy, and small squares make natural portion control at gatherings.
Why This Recipe Works
Crushed graham crackers mixed with melted butter create a sturdy, flavorful crust that presses easily and holds up when sliced. Sweetened condensed milk poured over the crust becomes thick, sweet, and caramel-like as it chills—no cooking required. Melting chocolate chips with creamy peanut butter produces a smooth, glossy topping that spreads easily and sets firm enough to slice while still tasting rich and slightly soft. Swirling the chocolate-peanut butter mixture creates an attractive marbled look and distributes the flavors. Chilling for at least three hours (overnight is even better) allows every layer to firm up so the bars cut cleanly and hold their shape. These simple layering and chilling techniques produce a reliable, crowd-pleasing no-bake dessert with excellent texture and balanced sweet-salty flavor.Ingredient Breakdown
- Graham Crackers (2 sleeves, crushed to about 2 cups fine crumbs): The classic base for the crust. Fine crumbs press more evenly and hold together better.
- Butter (1 stick / ½ cup, melted): Butter binds the crumbs and adds rich flavor so the crust tastes like more than just crackers.
- Sweetened Condensed Milk (14 oz can): This becomes the thick, glossy, caramel-like middle layer as it chills. Do not substitute evaporated milk.
- Chocolate Chips (11 oz bag): Chocolate chips melt into the topping and provide rich cocoa flavor. Semi-sweet or milk chocolate both work.
- Creamy Peanut Butter (½ cup): Peanut butter adds saltiness, creaminess, and classic flavor that pairs perfectly with chocolate and the sweet middle layer.
Kitchen Equipment
A 9x13-inch baking dish, a mixing bowl, a spatula, a microwave-safe bowl, and a butter knife or offset spatula for swirling are the main tools. A food processor makes quick work of the graham cracker crumbs but is optional.Step-by-Step Instructions
- Crush the graham crackers into fine crumbs (about 2 cups). Mix the crumbs with the melted butter until the mixture looks like wet sand and every crumb is coated.
- Press the mixture firmly and evenly into the bottom of a 9x13-inch baking dish. Use the bottom of a measuring cup or glass to pack it tightly.
- Pour the entire can of sweetened condensed milk evenly over the crust. Spread it gently with a spatula so it covers every inch of the crust.
- In a microwave-safe bowl, combine the chocolate chips and peanut butter. Microwave in 30-second bursts, stirring thoroughly between each interval, until the mixture is completely smooth and glossy.
- Pour the chocolate-peanut butter mixture over the condensed-milk layer. Use a butter knife or the tip of a spatula to swirl it into marble patterns. Do not overmix—messy swirls look beautiful once set.
- Refrigerate for at least 3 hours, or until the bars are fully set and firm. Overnight is ideal for the cleanest slices.
- Slice into squares and serve. Watch them vanish.
Expert Tips
- Crush the graham crackers into fine, even crumbs so the crust packs tightly and slices cleanly.
- Press the crust firmly—this is what keeps it from crumbling when you cut the bars.
- Use the full can of sweetened condensed milk and spread it to the edges for a consistent middle layer.
- Melt the chocolate and peanut butter gently in short bursts, stirring well each time, to avoid scorching.
- Swirl with a light hand. A few figure-eight motions create pretty marbling without muddying the layers.
- Chill for the full time (or overnight). The bars need it to set properly and cut cleanly.
- For the neatest squares, use a sharp knife wiped clean between cuts.
- Line the pan with parchment with overhanging edges if you want to lift the whole slab out for easier slicing.
- Creamy peanut butter gives the smoothest topping; natural peanut butter can be used but may separate or be less glossy.
- Semi-sweet chocolate balances the sweetness of the condensed milk nicely; milk chocolate makes them sweeter and milder.
- These travel well when kept cool—perfect for potlucks and gatherings.
- A light sprinkle of flaky sea salt on top before chilling elevates the sweet-salty contrast.
- Store them in the refrigerator so the layers stay firm.
- Make them a day ahead for the least stress and best texture.
Common Mistakes to Avoid
- Using coarse graham cracker crumbs. Fine crumbs pack better and give a more cohesive crust.
- Not pressing the crust firmly enough. A loose crust will crumble when sliced.
- Substituting evaporated milk for sweetened condensed milk. They are not the same and the middle layer will not set properly.
- Overheating the chocolate and peanut butter. Short microwave bursts and frequent stirring prevent seizing or burning.
- Over-swirling the topping until the layers become muddy instead of marbled.
- Cutting the bars before they are fully chilled. They need time to firm up.
- Using a pan that is not 9x13. The thickness of the layers will change and may affect setting and slicing.
- Skipping the chill time because the aroma is irresistible. The wait is worth it.
- Storing them at room temperature for long periods. The layers soften; refrigeration keeps them at their best.
- Expecting a baked cookie-bar texture. These are no-bake, layered, and soft-set.
- Using old or dry peanut butter that does not melt smoothly. Fresh, creamy peanut butter works best.
- Spreading the condensed milk so thinly that the crust shows through in spots. Cover it completely.
- Cutting with a dull knife and dragging the layers. A sharp, clean knife gives the prettiest squares.
- Making only one batch for a large gathering. They tend to disappear quickly.
Ingredient Substitutions
- Graham crackers can be replaced with digestive biscuits, vanilla wafers, or gluten-free graham-style crumbs.
- Butter can be replaced with a plant-based butter alternative.
- Semi-sweet chocolate chips can be replaced with milk chocolate, dark chocolate, or a mix.
- Creamy peanut butter can be replaced with crunchy for texture, or with almond butter or cookie butter for a different flavor (results will vary).
- Sweetened condensed milk is essential for the middle layer and does not have a direct one-to-one substitute in this no-bake method.
Recipe Variations
- Salted Chocolate Peanut Butter Bars – Sprinkle flaky sea salt over the swirled topping before chilling.
- Dark Chocolate Version – Use dark chocolate chips for a less sweet, more intense topping.
- Peanut Butter Cup Style – Add a few chopped peanut butter cups on top of the condensed milk before adding the chocolate layer.
- Pretzel Crust – Replace half the graham crumbs with finely crushed pretzels for extra salty crunch.
- Mocha Twist – Stir a teaspoon of instant espresso powder into the melting chocolate and peanut butter.
- Nutella Swirl – Replace part or all of the peanut butter with Nutella for a chocolate-hazelnut version.
- Mini Bars – Cut into smaller squares for potluck trays or dessert buffets.
- Layered Cups – Build the same layers in small cupcake liners or mini jars for individual servings.
- White Chocolate Version – Use white chocolate chips and a little peanut butter for a different look and milder flavor.
- Gluten-Free – Use certified gluten-free graham-style crumbs.
- Extra Peanut Butter – Increase the peanut butter slightly for a stronger peanut flavor.
- Holiday Version – Add festive sprinkles on top of the swirls before chilling.
- Make-Ahead Party Dessert – Prepare a day or two in advance; the bars hold beautifully in the refrigerator.
Make It Healthier
These bars are a rich, sweet treat. To lighten them slightly, cut smaller squares, use dark chocolate, or enjoy them as an occasional special dessert rather than an everyday snack. Pairing a small piece with a cup of coffee or tea can make the indulgence feel more intentional. They are best viewed as a celebratory or potluck dessert. Honest, practical notes: one small square is a genuinely satisfying portion — the layers are so rich that most people are content with one when they try it. Dark chocolate lowers the sugar a touch, and a smaller square keeps the calories modest while still delivering the full experience. For anyone mindful of healthy aging or blood sugar, the honest approach is simple: enjoy a modest piece, pair it with the protein in a meal or a mug of coffee, and let it be the treat it is meant to be.Meal Prep Guide
This dessert is ideal for making ahead. Prepare it the day before (or even two days before) you need it—the texture and flavor improve with time in the refrigerator. It travels well when kept cool and is perfect for potlucks, church gatherings, holidays, and family dinners. Slice just before serving for the cleanest presentation.Storage
Store the bars covered in the refrigerator for up to five days. Keep them cold so the layers stay firm and the texture remains ideal. For longer storage, freeze as directed below.Freezing
These bars freeze well for up to two months. Cut into squares, place in a single layer or with parchment between layers, and freeze in an airtight container. Thaw in the refrigerator for a few hours or overnight. The texture remains very good after freezing.Reheating
These bars are meant to be served cold or cool. No reheating is necessary. If they have been frozen, thaw them in the refrigerator and serve once they are sliceable and slightly softened.What to Serve With It
These chocolate peanut butter caramel bars are perfect on their own. They shine on a dessert table, at potlucks, or as a simple after-dinner treat with coffee. A glass of cold milk is classic. Fresh berries on the side can add a bright contrast if desired. They also make a wonderful homemade gift when packed in a tin with parchment between layers.Beverage Pairings
Cold milk is the classic and perfect pairing. Hot coffee or a latte balances the sweetness beautifully. A glass of cold brew or black tea also works well. For a special occasion, a small pour of dessert wine or a peanut-butter-friendly stout can be fun. Choose a drink that either cuts the richness or leans into the chocolate-peanut butter flavors.Frequently Asked Questions
- Is the middle layer really caramel? It is sweetened condensed milk that becomes thick, sweet, and caramel-like as it chills. No cooking is required.
- Can I use natural peanut butter? Yes, but the topping may be less smooth and glossy. Stir it very well and expect a slightly different texture.
- How long do they need to chill? At least 3 hours. Overnight is even better for clean slicing and full flavor.
- Can I make these in a different pan size? A 9x13 pan is ideal. A smaller pan will make thicker bars that may need longer to set; a larger pan will make thinner bars.
- Are these gluten-free? Only if you use gluten-free graham-style crumbs and confirm all other ingredients are gluten-free.
- Can I freeze them? Yes. They freeze well for up to two months. Thaw in the refrigerator before serving.
- How many bars does this make? About 16–24 squares, depending on how you cut them.
- Why is my crust crumbly? It may not have been pressed firmly enough, or the crumbs were too coarse. Pack it tightly next time.
- Can I use milk chocolate chips? Yes. The bars will be sweeter and milder. Semi-sweet provides a nice balance.
- Do I need to bake the crust? No. This is a completely no-bake dessert. Chilling sets everything.
- How do I get clean slices? Chill fully, use a sharp knife, and wipe the blade between cuts. Lining the pan with parchment also helps.
- Can I double the recipe? Yes. Use two 9x13 pans or one very large pan (adjust chilling time if the layers are thicker).
- Is the sweetened condensed milk necessary? Yes. It creates the signature thick, sweet middle layer. Evaporated milk will not work the same way.
- How long do leftovers keep? Up to five days in the refrigerator or up to two months in the freezer.
- What makes the swirls look pretty? A few light figure-eight or S-shaped motions with a knife. Stop before the layers become completely mixed.
Nutrition Information
Estimated nutrition per bar (based on 20 bars): approximately 220–260 calories, 12–15 g fat, 28–32 g carbohydrates, 3–4 g protein. Values vary depending on the exact brands of chocolate chips, peanut butter, and graham crackers used. These figures are estimates only and are not a substitute for professional nutritional advice. At about fifty cents a bar, this is one of the most affordable ways to make dessert feel extravagant. These bars are a rich, sweet treat best enjoyed in moderate portions as an occasional dessert. These chocolate peanut butter caramel bars earned their permanent place in my recipe box the moment I understood why my grandma guarded them so carefully. Four ingredients, a few minutes of work, and a little patience in the refrigerator produce something that tastes far more impressive than the effort required. The buttery crust, the gooey caramel-like layer, and that swirled chocolate-peanut butter topping still feel a little bit magical every time. I hope you make them for your next gathering—or just for a regular weekend when you want something special. I hope the swirls turn out beautiful, the layers set perfectly, and someone in your house eats three pieces before dinner without a shred of shame. If you try them, I would love to know whether you waited the full three hours—or sneaked a bite early. From my kitchen to yours—layered, balanced, and pure no-bake comfort.Recipe
Chocolate Peanut Butter Caramel Bars
Four ingredients, no baking, pure magic — a buttery graham crust, gooey condensed-milk caramel, and a swirled chocolate-peanut butter topping.Ingredients
- Graham crackers (2 sleeves, crushed to 2 cups fine crumbs)
- Butter (1 stick / 1/2 cup, melted)
- Sweetened condensed milk (14 oz can)
- Chocolate chips (11 oz bag)
- Creamy peanut butter (1/2 cup)
Instructions
- Crush the graham crackers into fine crumbs (about 2 cups). Mix with the melted butter until every crumb is coated.
- Press firmly and evenly into the bottom of a 9x13-inch dish. Use the bottom of a measuring cup to pack it tightly.
- Pour the entire can of sweetened condensed milk over the crust and spread gently to cover every inch.
- Combine the chocolate chips and peanut butter in a microwave-safe bowl. Microwave in 30-second bursts, stirring between each, until smooth and glossy.
- Pour the chocolate-peanut butter mixture over the condensed-milk layer. Swirl into marble patterns with a knife or spatula tip. Do not overmix.
- Refrigerate at least 3 hours, or until fully set and firm. Overnight is ideal.
- Slice into squares and serve. Watch them vanish.
Notes
Don't substitute evaporated milk for sweetened condensed milk. Chill fully before slicing. Semi-sweet chocolate balances the sweetness best. Flaky sea salt on top before chilling is a wonderful touch. Storage: fridge up to 5 days, freezer up to 2 months. Budget: about $0.50/bar.
Nutrition Information
Calories240
Carbs30g
Protein4g
Fat14g
Sat Fat7g
Sugar23g
Sodium120mg
Fiber1g
Servings20