

Crispy Cheese Taco Cups
My sister brought these to game night last month and I watched grown adults fight over the last one. I’m not even exaggerating — someone tried hiding one under a napkin.
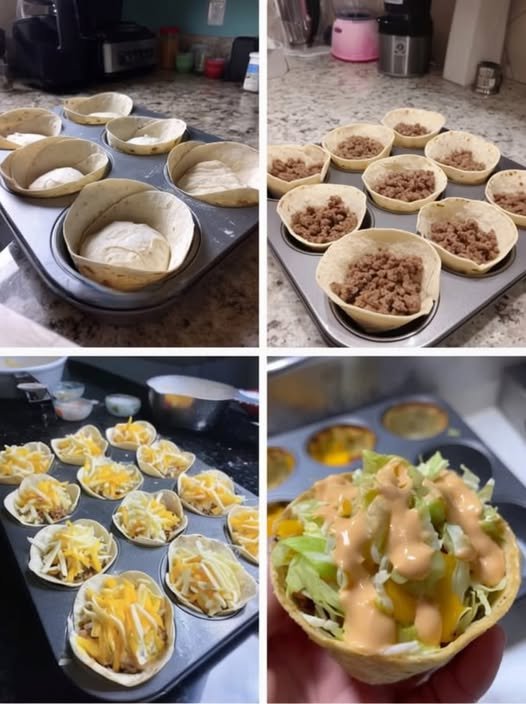
These little taco cups hit different. You get that crispy cheese shell on the outside, seasoned beef in the middle, more melted cheese, then shredded lettuce and this creamy sauce that just ties everything together. They’re like tiny edible taco bowls you can pop in your mouth without anything falling apart in your lap.
I made them in a muffin tin because honestly, who has time for complicated? And the cheese shell trick? Total game changer. It gets golden and crispy on the edges but stays just soft enough to bite through without shattering everywhere.
My husband ate four before I even finished plating them. Didn’t say a word, just kept reaching over while I was drizzling the sauce.
Why You’ll Love This Recipe
You will love these crispy cheese taco cups because they deliver all the best taco flavors in a fun, handheld, low-mess form. A golden cheese shell holds seasoned ground beef, melted cheese, cool lettuce, and a creamy drizzle.
You will love how easy they are. Everything comes together in a muffin tin with minimal ingredients and almost no cleanup.
You will love the texture contrast. Crispy cheese edges, savory beef, gooey melted cheese, and fresh cool toppings in every bite.
Most of all, you will love that they feel indulgent and impressive while staying simple enough for a busy weeknight or casual gathering.
Why This Recipe Works
Baking shredded cheese in a muffin tin creates sturdy, edible shells that hold their shape once cooled slightly. Ground beef seasoned with taco seasoning provides classic savory flavor. A second quick bake melts additional cheese over the filling so everything holds together. Cool shredded lettuce and a creamy hot-sauce drizzle add freshness and balance the richness. The muffin tin keeps the portions neat and makes serving effortless. The result is a crispy, cheesy, fully loaded taco bite that stays intact until the last bite.
Ingredient Breakdown
2 cups shredded cheddar or mozzarella (for the shells)
Forms the crispy, golden cheese cups (cheddar gives more flavor).
1 lb ground beef
The hearty, seasoned filling.
2 tbsp taco seasoning
Classic taco flavor.
Salt and pepper
To taste.
1 cup shredded cheese (for topping)
Melts over the beef.
Shredded iceberg lettuce
Adds cool crunch.
Sour cream or Greek yogurt mixed with a little hot sauce
Creamy, tangy drizzle.
Kitchen Equipment
A standard muffin tin, nonstick spray or oil for greasing, skillet, and mixing spoon.
Step-by-Step Instructions
Preheat your oven to 375°F. Grease a muffin tin very well (this is important for easy release).
Press about 2–3 tablespoons of shredded cheese into the bottom and up the sides of each muffin cup, forming little cheese bowls. Make sure the cheese is evenly distributed and covers the sides.
Bake for 8–10 minutes, until the cheese is fully melted, bubbly, and turning golden at the edges. Remove from the oven and let the cups cool in the pan for a few minutes so they firm up and hold their shape.
While the cheese shells bake, brown the ground beef in a skillet over medium-high heat, breaking it up as it cooks. Once no pink remains, drain any excess grease. Stir in the taco seasoning with a small splash of water and simmer until the beef is coated and slightly saucy. Season with salt and pepper if needed.
Spoon the seasoned beef into each cheese cup. Top with additional shredded cheese.
Return the muffin tin to the oven for 3–5 minutes, just until the cheese on top is melted.
Let the cups cool for a minute or two so they are easy to handle. Top with shredded lettuce and drizzle with the creamy sour cream (or Greek yogurt) and hot sauce mixture.
Serve immediately while the cheese shells are still crisp.
Expert Tips
- Grease the muffin tin thoroughly so the cheese cups release cleanly.
- Press the cheese firmly up the sides to create sturdy walls.
- Let the baked cheese shells cool a few minutes in the pan — they firm up as they cool.
- Use freshly shredded cheese if possible; it melts more evenly.
- Cheddar gives the best flavor and color for the shells.
- Do not overfill the cups or the filling may spill over.
- A short second bake is all you need to melt the topping cheese.
- Add the lettuce and sauce just before serving so they stay fresh and crisp.
- Work in batches if making a large quantity.
- These are best eaten soon after assembling for maximum crispiness.
- A silicone muffin tin can make release even easier.
- Keep the beef mixture slightly saucy so it stays moist.
- Double the recipe for parties — they disappear fast.
- Serve on a platter with extra sauce on the side for dipping.
Common Mistakes to Avoid
- Under-greasing the muffin tin and having the shells stick.
- Using too little cheese so the cups fall apart.
- Removing the shells from the pan while still hot and soft.
- Overbaking the cheese shells until they become hard and brittle.
- Skipping the drain step and ending up with greasy filling.
- Adding lettuce too early so it wilts.
- Overfilling the cups and making them hard to eat.
- Using pre-shredded cheese that contains anti-caking agents and melts less smoothly.
- Baking the second time too long and drying out the beef.
- Trying to move the cups before they have set.
- Forgetting a splash of water with the taco seasoning so the beef is dry.
- Crowding the muffin tin with too much cheese so the cups fuse together.
- Serving them ice-cold instead of warm.
- Making the sauce too thin so it runs everywhere.
Ingredient Substitutions
Ground beef can be replaced with ground turkey or ground chicken.
Cheddar can be swapped for mozzarella, Colby Jack, or a Mexican blend.
Taco seasoning can be replaced with a homemade mix of chili powder, cumin, garlic powder, onion powder, paprika, salt, and pepper.
Sour cream can be replaced with Greek yogurt or a dairy-free alternative.
Iceberg lettuce can be swapped for shredded romaine or cabbage for more crunch.
Recipe Variations
- Spicy – Add diced jalapeños to the beef or the sauce.
- Chicken – Use seasoned shredded chicken instead of ground beef.
- Breakfast – Fill with scrambled eggs, sausage, and cheese.
- Vegetarian – Use seasoned black beans or lentils.
- Bacon – Stir cooked crumbled bacon into the beef.
- Guacamole – Add a small dollop of guacamole on top.
- Pico – Top with fresh pico de gallo instead of (or with) lettuce.
- Queso – Drizzle with warm queso instead of the sour cream sauce.
- Mini – Use a mini muffin tin for bite-sized versions.
- Loaded – Add black olives, diced tomato, or green onion.
- Ranch – Mix a little ranch seasoning into the sour cream.
- BBQ – Swap taco seasoning for barbecue seasoning and sauce.
- Meal Prep – Bake the cheese shells and cook the beef ahead; assemble just before serving.
- Air Fryer – Crisp the cheese shells in an air fryer if preferred.
Make It Healthier
Use lean ground beef or turkey, choose reduced-fat cheese if desired, load up on the lettuce, and use Greek yogurt for the drizzle. The cheese shell keeps carbs lower than a traditional tortilla.
Meal Prep Guide
Bake the cheese shells and cook the beef up to a day ahead. Store separately in the refrigerator. Reheat the shells briefly and assemble with toppings just before serving for best texture.
Storage
These are best eaten fresh. Leftover assembled cups can be stored in the refrigerator for up to 1 day, though the shells will soften. Store components separately when possible.
Freezing
Cheese shells and cooked beef can be frozen separately for up to 1 month. Thaw and reheat before assembling. Fully assembled cups do not freeze well because of the lettuce and sauce.
Reheating
Reheat cheese cups and beef gently in a 350°F oven or air fryer until warmed. Add fresh lettuce and sauce after reheating.
What to Serve With It
Perfect as an appetizer, game-day snack, or light main dish. Serve with Mexican rice, refried beans, guacamole, salsa, or a simple side salad. Extra creamy sauce and hot sauce on the side are always welcome.
Beverage Pairings
Iced tea, sparkling water with lime, light beer, margaritas, or agua fresca. Cold soda also pairs well with the cheesy, savory flavors.
Frequently Asked Questions
Do the cheese shells really hold up?
Yes — once they cool for a few minutes they become sturdy enough to fill and eat by hand.
Can I make them ahead?
Bake the shells and cook the beef ahead, then assemble just before serving.
What cheese works best for the shells?
Cheddar gives excellent flavor and color; mozzarella works for a milder taste.
Can I use a mini muffin tin?
Yes — reduce the cheese amount and bake time slightly.
How do I keep them from sticking?
Grease the muffin tin very well or use a silicone muffin pan.
Can I add jalapeños?
Yes — they add a great kick. Dice them finely and mix into the beef or sprinkle on top.
Are these low-carb?
Yes — the cheese shell keeps them much lower in carbs than tortilla-based tacos.
Can I use ground turkey?
Yes — it works well and lightens the filling.
How many does this make?
Typically 10–12 standard muffin cups, depending on how much cheese you use per cup.
Would you add jalapeños or keep them mild?
Both are excellent. Mild is crowd-pleasing; jalapeños make them more exciting.
Can I make a creamy sauce without hot sauce?
Yes — plain sour cream or Greek yogurt works, or mix in a little salsa or taco sauce.
Why did my shells fall apart?
They may not have cooled long enough or needed a bit more cheese and bake time.
Can I bake the filling and shells longer together?
A short second bake is best so the shells stay crisp.
How should I store leftovers?
Best eaten fresh. Store components separately if possible.
Can I use pre-shredded cheese?
Yes, though freshly shredded often melts more smoothly.
Nutrition Information
Approximate nutrition will vary based on exact ingredients and portion sizes. These taco cups are high in protein and fat with lower carbohydrates thanks to the cheese shell. Values are estimates only and should not be considered professional nutritional advice.
Final Thoughts
These crispy cheese taco cups are the ultimate game-night (or busy-night) win. Golden cheese shells, seasoned beef, melted cheese, cool lettuce, and a creamy drizzle — everything you love about tacos in a neat, handheld bite that disappears fast.
I hope you make them the next time you need something fun and impressive without the stress. I hope the cheese turns golden, the cups hold their shape, and someone tries to hide the last one under a napkin. If you try them, I’d love to know whether you kept them mild or added a little heat. From my kitchen to yours — crispy, cheesy, and completely addictive.
Crispy Cheese Taco Cups
Ingredients
Equipment
Method
- Preheat oven to 375°F and grease a muffin tin well.
- Press 2–3 tbsp shredded cheese into the bottom and sides of each muffin cup. Bake 8–10 minutes until golden and bubbly. Cool a few minutes to firm up.
- Brown ground beef; drain. Stir in taco seasoning with a splash of water and simmer until coated.
- Fill cheese cups with beef, top with more cheese, and bake 3–5 minutes until melted.
- Top with shredded lettuce and drizzle with creamy sauce. Serve warm.
Notes