
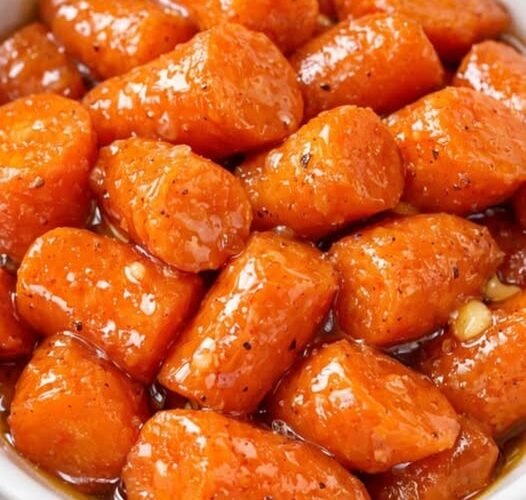
Brown Sugar Glazed Carrots
I used to think carrots were just… carrots. The thing you chop for soup or leave on the side of your plate. Then my mother-in-law made these at Easter dinner three years ago, and I watched my husband — who claims he doesn't like cooked vegetables — go back for thirds. I asked her what was in them, expecting some elaborate glaze recipe. She smiled and said, "Butter, brown sugar, and time." That's it. Three ingredients. But the way they come out — glossy, caramelized, with edges that catch the sweetness and a buttery glaze pooling at the bottom — it doesn't feel like three ingredients. It feels like the kind of side dish people remember. I make these now every time we need something that looks impressive but doesn't steal focus from the main dish. They're sweet enough to feel special, but they don't taste like dessert. Just deeply caramelized, melt-in-your-mouth tender, with that rich brown sugar glaze clinging to every bite. The first time I made them myself, I pulled them out of the oven and my daughter asked if they were candy. Close enough.Why You'll Love This Recipe
You will love these brown sugar glazed carrots because they turn a simple vegetable into something people actually fight over. You will love the glossy, buttery glaze that caramelizes around the edges and pools at the bottom of the pan. You will love how only three main ingredients and a little time produce a side dish that feels special. Most of all, you will love watching even the vegetable skeptics go back for seconds.Why This Recipe Works
Carrots roasted with butter and brown sugar undergo gentle caramelization that concentrates their natural sweetness. Covering them for the first half of baking steams them until tender. Uncovering for the second half allows the butter and sugar to reduce into a thick, glossy glaze that clings to every piece. A light seasoning of salt and pepper balances the sweetness so the carrots taste savory-sweet rather than dessert-like. Resting briefly after baking lets the glaze thicken further. The result is tender, deeply flavorful carrots that look and taste far more elaborate than the short ingredient list.Ingredients
Core Ingredients
- 2 lbs carrots, peeled and cut into 2-inch chunks
- ½ cup butter, melted
- ½ cup brown sugar, packed
- Salt and pepper to taste
- Optional: fresh thyme or parsley for garnish
Ingredient Breakdown
- 2 lbs carrots, peeled and cut into 2-inch chunks: The star of the dish — uniform pieces cook evenly.
- ½ cup butter, melted: Creates richness and helps the sugar form a glossy glaze.
- ½ cup brown sugar, packed: Provides deep caramel sweetness and helps with browning.
- Salt and pepper to taste: Balances the sweetness and enhances flavor.
- Optional: fresh thyme or parsley for garnish: Adds color and a fresh note.
Kitchen Equipment
A 9x13-inch or similar baking dish, foil, a spatula or spoon for stirring, and a peeler and knife for the carrots.Step-by-Step Instructions
- Preheat your oven to 375°F.
- Place the peeled and cut carrots in a baking dish. Pour the melted butter and brown sugar over them and toss until every piece is evenly coated.
- Season lightly with salt and pepper.
- Cover the dish tightly with foil and bake for 30 minutes.
- Remove the foil, stir the carrots gently, and return to the oven uncovered.
- Bake for another 20–25 minutes, stirring once halfway through, until the carrots are fork-tender and the glaze is thick and glossy.
- Let the carrots sit for a few minutes before serving — the glaze will thicken as they cool slightly.
- Garnish with fresh thyme or parsley if desired.
Expert Tips
- Cut the carrots into similar-sized pieces so they cook evenly.
- Use real butter for the best flavor and glossiest glaze.
- Pack the brown sugar firmly when measuring.
- Cover tightly for the first 30 minutes so the carrots steam and become tender.
- Uncover for the second half so the glaze can reduce and caramelize.
- Stir gently halfway through the uncovered baking to coat the carrots in the developing glaze.
- Don't skip the resting time — the glaze thickens beautifully as it cools slightly.
- A light hand with salt keeps the dish balanced.
- Fresh thyme adds an elegant touch for holidays.
- Baby carrots can be used in a pinch, though larger chunks look more rustic and appealing.
- Line the baking dish with foil or parchment for easier cleanup if desired.
- Double the recipe easily for larger gatherings.
- Make sure the foil seal is tight so moisture stays in during the first stage.
- Serve warm while the glaze is still glossy and fluid.
Common Mistakes to Avoid
- Cutting the carrots in uneven sizes so some are mushy and others underdone.
- Skipping the covered stage and ending up with dry or under-tender carrots.
- Leaving the foil on the whole time and missing the caramelized glaze.
- Using too little butter or sugar so the glaze doesn't form properly.
- Stirring too aggressively and breaking the carrots.
- Overbaking until the carrots turn mushy.
- Underbaking and leaving them too firm.
- Forgetting the salt and ending up with a one-note sweet dish.
- Serving immediately without resting so the glaze is still thin.
- Using diet or sugar-free substitutes that don't caramelize the same way.
- Crowding the pan so the carrots steam instead of glaze.
- Using cold butter that doesn't coat evenly.
- Adding the garnish too early so it wilts.
- Expecting the glaze to be thick straight from the oven — it thickens as it sits.
Ingredient Substitutions
- Butter can be replaced with olive oil or plant-based butter, though the flavor will be less rich.
- Brown sugar can be replaced with coconut sugar or a mix of white sugar and molasses.
- Carrots can be replaced with parsnips or a mix of root vegetables for variety.
Recipe Variations
- Classic: Keep the three ingredients as written.
- Cinnamon: Add a pinch of cinnamon to the butter and sugar.
- Maple: Replace half the brown sugar with pure maple syrup.
- Honey: Swap the brown sugar for honey, watching for faster browning.
- Garlic Herb: Add minced garlic and thyme with the butter.
- Spicy: Add a pinch of cayenne or red pepper flakes.
- Orange: Add a little orange zest or a splash of orange juice.
- Balsamic: Drizzle a little balsamic vinegar at the end.
- Pecan: Toss with toasted pecans before serving.
- Honey-Butter: Use half honey and half brown sugar.
- Smoky: Add a pinch of smoked paprika.
- Holiday: Finish with fresh thyme and a sprinkle of flaky salt.
- Baby Carrots: Use whole baby carrots for convenience.
- Extra Glaze: Increase butter and brown sugar slightly for more sauce.
Make It Healthier
Reduce the butter and brown sugar slightly, or replace half the butter with olive oil. The carrots themselves are nutritious, so modest portions of the glaze still let the vegetable shine.Meal Prep Guide
These carrots are best served fresh, but you can peel and cut them a day ahead and store them in the refrigerator. Reheat leftovers gently in the oven or on the stovetop with a splash of water to loosen the glaze.Storage
Cool completely, then store in an airtight container in the refrigerator for up to 4 days.Freezing
Not ideal — the texture of the carrots can become soft and the glaze may separate. Fresh is best.Reheating
Reheat in a 350°F oven for 10–15 minutes or gently on the stovetop over low heat. Add a teaspoon of water or butter if the glaze needs loosening.What to Serve With It
Roast chicken, glazed ham, turkey, pork tenderloin, or any holiday main dish. They also pair well with simple weeknight proteins.Beverage Pairings
Iced tea, sparkling water with lemon, a light white wine, or cider. The sweet glaze complements both savory mains and slightly sweet drinks.Frequently Asked Questions
Do these really only need three ingredients?
Yes — carrots, butter, and brown sugar are the core. Salt, pepper, and optional herbs are just for finishing.Why cover them first?
Covering steams the carrots so they become tender before the glaze reduces and caramelizes.Can I use baby carrots?
Yes — they work well and save prep time.Would you add a pinch of cinnamon, or keep them classic?
Both are delicious. Classic lets the butter and brown sugar shine; cinnamon adds cozy warmth.How do I know when they're done?
The carrots should be fork-tender and the glaze thick and glossy.Can I make them ahead?
They're best fresh, but leftovers reheat nicely.Why is my glaze too thin?
They may need a few more minutes uncovered, or a short rest to thicken.Why is my glaze too thick or sticky?
They may have cooked a bit long uncovered. A splash of water when reheating helps.Can I use honey instead of brown sugar?
Yes, though the flavor and browning will be slightly different.Do I need to peel the carrots?
Peeling gives a cleaner appearance and texture, but scrubbed unpeeled carrots also work.Can I add other spices?
A pinch of cinnamon, nutmeg, or ginger is lovely.Are these sweet like dessert?
They are sweet but still balanced and savory enough to serve as a side.Can I double the recipe?
Yes — use a larger baking dish or two pans so the carrots aren't crowded.What main dishes pair best?
Ham, turkey, roast chicken, pork, or beef all work beautifully.How long do leftovers keep?
Up to 4 days in the refrigerator.Nutrition Information
Approximate values will vary based on exact ingredients and portion size. Carrots provide vitamins and fiber; the butter and brown sugar add richness and sweetness. Values are estimates only and should not be considered professional nutritional advice. Per Serving (serves 8):- Calories: 195 kcal
- Carbohydrates: 24g
- Protein: 1g
- Fat: 11.5g
- Saturated Fat: 7g
- Cholesterol: 30mg
- Sodium: 230mg
- Fiber: 3g
- Sugar: 18g
Final Thoughts
These brown sugar glazed carrots prove that a few simple ingredients and a little time can turn an everyday vegetable into something memorable. Glossy, tender, and perfectly caramelized, they are the side dish that quietly steals the show. At about 35 cents a serving, three ingredients that barely move the grocery total look like they took real effort. I hope you make them the next time you need a reliable, crowd-pleasing side. I hope the glaze turns thick and shiny, the carrots come out fork-tender, and someone asks for the recipe before the pan is even empty. If you try them, I'd love to know whether you kept them classic or added a pinch of cinnamon. From my kitchen to yours — simple, glossy, and always finished to the last bite.Recipe
Brown Sugar Glazed Carrots
Glossy, caramelized carrots in a buttery brown sugar glaze — three ingredients and time.Ingredients
- 2 lbs carrots, peeled and cut into 2-inch chunks
- 1/2 cup butter, melted
- 1/2 cup brown sugar, packed
- Salt and pepper to taste
- Fresh thyme or parsley for garnish (optional)
Instructions
- Preheat the oven to 375°F.
- Toss the carrots with melted butter and brown sugar until evenly coated.
- Season lightly with salt and pepper.
- Cover tightly with foil and bake for 30 minutes.
- Uncover, stir gently, and bake 20-25 more minutes until fork-tender and glossy.
- Let rest a few minutes so the glaze thickens.
- Garnish with thyme or parsley if desired.
Notes
Cut carrots evenly for even cooking. Cover to steam tender, then uncover to caramelize. Don't skip the rest — the glaze thickens. Leftovers keep 4 days refrigerated. About 35 cents a serving.
Nutrition Information
Calories195
Protein1g
Carbs24g
Fat11.5g
Sat Fat7g
Cholesterol30mg
Sodium230mg
Fiber3g
Sugar18g