
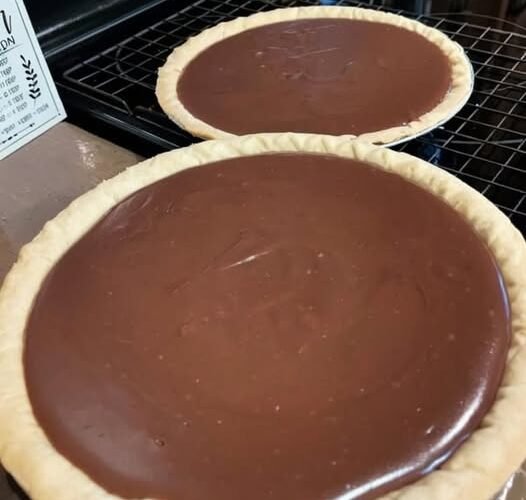
Old-Fashioned Chocolate Pie: MawMaw's Silky Cocoa Custard From Scratch
My husband's grandmother made this pie every holiday and most Sunday dinners, and he has been telling me about it for eleven years. MawMaw Hamrick's old-fashioned chocolate pie was the thing people fought over, the last slice that somebody always thought they'd taken. Last month his aunt finally handed me her handwritten card, the one with coffee ring marks on it, and I have been holding onto it like a document I wasn't sure I was cleared to interpret.
I made it yesterday and I was genuinely nervous, which is a strange thing to feel about a pie made from cocoa, sugar, milk, and egg yolks. I stood at the stove stirring constantly and worried I would ruin the one recipe his family actually trusts me with. Then he took one bite and went quiet, and he nodded, and he said, "That's it. That's exactly it." I might have cried a little, in the kitchen, by the stove, which is where most of my crying happens.
So this is a cooked chocolate custard, not a mousse pie, and not the whipped-cream-swiss-meringue-chocolate-pudding-double-thing that calls itself chocolate pie now. It is seven ingredients, it goes into a store-bought crust the way MawMaw did it, and it tastes like someone's kitchen on a Sunday afternoon in 1983. That is the whole pitch. It is unfashionable and I have never been happier about anything in my life.
Why You'll Love This Old-Fashioned Chocolate Pie
Because the filling is a real custard. Cooked, thickened, glossy, and dense enough to hold a clean edge when you cut it, and it settles in your mouth instead of dissolving. Nothing about it is airy, and that is the entire point. A slice holds its shape on a plate and keeps its texture on the fork.
Because the ingredient list is seven items long and you probably have six of them. Cocoa, sugar, cornstarch, salt, milk, butter, vanilla, and a crust. This is the kind of dessert that costs almost nothing and looks like you tried, which matters when you are making it for nine people on a holiday.
Because it works in a store-bought crust, and I will keep saying this until it stops surprising people. MawMaw Hamrick used a shelf-stable crust from a box and there is nothing wrong with that. No shame in it, no shortcut apology, no separate paragraph about how to bake your own. Pre-baked is what she used, it holds a wet custard better than most homemade crusts do, and it lets you spend your attention on the filling.
Because the recipe makes two pies, which means one is for right now and one is in the freezer for the Thursday nobody planned. That is not an accident of the ingredient list, that is a feature, and honestly it is the reason the scale of this recipe is what it is.
And because of the moment. Not the pie. The moment, when somebody you love takes a bite of something from their childhood and recognizes it immediately. You cannot engineer that with technique. You can only make the pie correctly and then hand it over.
Why This Old-Fashioned Chocolate Pie Works
Sugar, cocoa, cornstarch, and salt go in dry, whisked together with no lumps before any liquid arrives. That order is not a suggestion. Cocoa and cornstarch both clump the instant they hit liquid in an uneven stream, and once you have lumps in the pan there is no whisk clever enough to get them out. Whisking the dry first and then pouring the milk in slowly while whisking constantly is the entire anti-lump strategy, and there is no second chance.
Cooking until it bubbles is what activates the cornstarch. Cornstarch does not thicken by being present, it thickens when its starch granules burst under heat and water, which happens somewhere around a gentle simmer. If you pull it off the heat before it bubbles you get a filling that tastes right, pours smooth, and then fails to set in the crust two hours later. The bubbles are the reaction. Wait for them.
Tempering the yolks is about temperature, not flavor. You are raising three egg yolks from room temperature toward hot gradually, a spoonful at a time, whisking each one in fully before adding the next. Rush it and you drop hot milk into cold yolks and the proteins coagulate instantly into scrambled egg flecks floating in chocolate. Whisk slowly and they never experience a shock, and they stay smooth and yellow instead of turning grainy and pale.
Then the two minutes after tempering matter more than they look on paper. This is the cook that finishes the cornstarch activation and cooks the yolks all the way through. It is also the food safety step, since raw egg in a dessert you serve cold is not something to be casual about. Two full minutes of continuous stirring, no shortcuts, and the filling is thick, glossy, and cooked.
Butter and vanilla go in off the heat for a reason that is purely textural. Melting butter into a boiling custard can break the emulsion, because you are shaking up the proteins you just carefully stabilized. Off the heat it melts gently into the fat already present and you get the silky finish that defines the pie. Stir until the butter disappears completely, not just until you can no longer see a piece.
And the crust is pre-baked, which is not a suggestion either. This filling has roughly a cup and a half of liquid in each shell. An unbaked crust cannot absorb that in the time the pie spends in the fridge. The bottom turns grey, then wet, then soggy, and you get a chocolate soup sitting on a cracker. Pre-baked solves it completely.
Ingredient Breakdown
1 cup granulated sugar. Sweetens the custard and, less obviously, helps create the glossy surface. Sugar dissolved into a thickened liquid gives you that mirror finish on top when it chills, which is half of what makes this pie look like a holiday pie instead of just a chocolate one.
3 tablespoons unsweetened cocoa powder. This is the entire chocolate flavor, and it is the one place where substitutions need care. Natural unsweetened cocoa is traditional and what gives the pie its slightly rustic, old-fashioned color, which is a warm brown rather than a dark almost-black. Dutch process is darker and more acidic with a smoother finish, and you can use it, but it will change the color of the pie. Do not use sweetened cocoa, it will make the filling cloyingly sweet because the sugar formula does not account for it.
3 tablespoons cornstarch. The primary thickener, and the reason the pie slices. It gives you a dense, tender, custardy set rather than a gelatinous or gluey one. Do not substitute flour, which will taste raw and pasty in a filling with no baking time. This is not negotiable, and it is why the filling needs to actually bubble on the stove.
A pinch of salt. A quarter teaspoon or so. It does not make the pie salty, it makes the cocoa taste like more cocoa, and it cuts the sweetness just enough that a slice reads as rich rather than sugary. This is the most-skipped line in the recipe and the cheapest improvement in it.
2 cups whole milk. The base, and whole milk is specified because fat and milk proteins are what make this filling taste rich instead of thin. Two percent works in a pinch and you lose something you can taste but not identify. Skim milk is not a good swap here. Whatever fat you remove, the custard loses, and you also lose the body that stops the pie feeling watery two days later.
3 egg yolks, lightly beaten. Richness, color, and a share of the setting. Yolks are what make this a custard rather than just thickened chocolate, and they are what give it that deep golden-brown color instead of a dull brown. Beaten with a fork, no mixer, just enough to break them up.
2 tablespoons butter. Two things. It adds richness that reads as dairy rather than as butter, and it loosens a filling that cornstarch can turn slightly gluey, loosening it back to that silky, barely-thick consistency. Unsalted is specified. If you use salted butter, drop the pinch of salt, do not reduce everything, because the butter quantity matters for texture.
1 teaspoon vanilla extract. Rounds off the cocoa, warm and not distracting. Added off the heat with the butter, because extended cooking flattens vanilla and you lose the aroma entirely.
2 pre-baked 9-inch pie crusts. The vessel. Shelf-stable store-bought crusts are genuinely traditional here and structurally the right choice, since you need a shell that stands up to wet heat with no baking time of its own. If you make your own, bake it fully and let it cool completely before filling. If you want to go the gluten-free route, use a gluten-free pre-baked shell and expect it to be slightly more fragile when you slice.
Kitchen Equipment
A medium or medium-large saucepan. Medium, not small, because you need room for this to bubble without scorching, and if your pot is too small it will catch on the bottom before the cornstarch activates. A heavy-bottomed pot is better if you have one.
A whisk, and this is the tool that matters. Not a spoon. A whisk is how you keep the cocoa smooth from dry powder to finished filling, and the entire anti-lump plan depends on having one in your hand the whole time.
A small bowl for the egg yolks, a rubber spatula for smoothing the poured filling, and a fine-mesh strainer if you want to be obsessive about smoothness. Two 9-inch pie plates with rims, because the filling goes in hot and you want a lip. A wire cooling rack.
For slicing: a sharp thin-bladed knife, wiped between every cut, and a hot water pitcher to dunk the blade into.
Step-by-Step Instructions
Whisk the dry ingredients. In a medium saucepan, whisk together 1 cup granulated sugar, 3 tablespoons unsweetened cocoa powder, 3 tablespoons cornstarch, and a pinch of salt until completely smooth with no lumps. Take thirty seconds with this, longer if you think you need to. It is the step nobody does well and everybody regrets.
Add the milk slowly while whisking. Pour in 2 cups whole milk gradually, whisking constantly, until the mixture is entirely smooth with no dry pockets left at the bottom. Slow is the operative word. If you dump the milk in, you will have cocoa lumps that never come out.
Cook until it bubbles. Over medium heat, stir constantly until the mixture thickens noticeably and begins to bubble gently across the surface. This is when the cornstarch activates, so be patient and do not pull it early. Scrape the bottom to keep it from catching.
Temper the egg yolks. Remove the pan from the heat. Beat 3 egg yolks in a small bowl, then spoon a few tablespoons of the hot chocolate mixture into them while whisking briskly. It will thicken immediately. Stir that back into the pan until smooth, then repeat once more with another few tablespoons. Get the yolks up to temperature gradually and they will not scramble.
Return the pan and cook two more minutes. Put it back over medium-low heat and stir continuously for 2 full minutes, until the filling is thick, glossy, and coats the back of a spoon. This final cook is what finishes the thickening and cooks the eggs, so take the full two minutes.
Finish off the heat. Take the pan off the burner and stir in 2 tablespoons butter and 1 teaspoon vanilla, whisking until the butter has completely melted and the filling looks smooth and shiny. It should thicken slightly as it cools and you should see the surface turn glossy.
Pour into the crusts while hot. Spoon or pour the hot filling into 2 pre-baked 9-inch crusts, filling them about three-quarters of the way, and smooth the tops gently with a spatula. Each pie gets roughly a cup and a half, which is right for a custard pie. Pouring while hot is what gives you the smooth, level, shiny surface.
Cool 30 minutes at room temperature, then chill. Let the pies sit at room temperature for 30 minutes, which lets the steam escape instead of condensing under plastic wrap. Then refrigerate for at least 3 hours, or overnight, until fully firm.
Serve cold. Plain, or with a dollop of whipped cream. Cut with a hot clean knife, wiping between every slice, because the filling is soft and a cold blade will drag and tear instead of slicing.
Expert Tips
Whisk the dry ingredients before any liquid goes in. Cocoa clumps the moment it hits liquid unevenly and once lumps form they will not leave. Thirty seconds of dry whisking prevents every lump problem you will ever have with this recipe.
Stir constantly, and scrape the bottom. The milk solids and cocoa catch on the base of the pan fast, and what you scrape up is the best flavor in the whole pie.
Temper the yolks one spoonful at a time. Add hot liquid slowly while whisking, and stir each addition in completely before the next. Rushing this is the single most common way chocolate pie ends up with scrambled egg in it.
Whole milk for the creamiest filling. No substitution gives you the same texture, and the richness is the whole point of a chocolate custard as opposed to chocolate pudding.
Cook the full two minutes after tempering the yolks. This is where the cornstarch finishes thickening and the eggs finish cooking. Undershooting here gives you a pie that tastes correct and is not set.
Judge doneness by the spoon. The filling should coat the back of a spoon and look glossy, and it should bubble gently, not plop. If you run a finger across the pan and it leaves a clean line, you are there.
Pour while the filling is hot. Cold filling into a cold crust goes lumpy and matte. Hot filling settles into a smooth, level, shiny surface, which is what gives the top that bakery-window look.
Cool 30 minutes before covering. If you wrap a warm pie, condensation forms under the plastic and you get a wet top and a soggy crust. Thirty minutes at room temperature lets that moisture escape. Never cover a pie still hot.
Chill a full 3 hours minimum. Under-chilled custard cuts like pudding. Three hours gets you clean slices, overnight is better, and the flavor genuinely improves by the second day.
Store-bought pre-baked crusts are completely traditional. This is what grandmothers actually used, it is not a shortcut, and it produces a more reliable bottom crust than most homemade ones for a wet filling.
One recipe makes two pies. Freeze one. This is the single best practical reason to make the full batch, and it turns a holiday dessert into a Thursday dessert three weeks later.
Wipe the knife between cuts. A thin-bladed knife dipped in hot water and wiped dry after every slice is the only way to get clean edges through a soft custard.
A light dusting of cocoa or some dark chocolate curls at the end. It takes four seconds and it makes a plain pie look deliberate. Do this right before serving, not before storing, so it stays visible and dry.
Common Mistakes to Avoid
Adding milk too fast and creating lumps. The most common failure. Whisk the dry first, pour the milk in slowly, and whisk the entire time. Lumps cannot be beaten out once they are formed.
Walking away while the custard cooks. It scorches on the bottom within a couple of minutes and scorched cocoa ruins the batch. Stir continuously from the moment it hits the heat until it comes off the burner.
Adding egg yolks without tempering. Dropping hot chocolate mixture into cold yolks scrambles them, and you get pale flecks of cooked egg in a chocolate pie. Spoon it in a few tablespoons at a time, whisking.
Under-cooking after the yolks go in. Skipping or shortening the two minutes leaves you with a filling that is not set and eggs that are not fully cooked. Time it. Two full minutes of stirring.
Over-cooking it instead. This is the other end of the same problem. Boiling hard after the yolks go in thickens the filling past silky into something stiff and grainy. Medium-low after tempering, and keep stirring.
Using low-fat milk. Works, but you lose the fat that makes the custard feel rich and you lose body that keeps the pie from tasting thin a day later. If you must, go 2 percent, not skim.
Filling an unbaked crust. The filling has about a cup and a half of liquid per pie and the crust gets no baking time of its own. The bottom turns grey and soggy. Pre-baked only.
Covering the pie while it is warm. Trapped steam condenses, drips back into the filling, and leaves you with a wet top and a tacky crust. Thirty minutes uncovered first.
Cutting before it is fully chilled. Under-chilled custard slumps and the slices fall apart. Three hours minimum, overnight better, and wipe the knife between cuts.
Skipping the salt. It is a quarter teaspoon and it is doing real work. Without it the cocoa tastes flat and the sugar dominates. Do not add extra, just do not omit it.
Swapping in Dutch-process or sweetened cocoa casually. Dutch process works and makes a darker, smoother pie, which is a real change to the recipe. Sweetened cocoa will make it too sweet because the sugar quantity does not account for it. Use natural unsweetened, or adjust the sugar down by a tablespoon if you use sweetened.
Not stirring the butter in completely. A visible piece of butter in the filling means you stirred it in too quickly. Whisk it fully off the heat until the filling is uniformly glossy.
Expecting a mousse. This is a dense, silky custard. It is not light, it is not airy, and it is not supposed to be. If you want the whipped chocolate version, that is a different recipe, and it is not this one.
Storing uncovered. A refrigerated custard loses moisture fast and the surface dulls and cracks. Cover it, loosely with plastic wrap or foil so the wrap does not stick to the surface.
Ingredient Substitutions
2% milk for whole milk, in a pinch. One for one, and the filling will be slightly less rich and a hair less creamy. It still sets and still slices. Skim milk is not a good swap here.
Salted butter for unsalted. Works, but leave out the pinch of salt. Keep the quantity at 2 tablespoons because the butter is doing texture work, not just flavor work.
Store-bought versus homemade pre-baked crusts. Both work perfectly. Store-bought is more reliable for a wet custard and is what MawMaw used. Homemade is fine if you bake it fully and cool it completely first. Do not use a graham cracker crust unless you want a different pie, it is a real change in flavor and character.
Half the recipe for one pie. Halve everything and reduce the cook time slightly, watching for the bubble stage, which arrives faster in a smaller volume. This is the move if you want one pie and don't want a second one hanging around.
Recipe Variations
Classic. Exactly as written. This is the version that got the nod, and there is nothing wrong with it.
Single pie. Halve all ingredients for one 9-inch pie. Cook time shortens a little because a smaller volume thickens faster.
Meringue topping. Add a Swiss or French meringue on top and brown it lightly with a torch or under the broiler. Watch it closely, meringue goes from pale to burnt in under a minute.
Whipped cream. Served on the side or on top, sweetened with a little sugar and vanilla. This is the classic accompaniment and the reason the recipe ends with it.
Chocolate shavings. Dark chocolate curls from a peeler, right before serving. It looks like a bakery and takes almost no effort.
Espresso. Add 1/2 teaspoon instant espresso powder with the cocoa powder. It does not taste like coffee, it just makes the chocolate taste more like chocolate, which is a genuinely useful trick and the one variation here I would call essential.
Orange. Add 1 teaspoon orange zest along with the vanilla. Bright, and it works because the citrus cuts the sweetness the same way the salt does.
Coconut. Stir in 3 tablespoons toasted coconut off the heat. Good, but it is a departure and it is not this pie anymore.
Mini pies. Pour into mini pre-baked shells and shorten the chill slightly. Good for a party, but they set faster and dry out a touch quicker than full-size ones.
Make ahead. Prepare a day or two in advance. The texture improves noticeably by the second day and this is the best way to serve it on a holiday morning without being up at dawn.
Gluten-free. Use a gluten-free pre-baked shell. It works. Expect the crust to be more fragile when you slice, so bring the whole pie out and cut it on a board rather than trying to lift individual slices off the plate.
Extra dark. Increase the cocoa by 1 tablespoon for a more grown-up, less sweet pie. It will taste more intense and slightly less like the original.
Salted finish. A tiny sprinkle of flaky sea salt on top right before serving. It makes the plain version read as deliberate.
Double chocolate. Fold in a handful of mini chocolate chips after cooking, off the heat, so they melt into a thin shell. This is a real departure from a custard pie and worth knowing about before you commit to it.
Make It Healthier, Honestly
This is a chocolate custard pie made with a cup of sugar, whole milk, butter, and egg yolks. A slice is roughly 205 calories and 26 grams of carbohydrate. It is dessert, it is meant to be a treat, and I am not going to pretend otherwise.
What I will say is that this is one of the lighter desserts in the reasonable universe, and that is not nothing. Compare it to a slice of frosted layer cake or a mousse pie and this is roughly half the calories. The custard is not heavy because there is no cream in it, and using whole milk rather than a cream-thickened filling keeps it leaner than most pies of this type.
The one lever that actually matters is the milk. Swapping whole milk for 2 percent takes about 40 calories off a slice and reduces the fat meaningfully, and the filling still sets and still tastes like a chocolate custard pie. That is a real, honest change and I would not be sad about it.
Do not be tempted to swap the sugar down by more than a quarter cup. Cornstarch thickens based on liquid, not sugar, so reducing sugar will thin the filling slightly and change how it sets, and this pie is already at the edge of being delicate about that. A quarter cup is safe, more than that is a gamble.
What will not work: substituting a sugar-free sweetener, which does not behave like sugar in a cornstarch-thickened custard and tastes wrong; using a no-fat whipped topping, which is sweetened and does nothing for you; or skipping the crust, which would make this a bowl of pudding, not a pie.
Meal Prep Guide
This is the best make-ahead pie on the site. Make it a day or two ahead and it is better, not just older.
Make the pies up to two days ahead, cover loosely, and refrigerate. They slice cleanly and the flavor settles overnight. The overnight version is measurably better because the chocolate has time to fully meld with the dairy.
One pie can be frozen and saved for later, which is the reason to make the full batch of two. This scales to any holiday.
If you are serving a crowd, make them two days ahead and hold them cold. Bring out one pie 20 minutes before serving so it takes the fridge edge off without getting anywhere near room temperature for long.
You can also cook the filling a day ahead, refrigerate it covered, and pour it into warm crusts the day you serve. This works well and saves you 20 minutes on the day, though the pour-into-crust version is fresher and I would do that when you can.
Storage
Covered and refrigerated, this pie keeps for up to 4 days.
Cover loosely with plastic wrap or foil so the wrap does not stick to the surface, which will tear the top of the filling when you peel it off.
Because this is an egg and dairy custard, keep it cold the whole time it is out. Do not leave it sitting on a counter for more than about two hours, and less than that in a warm room.
If the surface dulls or develops a very thin crack in the fridge, that is normal custard behavior. It is still good. It firms back up a little as it comes toward serving temperature.
Freezing
Yes, and this is a genuinely good freezer pie.
Wrap the cooled, fully set pie tightly in plastic wrap and then foil or a freezer bag, and freeze for up to 1 month.
Thaw overnight in the refrigerator. Do not thaw it at room temperature and do not thaw it in a microwave, because you will wreck the texture and it is a chilled custard dessert served cold anyway.
The texture remains very good, better than most puddings or mousses, because the cornstarch and egg set holds up well through freezing. Slight weeping on the surface as it thaws is normal. Wipe it and it looks fine.
The custard freezes better than a whipped cream topping does, so if you froze a meringue-topped version, expect the meringue to soften. Freeze the plain ones.
This is where the second pie really earns its place. Make the full recipe, eat one, and put the other in the freezer for the week someone else needs a chocolate pie.
Reheating
This pie is served cold. Do not reheat it, and I would not make an exception.
Warm chocolate custard goes grainy, because the cornstarch and egg proteins that you carefully cooked together do not like being reheated. You will get a thinner, rougher filling and it will not slice.
If you want to eat it slightly less cold, take a slice out of the fridge and let it sit for 15 minutes before eating. That is the right move and it is the only one.
Serve it cold, with coffee, and stop there.
What to Serve With Old-Fashioned Chocolate Pie
A dollop of whipped cream, lightly sweetened. The classic, and it is all the pie needs. Real cream whipped with a spoonful of sugar and a little vanilla, not the canned stuff.
A cup of good coffee. Black, or with a little cream. The bitterness against the sugar and cocoa is what keeps a slice from being too much, and coffee is what this pie was made alongside.
Cold milk. For the kids, and for anyone who wants it, and it is genuinely the right answer for cutting the richness.
On its own, with a light dusting of cocoa. This pie does not need accompaniment. It is a complete dessert and it is not trying to be more than that.
For a dinner party, a small scoop of vanilla ice cream alongside, not on top, so it melts into the plate rather than sitting on the slice.
Beverage Pairings
Hot coffee, and the darker the better. A rich cocoa dessert against bitter coffee is a genuine balance, and this is the pairing I would serve first if you asked me for one answer.
Cold milk, which is what a nine-year-old will drink with this and what an adult should too. It cuts the fat and the sugar better than anything else here.
Black tea, English breakfast or Earl Grey. Gentler than coffee and it holds up if you are serving something after dinner rather than with it.
Cold water, and I am going to keep saying this. A glass of cold water is genuinely the best thing for a rich dessert, and it is the pairing people skip because it seems too simple.
A dry red wine, if you are serving this with adults at dinner. Something fruity and not heavy. Do not pair it with coffee, that combination is not for people.
One to avoid: sweet drinks, flavored coffees, and any dessert wine. Everything here is already sweet, and adding more sugar to a chocolate custard pie makes the whole plate cloying.
Frequently Asked Questions
Is this the same as chocolate cream pie? No, and this is the distinction that matters. This is a classic cooked chocolate custard pie, dense, glossy, and sliceable, made with whole milk and egg yolks thickened with cornstarch. A chocolate cream pie is a lighter, whipped mousse-style dessert, usually with more chocolate and often with whipped cream folded through it. They are different desserts that happen to share a name, and this old-fashioned chocolate pie is firmly the first one.
Why do I need to temper the egg yolks? Because adding hot liquid to cold eggs all at once scrambles them. Tempering raises the yolks' temperature gradually, a spoonful at a time, so they never hit a temperature that causes the proteins to seize. You get smooth, yellow, silky yolks instead of pale flecks floating in the chocolate.
Can I use a different milk? Whole milk gives the best texture and richness, and that is why it is specified. Two percent milk works and the filling will be slightly less creamy. Skim milk is not a good swap, because the fat is what gives the custard its body and you lose it entirely.
How do I know when the filling is thick enough? It should bubble gently across the surface, coat the back of a spoon, and look glossy rather than matte. The bubbles matter most, because that is the cornstarch activating. And remember the filling continues to thicken as it cools, so it will be firmer in the crust than it was in the pan.
Do the crusts need to be pre-baked? Yes. The filling goes into the crust hot and wet, and an unbaked crust cannot absorb that liquid before the pie is eaten, so the bottom turns soggy. Pre-baked crusts solve this completely, and store-bought pre-baked shells are genuinely traditional for this recipe.
Can I make one pie instead of two? Yes, halve every ingredient. Watch for the bubble stage a little sooner since a smaller volume thickens faster, and bake or buy a single shell. The texture and set are identical.
Why is my filling lumpy? Almost always because the milk went in too fast onto dry cocoa and cornstarch, or the dry ingredients were not whisked together thoroughly before the liquid arrived. Once lumps form they will not whisk out. Whisk the dry fully, then add the milk slowly while whisking the entire time.
How long does it need to chill? At least 3 hours. Overnight is better for clean slices and for the flavor to fully settle. Cutting before that gives you slices that slump and fall apart rather than hold a clean edge.
Can I add a meringue topping? Yes. A traditional Swiss or French meringue can go on top and be lightly browned, either with a torch or under the broiler. Keep your eye on it under the broiler, meringue goes from pale to burnt inside a minute.
Is cornstarch necessary? Yes, it is the primary thickener and the reason the pie slices cleanly. You cannot substitute flour for it in a filling with no baking time, because raw flour tastes pasty and will not dissolve into a smooth custard.
Can I use a graham cracker crust? You can, and it works, but it is a real change in the pie. You will get a sweeter, crunchier, more cookie-like dessert rather than MawMaw's version. If you want to stay true to the recipe, use a traditional pastry crust.
How long do leftovers keep? Up to 4 days in the refrigerator, covered loosely. This is a dairy and egg custard, so keep it cold the entire time it is out on a counter.
Can I freeze this old-fashioned chocolate pie? Yes. Wrap the cooled, set pie tightly and freeze for up to 1 month, then thaw overnight in the refrigerator. The cornstarch and egg set holds up well and the texture stays very good. Do not thaw it on the counter.
Why did my filling turn out too soft? Two likely causes. Either it did not bubble long enough before you tempered the yolks, so the cornstarch never fully activated, or the pie did not chill long enough, usually under three hours. Both leave you with a filling that tastes right but is not set enough to slice.
Nutrition Information
These are estimates. The yield is 2 pies from one recipe, each cut into 8 slices, for 16 slices total. Every figure below is calculated for one of those 16 slices and derived from ingredient weights.
Per slice: approximately 205 calories, about 26 grams of carbohydrate, roughly 8 grams of fat, around 3 grams of protein, and approximately 150 milligrams of sodium.
Where the calories come from: the sugar is roughly 48 calories of every slice, the milk and butter supply most of the fat, and the egg yolks add both fat and richness. The cocoa and the cornstarch round out the rest, with the crust contributing most of the fiber.
These are estimates from ingredient weights, so they will vary with your brand of pre-baked crust and store-bought cocoa, which is why the crust's label matters more here than in most pies. Treat the numbers as a guide rather than a measurement.
Allergens: milk and dairy, from the whole milk and butter, egg, wheat and gluten, from the standard pastry crust, and a trace of soy, which is common in commercial cocoa and pastry crusts. Check labels if that matters in your household.
Food safety: this filling contains raw egg that must be fully cooked. The two minutes of stirring after tempering the yolks is the step that cooks them, and it is not optional. Cool the filling before refrigerating, keep the finished pie refrigerated at all times, and do not leave it at room temperature for more than about two hours. Refrigerate leftovers within two hours and use inside 4 days.
This is not keto, not low-carb, not gluten-free, and not a health food. It is a 205-calorie slice of chocolate custard pie, which is honestly a reasonable number for dessert, and the point of it is that somebody took a bite and nodded.
Final Thoughts
I have made this pie maybe four times now and it has gone from the thing I was afraid of to the thing I make when I want the kitchen to smell like somebody else's childhood. It is only seven ingredients and it takes about fifteen minutes of actual cooking. Most of the time is stirring and then waiting three hours for it to set.
His aunt handed me the card with the coffee ring on it and I have thought about that a lot. Somebody stood in that kitchen and wrote out those numbers by hand, and the handwriting was not neat, and she did it anyway, and now here I am two generations later making it and getting it right. That is what a recipe actually is, it turns out. Not the ingredients. The fact that it was handed to you.
So make it for someone you love. Make it on a Tuesday if there is no special occasion, that is what it is for. And save one of the two in the freezer, because about three weeks from now somebody is going to have a bad week and you are going to be able to hand them something.
And when you make it, tell me who you gave it to. I want to hear that they nodded.
Seven Ingredients, Two Pies
Old-Fashioned Chocolate Pie
Cooked cocoa custard with whole milk, egg yolks, and cornstarch
Ingredients
- 1 cup granulated sugar
- 3 tablespoons unsweetened cocoa powdernatural, not sweetened
- 3 tablespoons cornstarch
- Pinch of salt, about 1/4 teaspoon
- 2 cups whole milk
- 3 large egg yolks, lightly beaten
- 2 tablespoons unsalted butter
- 1 teaspoon vanilla extract
- 2 pre-baked 9-inch pie crustsstore-bought is traditional
Step-by-Step Instructions
- Whisk together the sugar, cocoa powder, cornstarch, and salt in a medium saucepan until completely smooth with no lumps. Take your time here, this is the step that prevents every lump problem.
- Slowly pour in the whole milk while whisking constantly, until the mixture is fully smooth with no dry pockets at the bottom.
- Cook over medium heat, stirring constantly and scraping the bottom, until the mixture thickens noticeably and bubbles gently across the surface. The bubbles are the cornstarch activating, do not pull it off before then.
- Remove the pan from the heat. Spoon a few tablespoons of the hot mixture into the beaten egg yolks while whisking briskly, stir that back into the pan, then repeat once more with another few tablespoons.
- Return the pan to medium-low heat and stir continuously for 2 full minutes, until the filling is thick, glossy, and coats the back of a spoon. This finishes the thickening and cooks the eggs.
- Remove from the heat and stir in the butter and vanilla until the butter has fully melted and the filling looks smooth and glossy.
- Pour the hot filling into the two pre-baked 9-inch crusts, about three-quarters full each, and smooth the tops gently with a spatula.
- Cool at room temperature for 30 minutes, then refrigerate for at least 3 hours or overnight until fully set. Serve cold, plain or with whipped cream.
Cook's Notes
About 0.35 a slice, roughly 5.62 for the whole batch, which fills two 9-inch pies and yields 16 slices. The recipe is exactly what my husband's grandmother made.
Whisk the dry ingredients before any liquid goes in. Cocoa and cornstarch clump the instant they hit milk unevenly, and once lumps form no whisk will get them out. Pour the milk in slowly while whisking the entire time.
Cook until it actually bubbles. Cornstarch thickens when its starch granules burst under heat, which happens at a gentle simmer, not before. If you pull it off early you get a filling that pours smooth and then fails to set in the crust.
Temper the egg yolks one spoonful at a time, whisking each addition in fully. Rushing this drops hot chocolate into cold yolks and you get scrambled egg flecks in a chocolate pie.
Stir the butter and vanilla in off the heat, and stir until the butter is completely gone. Boiling butter into a custard can break the emulsion you just stabilized.
Pour into pre-baked crusts while the filling is hot for the smoothest, shiniest surface. Unbaked crusts cannot absorb that much liquid with no baking time of their own and will turn soggy.
Cool 30 minutes uncovered before refrigerating, or condensation forms under the wrap and makes the top wet and the crust tacky. Chill a full 3 hours, overnight is better, and it is genuinely more delicious on day two.
Allergens: milk and dairy, egg, wheat and gluten, and a trace of soy common in commercial cocoa and crusts. Raw egg in the filling, so cook the full 2 minutes after tempering, keep the pie cold, and refrigerate leftovers within 2 hours and use inside 4 days. About 205 calories, 26 grams of carbohydrate, and 8 grams of fat per slice. Not keto, not low-carb, not gluten-free, and a treat rather than a health food.
Nutrition Per Slice
Estimates, 2 pies cut into 16 slices.
Old-fashioned chocolate pie, cooked cocoa custard, serves 16 across two pies, about 0.35 a slice. Chill 3 hours minimum. Served cold, never reheated.