
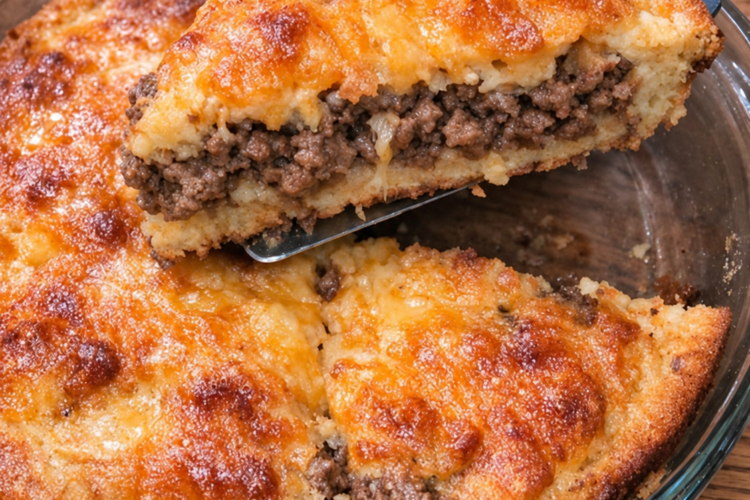
Cheeseburger Pie Recipe: An Oven-Baked Ground Beef Pie That Makes Its Own Crust
My neighbor clipped this from a magazine in 1976 and never stopped making it, and it is still the first thing requested at family reunions. That card has been in her kitchen for fifty years, grease-spotted and soft at the folds, and she has made this cheeseburger pie recipe probably four hundred times without ever once looking at the method. She browns the beef, she makes the batter, she pours it over the top, and everybody in that room knows what is coming. I finally asked her for it and she acted like I had asked for her will.
The whole idea is that there is no crust to make. The biscuit mix and the milk and the eggs bake into a crumb that sets underneath and around the beef, so the filling supports itself and you end up with something that is half casserole and half savory pie. It looks like a pie, it cuts like a pie, and it eats like a cheeseburger that fell asleep in a pie plate.
I make it on weeknights when I have ground beef in the freezer and nothing else going on. Forty minutes from the skillet to the table, one dish, one pan to wash, and it feeds six with enough left over for the person who eats second. It is the kind of retro weeknight dinner that only works because it has a handful of dependable ingredients and almost no fuss involved.
I am not going to tell you this is the cheapest dinner I have on the site, because it is not, and the price of ground beef decides that more than anything else. A serving runs about one dollar forty-six at my prices. What I will tell you is that it is the most forgiving, most requested, and most reliably impressive thing I can make out of a pound of beef and a box of baking mix, and that on a weeknight when you are tired, dependable is worth a lot more than cheap.
Why You'll Love This Cheeseburger Pie Recipe
Because there is no crust to make. That is the entire trick, and once you stop thinking of it as a pie with a missing step, it becomes the easiest thing in the rotation.
Because it feeds six from a 9-inch glass pie plate and one dish does the whole job. Skillet, bowl, pie plate, three items. There is no second side to bake because there are no sides. That is a real advantage over a cheeseburger casserole that needs its own time in the oven.
Because it is genuinely weeknight-fast. About 15 minutes of prep, a 25 to 30 minute bake, and a 5 minute rest. Forty minutes start to finish with almost nothing happening at any point.
Because it makes its own crust and the crust is genuinely good. The biscuit mix and the milk set into a tender, faintly sweet crumb on the bottom and up the sides, so every wedge has its own shell holding the beef in.
Because it converts a pound of ground beef into something that feels like a planned meal. Same beef, different expectations, and it lands as dinner rather than as Tuesday.
Because it travels and it reheats. Wedges reheat better than almost any other ground beef dish, which makes it a good thing to cook for people arriving late.
Because the cheese on top browns under the broiler for a couple of minutes and does something for the whole dish. Sharp cheddar, blistered and light brown, on a savory pie is not a small detail.
And because a 1976 magazine recipe that survives fifty years of family reunions has earned the benefit of the doubt that most internet recipes have not. This one has been stress-tested by an actual person at an actual table, repeatedly.
Why This Cheeseburger Pie Recipe Works
There is no magic here, and that is worth saying because a lot of recipes built on a good idea get buried under technique that does not exist. This one is four things happening at the same time, and once you can see them you can fix it when it goes wrong.
First, the beef has to be drained properly. This is the whole recipe in one instruction. Ground beef releases a great deal of rendered fat, and if that fat pools in the bottom of the pie plate it does two bad things at once: it keeps the milk-and-egg custard from setting properly, and it makes the finished dish heavy and greasy in a way people describe as wrong without knowing why. Drain it in a colander for a few minutes after you drain the liquid, until you can pick up a handful of beef and it feels like meat rather than grease.
Second, the batter settles around the filling rather than sitting on top of it. The egg proteins set in the heat coming off the beef and up from the melted fat, which is enough structure for the batter to grip the edges of the plate and become a crust without ever being rolled or shaped. That is why it works in a 9-inch glass pie plate and not in a loaf tin, and it is why the batter does not need to be thick.
Third, the fat is doing structural work, not just flavor work. A little rendered fat in the pan is what hydrates the biscuit mix at the edges. Too much fat and the bottom swims. No fat at all and the crumb stays dry and pasty. You are looking for a thin film, not a puddle and not a dry plate.
Fourth, the top cheese needs the last few minutes under heat. Shredded cheddar added from the start will mostly sink into the batter and burn at the edges. Added in the last few minutes, it melts on the surface, browns lightly, and forms a skin that keeps the custard underneath from weeping when you cut into it.
One note on this particular ratio. The milk and egg quantity here runs a little richer than the classic version people have printed on cards for decades, which means the center needs longer to set. If you pull it at 25 minutes and the middle is still liquid, that is not a mistake, it just needs three to five more minutes. Bake to the knife test, not to the clock.
Ingredient Breakdown
1 pound ground beef, 80/20 blend preferred. This is the entire filling and the flavor base of the dish. Eighty-twenty gives you enough fat for flavor and a tender texture. Ninety-three lean works and cuts roughly 60 calories and 7 grams of fat per serving, and you should absolutely use it if that is what is in the fridge, but the richer blend tastes more like the 1976 version. Avoid anything seasoned with packet mix or Worcestershire already in it, because the recipe seasons it.
1 small onion, finely chopped. About a third of a cup. It softens in the skillet alongside the beef and sweetens as it goes, which is what keeps the dish from tasting like plain beef. Dice it fine so it disappears into the filling instead of staying in chunks. A medium onion works if you like more, which is not a problem here.
1 cup shredded cheddar cheese, divided. Roughly two thirds goes on top for the melt and browning, and I recommend holding back about a third to fold into the beef if you like it richer. Sharp cheddar gives the most classic cheeseburger flavor. Monterey Jack melts smoother and milder, Colby is the closest affordable stand-in for a sharper American cheese, and a cheddar blend is fine. Do not use pre-shredded cheese with anti-caking powder on it, because that coating prevents a clean melt and turns the top grainy.
1/2 cup baking mix, about 60 grams. This is the crust, and the cup measurement matters more than it sounds. A dry biscuit mix such as Bisquick, or a generic equivalent, makes a crumb that is tender and slightly sweet. A self-rising flour blend works too and is usually identical in practice. Do not substitute a sugar-free or keto baking mix here without expecting a different result, because the small amount of sugar in a standard mix is part of why the crust tastes like a biscuit rather than like flour.
1 cup milk. About 240 grams. This hydrates the mix and, with the eggs, forms the custard that sets into the crust. Whole milk sets the richest version, 2% works and is what I usually use, and skim produces a slightly tighter, less tender crumb. Do not reduce this or the batter will not have enough liquid to spread and settle around the beef.
2 large eggs. The entire structure of the dish. Beaten with the milk and baking mix, they set into a custard that binds the filling and grips the plate. Room temperature eggs blend more smoothly into the milk, which reduces streaks, and any streaks left unbaked turn into rubbery patches.
Cooking spray or butter for the plate. Not optional, because the filling is fatty and dairy-rich and will bond to glass. Cooking spray is fine. Butter is better if you want the tiny bit of richness on the rim. If you are using butter, do not brown it for this.
Salt and black pepper. Season the beef lightly at the skillet stage, not heavily, because the baking mix and cheese both carry salt. Taste the filling before it goes in the plate and decide from there. This is where most people under-season and then blame the recipe.
Kitchen Equipment
A 9-inch glass pie plate. This is specified for a reason. The batter needs something with sloped sides to set against, and a glass plate lets you watch the edges set before the center does, which is the difference between pulling it at the right moment and guessing. A 9-inch pie plate or a 9-inch deep-dish works; a 10-inch will bake faster and give thinner wedges.
A skillet, preferably cast iron or heavy stainless, because you want the beef to brown and not steam. A nonstick pan works and is more forgiving about browning but you still need to drain the beef afterward.
A colander or fine-mesh strainer for draining, which is a step people skip and then wonder why the pie is greasy.
A mixing bowl and a whisk or a fork. A whisk is faster, a fork genuinely works.
A rubber spatula for spreading the beef to an even layer, and a paper towel for blotting the top of the beef dry if it looks greasy.
An oven mitt, obviously, and a knife that wipes clean between cuts so the wedges come out tidy rather than ragged.
Step-by-Step Instructions
Step 1: Preheat and grease the plate. Heat the oven to 400°F. Lightly grease a 9-inch glass pie plate with cooking spray or a thin layer of soft butter, working up the sides. Set it aside on a counter.
Step 2: Brown the beef and onion. Set a skillet over medium heat. Add the ground beef and the finely chopped onion, and cook it, breaking it up with a spatula as it goes, until the beef is thoroughly browned with no pink remaining and the onion is soft and translucent, about 7 to 8 minutes. Season with salt and pepper here, lightly.
Step 3: Drain the beef very well. Pour the beef and onion into a colander set over a bowl and let it drain for 3 to 4 minutes. Then pick up a handful and squeeze it. If it feels greasy rather than merely moist, keep draining. This is the single most important step in the recipe.
Step 4: Spread the filling. Scrape the drained beef and onion into the prepared pie plate and spread it into an even, compact layer about three-quarters of an inch thick, all the way to the edges. Press it down with the back of the spatula. If you folded in the reserved third of the cheddar, do that now, mixed into the beef.
Step 5: Whisk the batter. In a medium bowl, whisk the baking mix, the milk, and the eggs together until completely smooth and lump-free. Give it a full minute of whisking. If you see any streaks of white at the bottom, keep going.
Step 6: Pour it over the top. Pour the batter evenly over the beef, starting at the edge of the plate and working around in a circle so it flows down the sides. It settles into the dish and forms its own crust as it bakes, so do not try to spread it into a neat layer. Let it find the gaps and the corners on its own.
Step 7: Bake 25 to 30 minutes. Bake until the center is nearly set and a knife inserted into the middle comes out clean, checking from 25 minutes. If the middle is still liquid when you first check, give it three to five more minutes. The top should be lightly golden. Because this batter runs a little richer than most printed versions, underbaking is the more likely problem, not overbaking.
Step 8: Add the cheese and brown it. Sprinkle the remaining cheddar evenly over the entire top. Return the pie to the oven for 2 to 3 minutes, or run it under the broiler, until the cheese is fully melted and lightly browned on top. Watch it the whole time under the broiler, because it goes from perfect to scorched in under a minute.
Step 9: Rest, then slice. Remove from the oven and let it sit 5 minutes before cutting. This firms the custard enough that the wedges hold their shape on the plate instead of slumping.
Step 10: Serve. Cut into 6 wedges with a clean knife, wiping it between cuts. Serve warm, with whatever sides you have going.
Expert Tips
Drain the beef thoroughly. Not reasonably, not fairly well, thoroughly. Pick up a handful and squeeze it. If grease runs out between your fingers, keep going. This is the step that decides whether the pie is excellent or heavy.
Brown the beef properly, and give it room. If you crowd the skillet or stir it constantly, it steams instead of browning and you lose the flavor that a fifty-year-old recipe depends on. Leave it alone for a minute at a time.
Finely chop the onion. A small onion diced to the size of a grain of rice disappears into the beef and sweetens the whole filling. Chopped coarse, you get onion chunks in every bite and a different, more strongly onion-flavored dish.
Shred your own cheese if you care about the top. Pre-shredded cheese carries anti-caking powder that keeps it from melting smoothly and gives the surface a grainy texture once it browns.
Add the top cheese late. Two to three minutes before the end is right. From the start, it sinks and scorches.
Watch the broiler. Brie and cheddar go from blistered to black in about forty seconds once they are fully melted.
Press the beef down firmly and evenly in the plate. A loose layer gives you wedges that fall apart when you lift them, and a hollow center where the batter pools and stays wet.
Check at 25 minutes and trust the knife, not the clock. Wet batter needs three to five minutes more, and an over-baked pie is dry and rubbery.
Use room temperature eggs and milk. Cold eggs and cold milk beat into the mix less smoothly, and any streaks left unbaked become rubbery spots in the crust.
Grease the plate up the sides, not just the bottom. The batter grips the sloped walls, and that grip is what makes it a self-supporting crust.
Run the knife under hot water and wipe it dry between every cut. Ground beef and melted cheese are sticky, and a warm clean blade is the whole trick to six tidy wedges.
Let it rest the full 5 minutes. It looks ready and it is not, because the custard underneath is still setting.
Common Mistakes to Avoid
Not draining the beef enough. The single most common failure. Excess fat prevents the custard from setting and leaves you with a soggy, heavy bottom and a pie that tastes greasy instead of savory.
Adding the top cheese at the beginning. It sinks into the batter, burns at the edges, and leaves the surface pale. Cheese goes on in the last two to three minutes.
Leaving the broiler unattended. Shredded cheddar goes from melted and browned to blackened in under a minute. This is where people ruin an otherwise good pie.
Pulling it at 25 minutes regardless. This batter is richer than most printed versions. The center needs to actually set, and if you pull too early you get a soupy middle under a set top.
Baking it too long. The flip side. Once the knife comes out clean, it is done. Another ten minutes gives you a dry, tight crumb and a rubbery egg texture.
Not greasing the sides of the plate. The batter has to grip the sloped walls to become a crust. Dry glass means the edges release as a wet layer instead.
Using pre-shredded cheese and complaining about the texture. The anti-caking coating prevents a clean melt. It is a real difference once the top browns.
Skipping the salt. The filling tastes flat and the baking mix and cheese are not salted enough to cover it. Season at the skillet, taste, then decide.
Slicing it straight from the oven. The first wedge collapses and then everybody assumes the whole pie failed.
Using raw ground beef. Cook it through before it goes in the plate. The oven will cook it further, but it will not cook it evenly enough to count as safe, and the pie will be greasy and loose.
Pouring the batter in the center only. It pools and stays wet in the middle. Start at the edge and work around so it flows down the sides where it can set into a crust.
Crowding the skillet. Brown the beef in a layer with room around it. Steamed beef gives up none of the flavor this recipe is actually built on.
Ingredient Substitutions
93/7 or 90/10 ground beef. Works well and is the healthier swap, saving about 60 calories and 7 grams of fat per serving. The trade is slightly less rich flavor and a marginally drier texture. You do not need to add anything back; the milk and cheese carry it.
Turkey or chicken sausage instead of beef. Use about a pound of fully cooked sausage, browned first if it is raw, and drain it as carefully as the beef. This is not the 1976 version and it is not trying to be, but it works and it lowers the saturated fat considerably.
Monterey Jack, Colby, or a cheddar blend. All melt well. Sharp cheddar is the most classic cheeseburger flavor, Monterey Jack is the mildest and melts smoothest, and Colby is the closest cheap stand-in for a sharper American cheese. Avoid a heavily aged cheddar, which turns oily when it browns.
Any biscuit or baking mix. Store brand is fine and frequently identical to the name brand. A self-rising flour blend works as a straight swap. Do not use a sugar-free or keto baking blend expecting the same result, because the small amount of sugar in a standard mix is part of why the crust tastes like a biscuit.
2% or skim milk. 2% is what I use. Skim sets a tighter, less tender crumb but works. Do not reduce the quantity or omit it, because the batter needs the liquid to flow around the beef and form the crust.
Swap the onion for green onion. Thin-sliced green onion stirred in raw after the beef is drained gives a fresher, sharper note and works better if onion is not your thing. Cooked onion is the classic choice and sweeter.
Gluten-free baking mix. A certified gluten-free 1-to-1 baking blend will work and the crust is a minor part of the dish, so the texture difference is smaller here than in a real pie. Check the label, because many baking mixes contain wheat. I would not call the dish gluten-free with a standard mix in it.
Keto baking mix. It will technically work, but this is not a keto recipe and the crust will not taste like a biscuit, because the sugar is what makes it taste like one. Swap in the honest version rather than chasing a label.
Recipe Variations
Classic cheeseburger. Chopped dill pickle relish folded into the beef, a thin layer of mustard or ketchup on each wedge after baking, and a sprinkle of sesame seed. This is the version that gets the most requests.
Bacon cheeseburger pie. Cook 6 strips of bacon until crisp, crumble them into the drained beef, and stir the rendered bits through the batter. Add a few extra pieces on top with the cheese. You will need to drain the beef slightly less, because the bacon contributes fat.
Cheeseburger with mustard in the batter. Two tablespoons of yellow mustard whisked into the batter gives the whole dish a sharp, tangy edge that is genuinely cheeseburger-adjacent and costs nothing.
Onion and mushroom pie. Sauté 8 ounces of sliced mushrooms with an extra chopped onion until the moisture cooks off, then add to the beef. Do not add wet vegetables directly, or the crust will not set under them.
Taco pie. Add1/2 cup crushed tortilla chips to the batter, and top with a small amount of shredded lettuce and salsa after it comes out of the oven. Same architecture, different accent.
Cheeseburger pot pie version. Pour the batter as directed, then tuck 1 to 2 cups frozen mashed potatoes across the top before the cheese, dotted with butter, and bake 5 minutes longer. It reads as a pot pie and eats like one.
Mini pies. Use a9-inch plate divided by3 ramekins or a divided pie plate. Bake 18 to 22 minutes at the same 400°F and check earlier, since the batter is shallower. Good for a party.
Deep-dish double beef. Use 1.5 pounds of beef and the same 1/2 cup baking mix with 1.25 cups milk and 3 eggs, in a 9-inch deep-dish. Bake 30 to 35 minutes. The proportions scale roughly, but not perfectly, and the extra liquid is what keeps it from setting too dense.
Appetizer version. Bake in a9x13-inch pan in a thin layer and cut into 24 small squares with a mini quiche pan or a knife. Serves more, works for a crowd, and this is the shape most 1970s recipe cards actually used.
Make It Healthier, Honestly
Here is the thing that surprised me about this recipe when I worked out the numbers, and it is worth saying plainly: this pie has about 3 grams of sugar per serving, and essentially all of it is natural. There is no added sugar in the dish at all beyond what is in the milk, the eggs, the onion, and a few grams in the baking mix. That is unusual for something this rich-tasting, and it is a fact rather than a claim.
It is also about 5 grams of net carbohydrate per serving, which is low. But I am not going to call this keto, because the standard baking mix contains sugar and wheat, and a dish is not low-carb by accident. If you want keto, there is a different recipe and I would rather write that one honestly than relabel this.
The real levers, in order of how much they matter:
Swap 80/20 for 93/7 beef. That single change removes about 60 calories and 7 grams of saturated fat per serving, and it is the biggest available move. The pie still tastes like a cheeseburger pie.
Use 2% milk instead of whole. Saves about 30 calories and 2 grams of fat per serving with almost no detectable difference, because there is a lot of cheese in this dish doing the richness work.
Use Monterey Jack instead of sharp cheddar. Lower fat, and it melts smooth. You lose a little of the classic sharp-cheddar punch.
Cut the cheddar to 3/4 cup. Still browns, still melts, still reads as a cheeseburger pie, and saves real saturated fat.
Add 1/2 cup of finely diced bell pepper or a small amount of drained corn to the beef. It bulks the volume of the filling so a smaller amount of beef still looks generous, which is the highest-impact structural change available here.
What will not work: swapping in a sugar-free granular sweetener, because there is nothing here to sweeten anyway, so you would be adding a bulking agent for no
Brown, Pour, Bake, Slice
5-Ingredient Cheeseburger Pie Recipe
A pound of browned beef and onion under a biscuit-mix batter that sets into its own crust, finished with cheddar browned on top. One skillet, one pie plate, one oven, forty minutes.
Ingredients
- 1 lb ground beef (80/20 preferred)
- 1 small onion, finely chopped(about 1/3 cup)
- 1 cup shredded cheddar cheese, divided
- 1/2 cup baking mix (about 60 g, such as Bisquick)
- 1 cup milk
- 2 large eggs (room temperature)
- Cooking spray or butter, for the pie plate
- Salt and black pepper, to taste
For Serving
- Chopped dill pickles or pickle slices
- Dill pickle relish
- Yellow mustard and ketchup
- Crisp green salad
- Steamed green beans or roasted broccoli
- Fruit salad, potato wedges, or baked beans
Drain the beef thoroughly. That is the single most important step. Pick up a handful and squeeze it. If grease runs out between your fingers, keep draining. Excess fat keeps the custard from setting and makes the pie heavy.
Instructions
- Preheat and grease. Heat the oven to 400°F. Lightly grease a 9-inch glass pie plate, working up the sides, and set it aside.
- Brown the beef and onion. Over medium heat, cook the beef and finely chopped onion, breaking it up as it goes, until fully browned with no pink and the onion is soft, about 7 to 8 minutes. Season lightly.
- Drain very well. Pour into a colander over a bowl and drain 3 to 4 minutes. Squeeze a handful. If it feels greasy rather than moist, keep draining.
- Spread the filling. Scrape the beef into the plate and press it into an even three-quarter-inch layer to the edges. Fold in the reserved third of the cheddar if using.
- Whisk the batter. Whisk the baking mix, milk, and eggs together for a full minute, until completely smooth with no white streaks.
- Pour over the beef. Start at the edge of the plate and work around in a circle so it flows down the sides. Do not spread it. It settles and forms its own crust.
- Bake 25 to 30 minutes. Bake until a knife in the center comes out clean, checking from 25 minutes. If still liquid, give it 3 to 5 more. This batter runs richer than most printed versions, so underbaking is the more likely problem.
- Add cheese and brown it. Sprinkle the remaining cheddar over the top. Return to the oven for 2 to 3 minutes or run under the broiler until melted and lightly browned. Watch it constantly, because it scorches fast.
- Rest, then slice. Let it sit 5 minutes before cutting. Cut into 6 wedges with a knife dipped in hot water and wiped between cuts.
Cook's Notes
Costs are estimates based on store-brand ground beef, a store-brand baking mix, a bag of shredded cheddar, and a large carton of milk. Brand and location will move the total, and the price of ground beef is the single biggest variable. Assumes 6 servings from a 9-inch pie plate. This is not the cheapest recipe on the site, and the article says so rather than pretending otherwise.
- The one step that decides everything: drain the beef until a squeezed handful feels like meat, not grease. Too much fat in the plate keeps the milk-and-egg custard from setting and leaves you a soggy, heavy bottom. This is where most versions of this pie go wrong.
- Grease the sides of the plate, not just the bottom. The batter grips the sloped walls and that grip is what makes it a self-supporting crust. On dry glass the edges release as a wet layer instead.
- Pour at the edge, not the center. Starting at the rim and working around lets the batter flow down the sides where it can set into crust. Poured in the middle it just pools in a puddle and stays wet.
Nutrition (Labeled Estimates)
Approximate values for 1 of 6 wedges from a 9-inch glass pie plate, made with 80/20 ground beef, a small onion, shredded cheddar, biscuit baking mix, whole milk, and 2 eggs. Estimates only; actual values vary significantly by brand, particularly the ground beef blend and the cheese.
Sugar: approximately 4 g per serving, and there is no added sugar in the recipe. That figure comes entirely from the milk, eggs, onion, and the few grams in the baking mix. Worth knowing because it is unusual for something this rich-tasting. Contains milk, egg, wheat, and gluten. The baking mix is wheat flour, so this is not a gluten-free dish, and a standard mix also contains sugar, so this is not a keto recipe even though the net carb count happens to land low. Cooking safety: the eggs are raw in the batter and the beef is only partially cooked before baking, so the center must reach 160°F and come out clean at the knife test. Do not skip the thermometer on the beef. Ground beef carries a perishable-food risk when it is undercooked, and there is no margin here because the bake is short.