
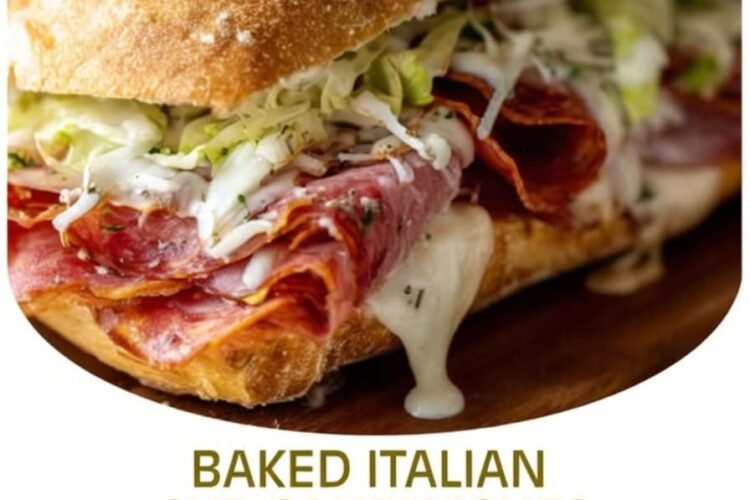
Baked Italian Subs: Crusty, Cheesy, Golden-Top Sandwiches Just Like the Deli
My dad used to bring home these massive Italian subs from a little deli downtown — the kind of place with a hand-lettered sign and a case full of cured meat — and we'd slide them into the oven until the cheese went melty and the tops of the bread turned golden and crispy. That feeling is what I've been chasing for years, and this baked italian subs recipe finally nails it. Crusty rolls, layers of salami and pepperoni, provolone bubbling over the edges, and a tangy shredded-lettuce situation on top that somehow makes the whole thing feel lighter even though it absolutely, demonstrably is not. The secret, and I say this having tried every other way, is baking them just long enough. Not so long that the bread goes hard, not so briefly that the cheese only half-melts — that sweet spot where the meat edges get a little crisp, the cheese melts down into every layer, and the crust of the roll toasts to a deep gold. Eight to ten minutes at 375°F. That's the whole window, and it's the difference between a sandwich and something that tastes like it came off a deli counter. The oven does the magic here: outside toasts, inside goes warm and gooey, and the whole thing smells like the best part of a Saturday. I made these for a casual Sunday dinner last week and my husband ate two, then asked if there were more. There weren't. There are never more, because four subs disappear faster than anything else I cook, which is why I now make them whenever there's a crowd, a game, or a lazy weekend lunch that needs to feel like a hug in sandwich form. The deli-meat and cheese shopping is the only real effort — after that it's layering and ten minutes in the oven, which is exactly the kind of dinner I want on a night when I've done enough already. They're honestly cheap, too: about eight dollars and fifty cents for four loaded subs, or roughly two dollars and fifteen cents each, which undercuts any deli on the same block. One honest heads-up before we start, since I'd rather you know going in: cured meats plus cheese plus rolls means this is a high-sodium sandwich — roughly 1,700 mg each — and the numbers are stated plainly in the nutrition panel below. It's a sometimes-food, a game-day food, and a dad's-car food. Let's make them.Why You'll Love These Baked Italian Subs
- Ten minutes of prep and ten minutes in the oven — hot, melty deli sandwiches on a weeknight.
- The oven toasts the roll and melts the cheese at the same time, so every layer is at its best at once.
- A tangy mayo-and-Italian-dressing spread that ties the lettuce and meat together and keeps the whole thing from tasting heavy.
- Roughly $8.50 for four loaded subs — about $2.15 each, well under deli counter prices.
- Endlessly scalable: they hold up perfectly for a crowd and can be built on sheet pans assembly-line style.
- Completely flexible on fillings — the meat, cheese, and optional veggies are all swappable.
Why This Recipe Works
Baking an assembled sandwich works because heat does two jobs at once in the same ten minutes. The roll's cut surface — face up, directly exposed — toasts and dehydrates slightly, which is what gives you that crisp, golden texture on top instead of a soft, steamed bun. Meanwhile, the heat works from below through the meat and cheese, melting the cheese into every fold of salami and pepperoni so it becomes a single warm, gooey layer rather than slices that slide apart. The one instruction that matters most: bake the bottoms with a lid off, so the bread can breathe and crisp instead of trapping steam and going soggy. Layering order is doing structural work too. Salami and pepperoni go down first, directly on the bread, because their fat renders slightly and bastes the bottom of the roll, which is what makes the base taste seasoned and rich. Cheese goes on top of the meat, where it can melt downward and fuse the slices together. If you reversed it — cheese on the bread, meat on top — the melted cheese would glue itself to the roll and the meat would dry out on top. Small thing, big difference, and it's why the recipe reads the way it does. Then there's the cold spread and the lettuce, and this is the underrated part of the whole sandwich. A hot, cheesy sub straight from the oven is rich and can feel heavy after three bites. The mayo-Italian-dressing mixture spread on the top half brings acid, herbs, and a little sweetness, and the shredded lettuce gives crunch and a cold, fresh contrast against the molten filling. Hot and cold, rich and tangy, soft and crisp — that's the entire reason a good Italian sub feels "lighter" even when the nutrition label says otherwise. It's a texture trick, and it works.Ingredient Breakdown
| Ingredient | What it does | Notes |
|---|---|---|
| 4 sub rolls or hoagie buns | The crusty delivery vehicle | A roll with a firm crust toasts best. Soft buns go soggy fast. Most standard rolls contain wheat. |
| 8 slices salami | Salty, fatty, savory base layer | Genoa-style is classic. Lay flat so the fat renders onto the bread. |
| 8 slices pepperoni | Spice and a slightly crisped edge | The thinner cuts crisp faster at the edges, which is the whole point. |
| 8 slices provolone or mozzarella | The melt that fuses everything | Provolone for sharper flavor, mozzarella for stretchier melt. Both good. |
| 1 cup shredded lettuce | Cold crunch that lightens the whole sandwich | Goes on after baking, never before. Iceberg shreds best; romaine works. |
| 1/2 cup mayonnaise | The base of the tangy spread | Full-fat mayo tastes best and holds the herbs. Light works if you must. |
| 2 tbsp Italian dressing | Acid, herbs, and the "lighter" feeling | Shake the bottle first. A vinaigrette-style dressing is what you want. |
| 1 tsp dried oregano | The deli-counter aroma and flavor | Crush it between your fingers before adding — it wakes it up. |
| 1/2 tsp garlic powder | Savory backbone for the spread | Powder, not fresh, so it doesn't add water. |
| Tomatoes, banana peppers, pickles (optional) | Freshness, heat, and crunch | Banana peppers are the classic move. Pickles add acid and snap. |
Kitchen Equipment You Actually Need
- Baking sheet — large enough to hold four open rolls in a single layer without crowding.
- Small mixing bowl and spoon — for the mayo, dressing, oregano, and garlic powder spread.
- Parchment paper or foil — the cheese will drip; this saves you a scouring session.
- Sharp serrated knife — for slicing the rolls cleanly in half lengthwise and then into halves for serving.
- Instant-read thermometer — optional, but the honest way to confirm the deli meat reached 165°F.
- Spatula or spoon — for spreading the mayo mixture onto the top halves.
Step-by-Step Instructions
- Heat the oven. Preheat to 375°F and line a baking sheet with parchment or foil.
- Open the rolls. Slice the sub rolls in half lengthwise and lay them open, cut side up, on the baking sheet.
- Layer the meat. Divide the salami and pepperoni evenly over the bottom halves of each roll. Lay the slices flat and overlapping so the whole surface is covered.
- Add the cheese. Top each with the provolone or mozzarella, covering the meat edge to edge so it melts over the whole sub.
- Bake 8–10 minutes. Until the cheese is fully melted and bubbling at the edges. Watch the last two minutes — that's when the meat edges crisp and the roll browns.
- Mix the spread. While they bake, stir together the mayo, Italian dressing, oregano, and garlic powder in a small bowl.
- Spread the tops. When the subs come out, spread the mayo mixture generously on the top halves of the rolls.
- Build and close. Pile on the shredded lettuce and add tomatoes or banana peppers if using. Close the sandwiches, press gently, slice in half, and serve while the cheese is still stretchy.
Two food-safety notes, stated plainly. First, deli meats are a known Listeria risk for pregnant people, older adults, and anyone immunocompromised — which is exactly why this recipe is baked rather than served cold. A thermometer in the center of the meat and cheese should read 165°F; the 8–10 minute bake gets you there, but check if anyone at the table is in a higher-risk group. Second, the shredded lettuce and the mayo spread go on after baking and should not sit out warm for long. Assemble, serve, and refrigerate leftovers within two hours.
Expert Tips
Firm rolls, not soft buns. The crust is what toasts into that golden, crisp top. A soft hot-dog-style bun steams and goes flabby under the cheese. If all you have is soft bread, toast the cut sides under the broiler for 60 seconds first.
Layer meat first, cheese second. The meat bastes the bread from below and the cheese melts down over it. Reversing the order glues the cheese to the roll and dries the meat.
Spread the cheese to the very edges. Cheese that touches the parchment crisps into a lacy, fried edge — that's the best bite on the whole pan and the thing that makes it look deli-made.
Watch the last two minutes. Every oven browns differently. The window between perfectly golden and burnt is roughly ninety seconds, and the meat edges are the first to go.
Dress the lettuce with the spread, not the bread. Spreading the mayo mixture on the top roll and then adding lettuce keeps the dressing where it belongs. It also keeps the bread from turning soggy under wet lettuce.
Serve immediately. This is a hot sandwich by definition. Five minutes on the counter and the cheese tightens and the lettuce wilts. Call people to the table while you're slicing.
Common Mistakes
Baking the lettuce. Shredded lettuce goes on after the oven, always. Baked lettuce is a sad, translucent thing with no crunch and no purpose.
Using soft bread. It collapses under the melted cheese and turns into a soggy log. Firm-crust sub rolls are the whole structural basis of the recipe.
Overloading with too much meat. Sounds impossible, but a three-inch pile of salami never gets hot in the middle and the sandwich won't close. Two slices each per sub is the tested amount.
Skipping the dressing in the spread. Mayo alone is flat and heavy. The Italian dressing brings the acid that makes the whole sandwich taste bright instead of dense.
Baking too long for extra crisp. Twelve minutes feels like "a little more golden" and delivers dried-out meat and a rock-hard roll. Eight to ten is the window.
Making them ahead and serving later. These are a cook-and-serve food. Assembled hours ahead, the dressing and lettuce turn the bread to mush. Prep the components, then assemble at the last minute.
Forgetting the parchment. Melted cheese drips. Without a liner you're soaking and scraping a baking sheet by hand, which is a worse way to spend the evening.
Ingredient Substitutions
| If you don't have… | Use… | Watch out for… |
|---|---|---|
| Salami | Ham, capicola, or turkey | Turkey is much leaner and dries faster — pull at 8 minutes. Capicola is the closest flavor match. |
| Pepperoni | Soppressata, chorizo, or extra salami | Spicier cured meats can throw a lot of oil. Blot them before layering. |
| Provolone or mozzarella | Swiss, fontina, or a shredded Italian blend | Shredded blends melt faster — check at 6–7 minutes. Fontina is the best melt here. |
| Sub rolls (gluten-free) | Certified gluten-free sub rolls or a GF baguette | The verified route to a GF version. GF bread toasts faster — check at 6–7 minutes; it can go hard quickly. |
| Mayonnaise | Full-fat Greek yogurt or a mix of half mayo, half yogurt | Thicker and tangier. Whisk in the dressing a spoon at a time so it doesn't break. |
| Italian dressing | Red wine vinegar + olive oil + a pinch of oregano, whisked | Make it just before using — 2 tbsp vinegar to 4 tbsp oil. |
| Shredded lettuce | Shredded cabbage, frisée, or a slaw mix | Cabbage gives more crunch and stays crisp longer. Excellent swap. |
| Banana peppers | Pickled jalapeños, pepperoncini, or giardiniera | Giardiniera is the Chicago move and turns this into a different, louder sandwich. |
Variations
- Spicy Italian. Add hot capicola and pickled jalapeños, plus a pinch of crushed red pepper in the spread. This is the version for people who keep hot sauce on the table.
- Chicken parm sub. Swap the cured meats for breaded chicken cutlets, add marinara over the cheese before baking, and finish with basil. Same method, different sandwich entirely.
- Meatball sub. Meatballs in marinara under the cheese, baked 12–15 minutes so the meatballs heat through. Add an extra couple of minutes.
- Hot ham and cheese. Ham, Swiss, honey mustard spread in place of the mayo mix, and a butter brush on the roll before baking.
- Slider party version. Use 12 slider rolls on a sheet pan, butter-and-oregano-brush the tops, cover with foil for the first 10 minutes, then uncover for 5. Built for a crowd.
- Giardiniera Italian. Skip the lettuce entirely, pile on chopped giardiniera after baking, and drizzle the spread over it. Loud, crunchy, and worth it.
Make It Healthier
I'll be straight with you: cured meat, cheese, mayo, and a white roll is not a health food, and the sodium is genuinely high. But there are levers that work. Swapping the mayo for Greek yogurt in the spread cuts a lot of fat without changing the tang. Going light on the cheese — one slice per sub instead of two — still gives you the melt people came for, at roughly half the cheese calories. Adding more lettuce, tomato, and banana peppers is free nutrition and actually improves the sandwich because the contrast is what makes it feel light. On the meat, turkey or lean ham in place of salami and pepperoni drops the fat significantly, though it changes the flavor profile from "Italian deli" to "lighter sub" — a fair trade depending on the night. If you keep the classic build, the honest move is portion and frequency: one sub is a filling meal at around 750 calories, so it's the second sub that tips it, not the first. The protein lands around 29 grams, which is real and worth noting. What I won't do is pretend this is a light recipe. It's a satisfying one, and sometimes that's the more honest goal.Meal Prep
This is an assemble-and-bake recipe, so the prep-ahead that helps is component prep. Slice the rolls and store them in a zip-top bag at room temperature up to a day. Shred the lettuce and keep it in a sealed container lined with a paper towel (it stays crisp for 2–3 days). Mix the mayo spread up to 3 days ahead and refrigerate it in a jar — the flavor actually improves as the oregano blooms. The meats and cheese can be portioned into four piles on a plate and covered in the fridge the night before, turning dinner into pure assembly. What you should not do is build the sandwiches ahead. Dressing and lettuce on bread equals a soggy sub within an hour, and the whole point of this recipe is the crisp toasted roll. If you're feeding a crowd, set up a station: baking sheet with the meat-and-cheese bottoms ready to go, spread and lettuce and toppings on the counter, and a rhythm of bake-slice-serve. Two sheet pans alternating through the oven keeps hot subs coming while the first batch gets eaten, which is the only way to feed more than four people hot Italian subs at once.Storage
Leftover subs are a compromise — this is a hot sandwich, and cold it's just a sandwich. If you have leftovers, keep the components separate: store the baked meat-and-cheese halves covered in the refrigerator for up to 3 days, and keep the lettuce and spread in their own containers. Reassemble and reheat as below. A fully assembled sub that sat out or went in the fridge as one unit will be soggy by the next day; the flavor is still there, but the texture is gone. Deli meats themselves keep 3–5 days in the refrigerator once opened, and cheese about a week. Keep an eye on the lettuce — once it starts going translucent it's done, and no amount of reheating brings it back. The honest truth about this recipe is that it's built for the moment it comes out of the oven, so if you're cooking for four, cook for exactly four. Very rarely is there anything left to store.Freezing
You can freeze the meat-and-cheese halves, and it's a decent weekday shortcut. Assemble the bottoms with salami, pepperoni, and cheese (no spread, no lettuce), wrap tightly in foil, and freeze up to 2 months. To serve, bake from frozen — foil on for the first 10 minutes, then open and bake another 6–8 minutes to crisp, until the cheese bubbles and the center hits 165°F. Add the spread and lettuce fresh. The roll toasts more slowly from frozen but comes back surprisingly well. What you should not freeze is the fully built sandwich with spread and lettuce — the lettuce turns to mush and the dressing separates into the bread. And freezing baked, assembled sandwiches is worse than freezing the raw components, because twice-cooked cured meat gets tough and salty. If you're planning ahead, freeze the fillings, not the finished product. The components hold; the sandwich doesn't.Reheating
The oven is the right answer: 350°F for 8–10 minutes, directly on a lined sheet, until the cheese is bubbling and the roll re-crisps. Cover loosely with foil for the first four minutes if the top is browning before the center is hot, then uncover. An air fryer at 350°F does it even better in 4–5 minutes and re-crisps the crust like it was built for this job — if you have one, use it. The microwave is a texture sacrifice: 30–45 seconds gets the cheese molten but leaves the roll soft and chewy. If you must, follow the microwave with 90 seconds in a toaster oven to bring the outside back. Never reheat this sandwich at high heat or for long — the meat dries, the cheese splits into oil, and a perfectly good sub becomes a mediocre one. Warm, melty, and quick is the target.What to Serve With Them
These are a meal on their own, so the sides are about contrast and convenience, not filling the plate more. A pile of potato chips and a dill pickle is the classic deli-counter plate and it's classic for a reason — the salt and the snap of the pickle cut the richness of the melted cheese. A tangy coleslaw or a vinegar-based pasta salad does the same job with more substance and travels well to a cookout. On a game-day table, put the subs next to a big bowl of chips, a pickle platter, and something cold and crunchy. If you're building a heartier Sunday dinner rather than a game-day spread, a light Italian-style salad with a sharp vinaigrette is the overlooked best pairing here. The acidity of the dressing mirrors the spread and keeps the whole meal from feeling like a pile of bread and cheese. And if you want to round out a bigger sandwich night, these sit naturally beside other oven-baked handhelds — the tangy, crunchy finish here complements a hot, cheesy sandwich of a different kind beautifully, and the two together will feed a table of picky eaters without complaint.Beverage Pairings
For a sandwich night, a cold soda is the honest, perfect pairing — a root beer or a cream soda with the salty cured meat is nostalgia in a glass, and there's no need to overthink it. For beer, an Italian-style lager or a crisp pilsner is the deli answer, and a hoppy pale ale works if you want the bitterness to cut the cheese. If you're pouring wine, keep it Italian and unpretentious: a Sangiovese or a Chianti with a slight chill stands up to the salty meat and tomato, and a dry Lambrusco with its fizz is the fun, correct choice. Non-alcoholic: an iced tea with lemon is great against the salt, and sparkling water with a squeeze of lemon resets the palate between bites better than anything on the table. Kids will want milk or juice and should get it. And if someone hands you a cold beer and a hot Italian sub at a game-day party, you've achieved the intended experience — don't overcomplicate the moment.Frequently Asked Questions
Can I make baked Italian subs ahead of time?
You can prep every component ahead, but don't build the sandwiches until you're ready to bake. Slice rolls and store them at room temperature, shred lettuce and keep it crisp with a paper towel, and mix the spread up to three days ahead. Assembled-but-unbaked subs can sit for about 30 minutes, no more — after that the dressing and any tomato start to soften the bread, and the crisp toasted roll is the whole point.How do I keep the bread from getting soggy?
Four things. Use a firm-crust sub roll rather than a soft bun. Layer the meat first so its rendered fat seals the bread instead of water from the toppings soaking in. Keep the lettuce and the mayo spread off the sandwich until after baking. And don't assemble early — build and bake in the same twenty minutes, then eat immediately. Do those and the roll stays crunchy even under all that melted cheese.What's the best cheese for baked Italian subs?
Provolone is the classic and my default — it has enough sharpness to stand up to the salty cured meat, and it melts into a nice stretch. Mozzarella is the choice when you want a milder, stretchier melt. A shredded Italian blend or fontina also works and melts faster, so check at 6–7 minutes instead of 8–10. Avoid anything very hard like Parmesan alone; it won't melt into the gooey layer you're after.Can I add lettuce before baking?
No — shredded lettuce always goes on after the oven. Baked lettuce turns limp and translucent, loses all its crunch, and releases water that sogs the bread. The whole reason the lettuce works here is the hot-and-cold contrast against the melted cheese, and that only happens if it's fresh and cold when the sub comes out. Add it in the last thirty seconds before serving.How much meat and cheese per sub?
Two slices each of salami and pepperoni and two slices of cheese per sub, as written, is the tested amount. It fills the roll, melts evenly, and still closes without falling apart. Piling on more feels generous but creates a cold center that never heats through in a 10-minute bake and a sandwich that won't hold together. If you want them meatier, use a wider roll rather than a taller pile.Can I make these gluten-free?
Yes, with one swap: use certified gluten-free sub rolls or a GF baguette. That substitution is the only basis for calling these gluten-free. Everything else — the meats, cheese, mayo, dressing, and spices — is naturally gluten-free, though you should check your Italian dressing and any cured meat labels for additives. GF bread toasts faster than wheat, so start checking at 6–7 minutes; it can go hard in a hurry.How do I make these for a crowd?
Work in batches on sheet pans, and don't crowd the rolls — they need room around them to toast. Set up an assembly line: meat-and-cheese bottoms onto pans, one pan in the oven at a time, spread and lettuce and toppings on the counter, and a rhythm of bake-slice-serve. Two pans alternating keeps hot subs coming while the first batch is being eaten. Or switch to the slider version — 12 small rolls on one pan, foil on for the first 10 minutes, then uncovered for 5.Is this recipe healthy?
Not really, and I'd rather say so plainly. Each sub runs about 750 calories and roughly 1,700 mg of sodium, mostly from the cured meats, cheese, and bread. It's a satisfying, nostalgic, occasionally-food — not an everyday lunch. The honest levers if you want it lighter: swap the mayo for Greek yogurt, use one slice of cheese instead of two, pile on extra lettuce and peppers, or go with turkey instead of salami and pepperoni. Protein is around 29 grams per sub, which is a genuine bright spot.Nutrition Facts (Estimated)
| Per sub (1 of 4, classic build) | Amount |
|---|---|
| Calories | ~750 |
| Total Fat | ~47 g |
| Saturated Fat | ~13 g |
| Carbohydrates | ~45 g |
| Sugars | ~4 g |
| Protein | ~29 g |
| Sodium | ~1,700 mg |
Final Thoughts
These baked Italian subs are as close as I've gotten to the ones my dad carried home from that little downtown deli — crusty roll, crisp-edged cured meat, cheese melted into every layer, and that tangy shredded lettuce on top doing its underrated job. Ten minutes to assemble, eight to ten minutes in the oven, and about two dollars and fifteen cents a sub. My husband ate two and asked for more, which is the highest rating this kitchen issues. On the extra-pepperoni question: my honest answer is classic for the first batch so you can taste how the balance works, then go heavier on the pepperoni next time if you want it loud. The pepperoni edges crisp in the oven and every extra slice makes the sandwich saltier and spicier, which is great for game day and a little much for a quiet Sunday. Either way, serve them hot, slice them down the middle while the cheese is still stretching, and get everyone to the table before the lettuce wilts. Then save the recipe for the next crowd, the next game, or the next night you want something that feels like a hug in sandwich form.Baked Italian Subs
Crusty rolls, crisp-edged salami and pepperoni, molten cheese, tangy shredded lettuceIngredients
Directions
- Preheat oven to 375°F. Slice the sub rolls in half lengthwise and lay them open on a lined baking sheet.
- Layer the salami and pepperoni evenly over the bottom halves, then top with the provolone or mozzarella, edge to edge.
- Bake 8–10 minutes, until the cheese is fully melted and bubbling at the edges.
- While they bake, mix the mayo, Italian dressing, oregano, and garlic powder in a small bowl.
- Spread the mayo mixture onto the top halves of the rolls.
- Pile on the shredded lettuce and add tomatoes or banana peppers if using. Close, slice in half, and serve warm.
Cost: about $8.50 per batch — roughly $2.15 per sub.
Tip: firm-crust rolls, not soft buns. The crust is what toasts golden; soft bread goes soggy.
Tip: lettuce and the mayo spread go on after baking, never before.
Sodium: about 1,700 mg per sub — cured meat, cheese, and bread add up fast. Serve with unsalted sides.
Gluten-free: not as written. Use certified GF sub rolls — check the dressing and meat labels too.
Nutrition (estimated per sub)
750Calories
29 gProtein
47 gFat
45 gCarbs
4 gSugar
1,700 mgSodium
Estimates only — not medical or dietary advice. Values vary by brand. Sodium is high by design here: enjoy it as an occasional meal with plenty of water.