
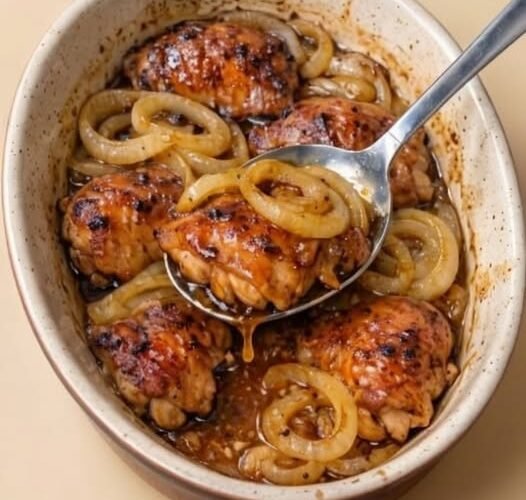
Honey Soy Chicken Thighs: The 1971 Skillet Dinner That Still Feels Like Sunday
These honey soy chicken thighs come from a recipe my mother-in-law clipped from a magazine in 1971 and made every August until she couldn't cook anymore. The paper's yellowed and splattered and I can't imagine summer without it, so now I carry on the tradition. There's something about chicken thighs cooked low and slow with onions that just sweetens everything — the onions practically melt into the pan drippings, and the glaze gets deep and caramelized around the edges. My husband still talks about eating this at his mom's table when he was a kid, and says the smell alone made him feel like everything was right in the world. I make it on Sundays now, when we need something comforting but don't want to stand over the stove. It's one of those recipes that does all the work for you while you sit on the porch with iced tea. You sear the thighs until the skin is deeply golden and crackling, pile in a mountain of sliced onions to catch all those browned bits, whisk together a simple four-ingredient sauce, and then the whole skillet goes into the oven and you walk away. Forty minutes later you pull out glossy, sticky, fall-apart-tender chicken sitting on a bed of jammy onions with a pan sauce that you'll want to spoon over everything in sight. What I love most is how little it asks for how much it gives back. The sauce is only soy sauce, honey, apple cider vinegar, and garlic, and that combination is genuinely greater than the sum of its parts — salty, sweet, tangy, and savory all at once, reducing down in the oven into something thick and lacquered that clings to the chicken. Bone-in, skin-on thighs are the right call here, because their fat and connective tissue keep them juicy through a long bake in a way that lean breasts simply won't. And the onions, cooked in those drippings, turn soft and sweet and almost jammy, which is honestly my favorite part of the whole dish. The honest notes are these. It's genuinely high in protein at about 24 grams a serving, mostly from the chicken, and I state that as a number rather than a claim. It is not gluten-free as written, because soy sauce contains wheat — tamari makes it gluten-free, so that's a swap rather than a tweak. It's not low-carb or keto, since honey is sugar, though a sugar-free sweetener and tamari make a much lower-carb version. And sodium is the honest headline: about 1,100 milligrams a serving, because a third of a cup of soy sauce plus added salt is a lot. Low-sodium soy sauce or tamari brings that down to roughly 650 milligrams, so do that if you're watching it. Chicken needs to reach 165°F, and the leftovers, if there are any, are even better the next day. Let's make it.Why You'll Love These Honey Soy Chicken Thighs
- A 1971 heirloom recipe that still tastes like a Sunday well spent.
- Sticky, glossy, sweet-savory glaze that caramelizes around the edges.
- Juicy, tender bone-in thighs that stay moist through a long bake.
- Sweet, jammy onions cooked down in the pan drippings.
- One skillet, four-ingredient sauce, and the oven does the rest.
- Genuinely high in protein at about 24 grams a serving.
- Feeds six for about $1.75 a serving — real value.
- Tastes even better the next day, and the sauce is incredible over rice.
Why This Honey Soy Chicken Thighs Recipe Works
This recipe works because every step builds flavor that the next step leans on. Searing the chicken skin-side down first isn't just about crispy skin — those deeply browned bits left in the pan are pure concentrated flavor, and when you cook the onions in that same skillet, they lift those bits up and become the savory foundation of the whole dish. Skip the sear and you skip the best part. Bone-in, skin-on thighs are also doing structural work: the bone and the fat under the skin keep the meat juicy during a 35-to-40-minute oven bake, and the rendered fat helps the sauce reduce and thicken into that glossy glaze. The sauce is a textbook balance of the four tastes, and that's why it works so reliably. Soy sauce brings salt and deep umami, honey brings sweetness and body and is what caramelizes into that sticky lacquer, apple cider vinegar brings just enough acid to keep the sweetness from turning cloying, and garlic brings a sharp, aromatic backbone. Pouring it over the chicken and baking uncovered is deliberate: the open oven lets the sauce reduce and concentrate around the chicken instead of staying thin and watery, so by the time the chicken is cooked through, the sauce has tightened into something you'd pay for at a restaurant. The onions are the quiet hero and the reason this dish feels different from a plain soy-glazed chicken. Sliced into rings and nestled under and around the thighs, they slowly soften in the sauce and drippings, turning sweet, silky, and almost jammy. They soak up all that honey-soy-garlic flavor and end up as a savory-sweet pile that's as good as the chicken itself — which is why my husband always asks for extra onions, and why you should spoon them generously over whatever you serve this with. That layering of chicken on top and onions below is what makes the whole thing taste like it was tended all afternoon, when really it just sat in the oven unattended.Ingredient Breakdown
| Ingredient | What it does | Notes |
|---|---|---|
| 6–8 bone-in, skin-on chicken thighs | The star — juicy, flavorful, and built for a long bake | Keep the skin on for crispness and the bone in for juiciness. Must reach 165°F. Boneless thighs will dry out faster. |
| 2 large yellow onions, sliced into rings | Sweet, jammy base that soaks up the glaze and drippings | Slice evenly so they cook at the same rate. Yellow onions are sweetest; white works too. |
| 1/3 cup soy sauce | Salt, umami, and the savory backbone of the glaze | The main sodium source. Low-sodium soy or tamari cuts it nearly in half; tamari also makes it gluten-free. |
| 1/4 cup honey | Sweetness and the glossy, caramelized lacquer | Brown sugar is a fine swap. To cut sugar, use a sugar-free honey substitute. |
| 2 tablespoons apple cider vinegar | Balances the sweet and salty and brightens the glaze | Don't skip it — without the acid, the honey turns cloying. Rice vinegar or white vinegar work too. |
| 3 cloves garlic, minced | Aromatic depth and a pungent backbone | Fresh is best. Garlic powder works in a pinch (about 3/4 teaspoon). |
| Salt, black pepper | Seasoning the chicken before searing | Go lighter on the salt than you think — the soy sauce brings plenty. Pepper is more important here. |
| 1 tablespoon olive oil | For searing the chicken | Any neutral high-heat oil works. The chicken renders plenty of its own fat anyway. |
The one thing to get right: pat the thighs completely dry and sear them skin-side down until deeply golden. That crisp, rendered skin and those browned pan bits are the whole flavor foundation — and wet chicken steams instead of searing.
Kitchen Equipment You Actually Need
- Large oven-safe skillet — a 12-inch cast-iron or stainless skillet is ideal. It needs to go from stovetop to oven and hold all the chicken and onions.
- Tongs — for searing and turning the chicken without piercing the skin.
- Small bowl and whisk — for the sauce.
- Knife and cutting board — for slicing the onions and mincing the garlic.
- Paper towels — for patting the thighs dry, which is what makes them sear properly.
- Spoon — to baste the chicken and spoon the onions and drippings over at the end.
- Instant-read thermometer — the reliable way to confirm the chicken reaches 165°F.
- Aluminum foil — to tent the skillet if the glaze starts browning too fast.
Step-by-Step Instructions
- Preheat. Preheat the oven to 375°F.
- Season the chicken. Pat the chicken thighs dry and season both sides with salt and pepper.
- Sear the first side. Heat the olive oil in a large oven-safe skillet over medium-high heat. Sear the thighs skin-side down until deeply golden and crispy, about 5–6 minutes.
- Sear the second side. Flip and sear the other side for 3 minutes. Remove and set aside.
- Soften the onions. In the same skillet, add the sliced onions and cook until they start to soften and pick up all those browned bits, about 4 minutes.
- Mix the sauce. In a small bowl, whisk together the soy sauce, honey, vinegar, and garlic.
- Nestle and pour. Nestle the chicken thighs back into the skillet on top of the onions, skin-side up. Pour the sauce over everything.
- Bake. Transfer the skillet to the oven and bake uncovered 35–40 minutes, until the chicken is cooked through and the sauce is thick and glossy.
- Serve. Spoon some of the onions and pan drippings over the top before serving.
Chicken doneness and leftovers, stated plainly. Bone-in thighs should reach 165°F at the thickest part, away from the bone. If the skin starts getting too dark before the chicken is done, tent the skillet loosely with foil. Cool leftovers within two hours, refrigerate, and eat within 3 to 4 days, reheating until steaming hot. Never reuse the leftover pan sauce from a skillet the raw chicken touched unless it's been fully cooked through in the oven, which this sauce has.
Expert Tips
Pat the thighs bone dry. Moisture is the enemy of crispy skin. Blotting them with paper towels before seasoning is the single easiest upgrade you can make.
Sear skin-side down, undisturbed. Don't move the chicken around — let it sit for the full 5 to 6 minutes so the skin renders, crisps, and develops that deep golden color.
Use a cold-pan start for extra-crispy skin if you have time. Placing the thighs skin-side down in a cold skillet and bringing it up slowly renders more fat and gives an even crispier result.
Don't crowd the skillet. If the thighs are touching, they steam. Sear in two batches if your pan is smaller than 12 inches.
Cook the onions in the fond. Those browned bits left from searing are flavor — scrape them up as the onions soften. That's the difference between good and memorable here.
Bake uncovered. The open oven is what reduces and thickens the sauce into a glaze. Covering traps steam and leaves you with a thin, pale sauce.
Watch the honey near the end. Honey and soy can go from beautifully lacquered to burnt in a few minutes on high heat. If the glaze is darkening fast, tent with foil or drop the oven to 350°F.
Baste once or twice. Spooning the pan sauce over the chicken during the last 10 minutes builds up that glossy, sticky coating.
Finish under the broiler for restaurant skin. Two to three minutes on high at the end crisps the skin further — watch it constantly, since the honey will scorch quickly.
Spoon the onions and drippings over everything. Don't leave that jammy onion pile and pan sauce in the skillet. It's the best part.
Common Mistakes
Wet chicken going into the pan. If you don't pat the thighs dry, they steam and the skin stays flabby instead of crisping. Dry them thoroughly first.
Crowding the skillet. Too many thighs at once drops the pan temperature and steams the chicken. Sear in batches, or use a bigger skillet.
Cooking on too high a heat. Honey and soy scorch fast. Medium-high for searing is right, and the oven bake at 375°F does the rest gently.
Skipping the sear. Those golden-brown bits are the flavor base for the onions and the sauce. Skip them and the dish tastes flat.
Using boneless, skinless thighs. Leaner and quicker, but they dry out in a 40-minute bake and you lose the crispy skin. If you must, shorten the bake and add liquid.
Not enough seasoning on the chicken. The sauce is sweet-salty, but the meat itself still needs salt and pepper before searing.
Overdoing the salt. Between soy sauce and any added salt, it's easy to go too far. Taste the sauce before pouring and go light on the salt.
Cooking until the chicken is technically overdone. Thighs are forgiving, but past about 190°F they shred rather than slice. Aim for 165–175°F for juicy, tender meat.
Leaving the sauce thin. If your skillet is small and crowded, the sauce won't reduce. Use a wide skillet so it concentrates, or simmer the sauce on the stovetop after removing the chicken.
Forgetting to spoon the sauce. Serving the chicken without those onions and drippings is leaving the best bite in the pan.
Ingredient Substitutions
| If you don't have… | Use… | Watch out for… |
|---|---|---|
| Soy sauce | Tamari (gluten-free), coconut aminos, or low-sodium soy sauce | Tamari makes it gluten-free; coconut aminos is milder and less salty; low-sodium soy cuts about half the sodium. Adjust salt accordingly. |
| Honey | Brown sugar, maple syrup, or a sugar-free honey substitute | All work; the source itself notes brown sugar is a fine swap. Sugar-free sweeteners brown differently and thin the glaze slightly. |
| Apple cider vinegar | Rice vinegar, white wine vinegar, or fresh lemon juice | All bring the acid that balances the honey. Rice vinegar is mildest; lemon is brightest. |
| Bone-in, skin-on thighs | Drumsticks, bone-in breasts, or boneless thighs | Drumsticks are great; bone-in breasts need similar time but are less juicy; boneless thighs cook faster, so start checking at 20 minutes. |
| Fresh garlic | Garlic powder (about 3/4 teaspoon) | Works fine in the sauce but lacks fresh punch. Add it with the sauce so it can't burn in the sear. |
| Yellow onions | White onions, shallots, or sweet onions | Shallots are milder and sweeter; sweet onions are even softer. Red onions are a little sharper but still good. |
| Soy sauce (soy-free) | Coconut aminos | Necessary for soy allergies. It's sweeter and less salty, so you may want a pinch more salt and a shorter reduction. |
Variations
- Spicy honey soy. Add a teaspoon of sriracha, chili garlic sauce, or red pepper flakes to the sauce for a sweet-heat kick.
- Ginger garlic. Add a tablespoon of freshly grated ginger for a brighter, warmer, more aromatic glaze.
- Maple Dijon. Swap the honey for maple syrup and add a spoonful of Dijon mustard for a tangy, autumnal twist.
- Balsamic onion. Replace half the soy with balsamic vinegar and lean into the slow-caramelized onions for a deeper, more Italian-leaning flavor.
- Teriyaki-style. Add a splash of mirin and a little brown sugar, and simmer the sauce down for a classic teriyaki glaze.
- Orange chicken thighs. Add the zest and juice of an orange and a pinch of red pepper flakes for a bright, citrusy version.
- With potatoes. Tuck halved baby potatoes in around the chicken so they roast in the drippings for a complete one-pan dinner.
- Slow cooker version. Brown the thighs first, then cook everything on low 5–6 hours. The skin won't crisp, but the flavor and tenderness are excellent.
Make It Healthier
Let me be straight with you: this is a sticky, sweet, skin-on chicken dish, and that's a big part of what makes it good. But a few honest swaps lighten it meaningfully without gutting the flavor. The biggest one is sodium — use low-sodium soy sauce or tamari instead of regular, and skip the added salt entirely, since the sauce brings plenty. That alone drops the sodium from around 1,100 milligrams a serving to roughly 650. Cutting the honey to two or three tablespoons instead of a quarter cup reduces the sugar substantially while still giving you enough to caramelize, and a sugar-free honey substitute takes it further for a lower-carb version. From there, you can remove the skin before eating (the meat underneath is still flavorful and moist, especially cooked on the bone), trim any large fat pockets, and serve the chicken and onions over cauliflower rice or a big bed of vegetables instead of white rice so the plate is lighter and more balanced. Portion matters too: one thigh with a generous scoop of onions and vegetables is a satisfying plate, and it's easy to go back for two when it's this good. I won't call this a light dish as written, but with low-sodium soy, less honey, and vegetable-forward sides, it fits comfortably into a normal week — and nobody at the table will feel like they're eating a compromise.Meal Prep
This is one of the best meal-prep dinners in my rotation, partly because the recipe already improves overnight — the chicken soaks up more of that honey-soy glaze, and the onions get even softer and sweeter. Make it on Sunday, then portion the thighs with plenty of onions and pan sauce into containers over rice, cauliflower rice, or roasted vegetables, and you've got grab-and-go lunches and easy dinners for days. The sauce keeps everything moist, so the chicken reheats beautifully without drying out. If you're prepping ahead, you can do the sear and sauce steps a day in advance, refrigerate the skillet (or transfer everything to a baking dish), and bake it the night you want it, adding a few minutes since it starts cold. You can also double the recipe and use two skillets or a large roasting pan — it scales cleanly and makes sense if you're feeding a crowd or stocking the freezer. Just stir the sauce with the chicken as it cools so everything stays coated and nothing dries out on top.Storage
Store leftovers in an airtight container in the refrigerator for 3 to 4 days, and keep the chicken submerged in some of the pan sauce and onions so it stays moist. Because it's cooked chicken, cool it within two hours and refrigerate promptly. The sauce will thicken and gel in the fridge, which is a normal sign of the rendered fat and gelatin from the chicken — it loosens right back up when reheated, so don't drain it off, since that's flavor. Honestly, this dish is at its best on day two. The chicken becomes even more tender and the flavor of the glaze intensifies overnight. Discard anything that's been refrigerated longer than four days or shows any sign of spoilage. And if you're serving it cold — it's genuinely good cold, straight from the fridge, especially shredded into a salad or a grain bowl — just spoon a little of the loose sauce over the top to keep it from tasting dry.Freezing
These thighs freeze well and keep for up to 3 months, which makes them a smart cook-ahead for busy weeks. Freeze the chicken with plenty of the onions and sauce in an airtight container or freezer bag so it stays moist — dry frozen chicken reheats poorly, but this one is well protected by the glaze. Label with the date, press out the air, and freeze flat for faster thawing. The skin will lose its crispness after freezing and thawing; that's unavoidable with any saucy chicken. The flavor and juiciness, though, hold up beautifully, and a few minutes under the broiler after reheating brings the skin back to something close to fresh. Thaw overnight in the refrigerator, then reheat covered in a 350°F oven until hot through (about 20 to 25 minutes), uncovering for the last few minutes to re-glaze the skin, or use the microwave for a single portion if you don't mind softer skin.Reheating and Serving Leftover Chicken Thighs
The oven is the best way to reheat these. Put the chicken and onions in a covered dish with a spoonful of water or extra sauce and warm at 350°F until hot through, about 15 to 20 minutes for a couple of thighs, then uncover and broil for a minute or two to re-crisp the skin. The microwave works in a pinch for a single serving, though the skin will soften — though honestly, with a glaze this good, soft skin is a minor loss. Spoon the reheated pan sauce over the top either way, since it carries most of the flavor. Leftovers are also a launchpad rather than just a reheat. Shred the chicken and onions and pile them into tacos, fold them into a wrap or a quesadilla, tuck them into sliders, or scatter them over a rice bowl with a fried egg on top. The pan sauce is liquid gold — spoon it over rice, noodles, roasted vegetables, or mashed potatoes, or whisk a spoonful into a vinaigrette. However you serve it, that deep caramelized onion-and-soy flavor just keeps giving.What to Serve With It
Rice is the classic pairing and my first choice, because it soaks up all that sticky pan sauce and gives the onions somewhere to land — plain white rice, jasmine, or brown rice all work. Mashed potatoes are a surprisingly great match for the same reason, and crusty bread serves the same purpose if you'd rather mop than spoon. For vegetables, roasted broccoli, green beans, asparagus, or a simple stir-fried cabbage or bok choy all balance the sweet-savory glaze with freshness and a little char. Because the glaze is sweet and salty, crisp, acidic sides are your friend — a cucumber salad, a vinegary slaw, or a simple tomato-and-onion salad with rice vinegar all cut the richness nicely. If you want to make it a full one-pan meal, roast baby potatoes and carrots alongside the chicken in the same skillet. And if you're serving it for company, a platter of the thighs over a bed of rice with the onions spooned over the top and a scatter of sliced scallions or sesame seeds looks genuinely impressive for almost no extra effort.Beverage Pairings
The sweet-savory soy-honey profile is one of the most wine-friendly flavors there is, and an off-dry white shines here — a German Riesling, a Pinot Gris, or an Albariño has the acidity and slight sweetness to stand up to the glaze without fighting it. Sake is a lovely, often-overlooked match, and a light lager, a wheat beer, or a Japanese-style rice lager works beautifully on the beer side. For a casual dinner, iced tea or lemonade is exactly what I drink with this on the porch, and a cold ginger ale is a nice soda pairing. If you'd rather have red, keep it light and low-tannin — a Pinot Noir or a Beaujolais works because the honey and soy would make a big tannic red taste bitter and metallic. What to avoid: heavy oaky Chardonnays and bold Cabernets, both of which clash with the sweet glaze. On the nonalcoholic side, unsweetened green tea is a classic pairing with soy-based dishes, and sparkling water with lime keeps things fresh. In our house, honestly, it's a tall glass of sweet tea on the porch, and it's perfect.Frequently Asked Questions
Can I use boneless, skinless chicken thighs or chicken breasts?
You can, but expect a different result. Bone-in, skin-on thighs are ideal because the bone and skin keep the meat juicy and the skin crisps into that caramelized glaze. Boneless thighs cook faster — start checking around 20 to 25 minutes — and chicken breasts dry out more easily in a long bake, so reduce the time and consider adding a splash more liquid. If you use either, the sauce and onions still make it delicious; you just lose some richness and crispness.How do I get the chicken skin really crispy?
Three things: pat the thighs completely dry before seasoning, sear them skin-side down over medium-high heat and don't move them for the full 5 to 6 minutes, and bake uncovered so the oven air crisps the skin. You can also finish under the broiler for two to three minutes at the end — just watch closely, because the honey in the glaze scorches fast. A cast-iron or heavy stainless skillet gives the best sear.Is honey soy chicken gluten-free?
Not as written, because standard soy sauce contains wheat. Swap in tamari, which is essentially soy sauce brewed without wheat, and the dish becomes gluten-free — everything else here (honey, apple cider vinegar, garlic, onion, oil, salt, pepper) is naturally gluten-free. Coconut aminos is another gluten-free option and is also soy-free, though it's milder and less salty, so taste and adjust. Always check your labels.Why is my sauce too salty or burning?
Too salty almost always means regular soy sauce plus added salt — use low-sodium soy or tamari and skip the extra salt, since the sauce provides plenty. Burning happens when honey and soy meet too much direct heat; keep the oven at 375°F, and if the glaze is darkening too fast near the end, tent the skillet loosely with foil or reduce the oven to 350°F. A wider skillet helps the sauce reduce evenly instead of scorching in a deep, crowded pan.Can I make this ahead of time or freeze it?
Yes to both, and it's arguably even better the next day as the chicken absorbs more glaze and the onions get sweeter. Refrigerate it for 3 to 4 days, keeping the chicken in the sauce. To freeze, pack the chicken with plenty of onions and sauce in an airtight container for up to 3 months, thaw overnight in the fridge, and reheat covered at 350°F, finishing under the broiler to re-crisp the skin. You can also sear and sauce it a day ahead, then bake it fresh.Can I make this in a slow cooker or add vegetables?
For a slow-cooker version, brown the thighs first for flavor, then cook everything on low for 5 to 6 hours — the skin won't crisp, but the meat will be very tender. To add vegetables, tuck halved baby potatoes, carrots, or chunks of bell pepper around the chicken before baking; potatoes in particular soak up the drippings beautifully. Just don't crowd the skillet too much, or the sauce won't reduce and the chicken will steam.How do I know when the chicken is done?
Use an instant-read thermometer — bone-in thighs should reach 165°F at the thickest part, avoiding the bone. Visually, the juices should run clear and the meat should be opaque all the way through with no pink near the bone. The glaze should be thick and glossy. Thighs are forgiving and stay juicy up to about 175°F, so if in doubt, a few extra degrees won't hurt; just don't push past 190°F or the meat starts to shred.Can I make it spicy, and what do I serve with it?
Absolutely — add a teaspoon of sriracha or chili garlic sauce to the glaze, a pinch of red pepper flakes, or a little grated ginger for a warmer kick, and a scatter of sliced scallions or sesame seeds on top. As for sides, rice is the classic choice because it soaks up the pan sauce; mashed potatoes and crusty bread work for the same reason, and roasted broccoli, green beans, or a crisp cucumber salad balance the sweet-savory glaze perfectly.Nutrition Facts (Estimated)
| Per serving (1 thigh with onions and sauce) | Amount |
|---|---|
| Calories | ~330 |
| Total Fat | ~18 g |
| Saturated Fat | ~5 g |
| Carbohydrates | ~16 g |
| Fiber | ~1 g |
| Sugars | ~12 g |
| Protein | ~24 g |
| Sodium | ~1,100 mg |
Final Thoughts
Honey soy chicken thighs are the dish that made me understand why my mother-in-law made the same recipe every August for decades. It's unbelievably simple — sear, pile in onions, pour over a four-ingredient sauce, and let the oven do the rest — and it comes out sticky, glossy, deeply caramelized, and tender enough to fall apart under a fork, with jammy onions and a pan sauce you'll want to drink. It feeds six for about a dollar seventy-five a serving, it's high in protein, and it tastes even better the next day. Some traditions are worth carrying on, and this one has earned its place in my kitchen just like it did in hers. So — who's making this first? I hope it's you, ideally on a Sunday, ideally with iced tea on the porch while it bakes. Start with the recipe exactly as written, with bone-in skin-on thighs and that golden sear, because that's the version that's been making people feel like everything is right in the world since 1971. Then make it yours: add ginger, bring the heat with sriracha, swap the honey for brown sugar or a sugar-free sweetener, or use low-sodium soy to keep it lighter. Whatever version you land on, spoon those onions and drippings generously over the top, serve it with rice, and save a little for tomorrow — because the leftovers are the quiet reward. My husband says the smell alone makes everything feel right, and after all these years and all these Sundays, I finally agree.Honey Soy Chicken Thighs
Bone-in chicken thighs seared until golden, then baked with sweet onions in a sticky honey-soy-garlic glaze — a 1971 heirloom Sunday dinnerIngredients
Directions
- Preheat the oven to 375°F.
- Pat the chicken thighs dry and season both sides with salt and pepper.
- Heat the olive oil in a large oven-safe skillet over medium-high heat. Sear the thighs skin-side down until deeply golden and crispy, about 5–6 minutes. Flip and sear 3 minutes. Remove and set aside.
- In the same skillet, add the sliced onions and cook until they soften and pick up the browned bits, about 4 minutes.
- In a small bowl, whisk together the soy sauce, honey, vinegar, and garlic.
- Nestle the chicken back into the skillet on top of the onions, skin-side up, and pour the sauce over everything.
- Transfer the skillet to the oven and bake uncovered 35–40 minutes, until the chicken is cooked through (165°F) and the sauce is thick and glossy.
- Spoon some of the onions and pan drippings over the top before serving.
Cost: about $10.50 per skillet — roughly $1.75 per serving (6 servings).
Keyword tips: targets "honey soy chicken thighs," "baked honey soy chicken thighs," and "soy sauce chicken thighs with onions." Lean into the 1971 heirloom, Sunday-dinner, one-skillet angle.
Crispy skin secret: pat the thighs bone dry, sear skin-side down undisturbed, and bake uncovered. Finish under the broiler for 2–3 minutes if you want extra crisp (watch the honey — it scorches).
Safety: chicken must reach 165°F. Refrigerate leftovers within 2 hours and use within 3–4 days.
Gluten-free: not as written (soy sauce contains wheat). Swap in tamari to make it gluten-free.
Sodium note: ~1,100 mg per serving, driven by the soy sauce and added salt. Use low-sodium soy or tamari and skip the added salt to bring it to roughly 650 mg.
Nutrition (estimated per serving)
330Calories
24 gProtein
18 gFat
16 gCarbs
12 gSugar
1,100 mgSodium
Estimates only — not medical or dietary advice. Sodium is high; low-sodium soy sauce or tamari plus no added salt cuts it to roughly 650 mg. Based on 6 servings (1 thigh each). Contains soy and wheat — GF only with tamari.