

Easy No-Knead Bread
I was standing in my kitchen last Tuesday, staring at an empty bread bag, and I remembered my neighbor telling me about this old no-knead bread trick. I almost grabbed my keys to run to the store, but something made me try it instead.
Best decision I made all week.
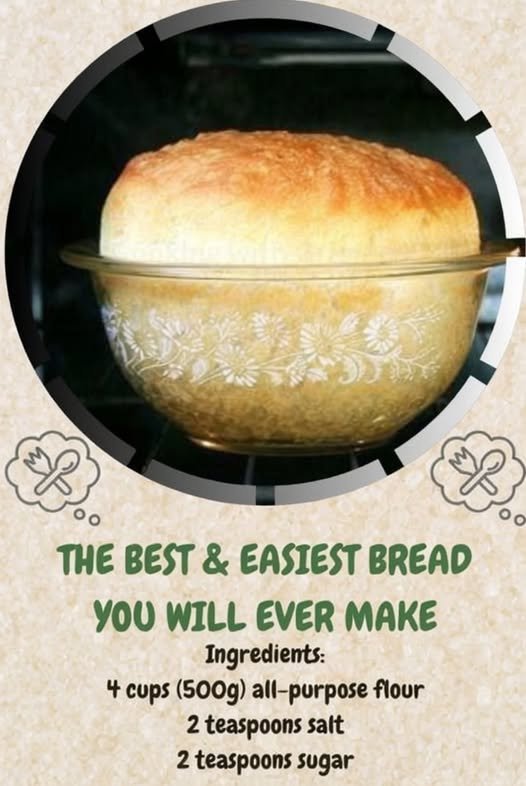
This bread is what happens when you realize you don’t need fancy equipment or hours of kneading to fill your house with that warm, just-baked smell. It’s soft inside, golden on top, and honestly tastes better than anything I’ve grabbed off a grocery shelf in years. My daughter walked in from school, followed the smell straight to the kitchen, and asked if we were having company over.
Nope. Just making bread like it’s the easiest thing in the world — because it actually is.
Why You’ll Love This Recipe
You will love this easy no-knead bread because it delivers a soft, tender crumb and golden crust with almost no work. A simple mix, a couple of rises, and a covered bake create bakery-quality results without kneading or special skills.
You will love how forgiving it is. The dough is meant to be sticky and shaggy, and the method does the hard work for you.
You will love the aroma. Your kitchen will smell like a real bakery while the bread bakes.
Most of all, you will love that homemade bread can be this simple and still taste far better than store-bought.
Why This Recipe Works
Warm water activates the yeast with a little sugar for food. Mixing the flour and salt just until combined develops enough structure without kneading. A long first rise allows gluten to form naturally and creates good flavor. Transferring the dough gently into a lidded pot traps steam during the first part of baking, which helps the bread rise fully and develop a tender crumb. Uncovering for the final minutes crisps and browns the crust. A short rest after baking sets the interior so slicing is clean. The result is a reliable, delicious loaf made with pantry staples and minimal effort.
Ingredient Breakdown
4 cups all-purpose flour
The structure of the loaf (can substitute up to half with whole wheat).
2 teaspoons salt
Seasons and strengthens the dough.
2 teaspoons sugar
Feeds the yeast and adds a touch of tenderness.
2 cups warm water
Hydrates the flour and activates the yeast (comfortable to the touch, not hot).
2¼ teaspoons active dry yeast (one packet)
The leavening agent.
1 tablespoon olive oil (optional)
For brushing the top or greasing the pot.
Kitchen Equipment
A large mixing bowl, wooden spoon or spatula, clean kitchen towel, oven-safe pot or casserole dish with a lid (Dutch oven works perfectly), and a cooling rack.
Step-by-Step Instructions
In a large bowl, mix the warm water, sugar, and yeast. Let it sit for about 5 minutes until the mixture becomes foamy.
Add the flour and salt. Stir until everything just comes together into a shaggy, sticky dough. Do not knead.
Cover the bowl with a clean kitchen towel and let the dough rise in a warm spot for about 2 hours, or until doubled in size.
Lightly grease an oven-safe pot or lidded casserole dish. Gently turn the dough into the pot without punching it down vigorously.
Cover and let the dough rest for 30 minutes while you preheat the oven to 450°F.
Bake covered for 30 minutes. Remove the lid and bake another 10–15 minutes until the top is deeply golden brown.
Transfer the bread to a wire rack and let it cool for at least 10 minutes before slicing. The crust will crackle as it cools.
Expert Tips
- Water should feel warm to the touch, not hot, so you don’t kill the yeast.
- The dough is supposed to be sticky and rough — resist the urge to add more flour.
- A warm spot (near a sunny window or on top of the fridge) helps the rise.
- A Dutch oven or any heavy oven-safe pot with a lid traps steam for a better rise.
- Handle the risen dough gently to keep the air bubbles intact.
- Preheat the oven fully while the dough has its second rest.
- Baking covered first creates steam that helps oven spring.
- Uncovering at the end develops color and crust.
- Cool at least 10 minutes so the interior finishes setting.
- A sharp serrated knife makes the cleanest slices.
- Brush the top with olive oil or melted butter after baking for extra flavor if desired.
- This dough is very forgiving of small measurement variations.
- For a heartier loaf, replace up to half the flour with whole wheat.
- Double the recipe only if you have a large enough pot.
Common Mistakes to Avoid
- Using water that is too hot and killing the yeast.
- Kneading the dough when it is meant to stay shaggy.
- Adding too much extra flour and making the loaf dense.
- Skipping the full rise time.
- Punching the dough down hard before the second rest.
- Baking in a pot without a lid for the first stage.
- Opening the oven too often and losing heat.
- Slicing while the bread is piping hot (it can turn gummy).
- Using old yeast that doesn’t foam.
- Choosing a pot that is too large so the loaf spreads instead of rising upward.
- Forgetting to grease the pot and having the bread stick.
- Under-baking so the center stays doughy.
- Expecting a super-crusty artisan loaf — this version is softer and more tender.
- Storing while still warm and trapping moisture.
Ingredient Substitutions
All-purpose flour can be partially replaced with whole wheat flour (up to half).
Active dry yeast can be replaced with instant yeast (you can mix it directly with the flour).
Sugar can be replaced with honey (use the same amount).
Olive oil is optional and can be omitted or replaced with melted butter.
Recipe Variations
- Whole Wheat – Replace up to half the flour with whole wheat.
- Herb – Stir in dried rosemary, thyme, or Italian seasoning with the flour.
- Garlic – Add garlic powder or roasted garlic to the dough.
- Cheese – Fold in shredded cheddar or Parmesan before the first rise.
- Seeded – Top with sesame, poppy, or everything bagel seasoning before baking.
- Olive – Add chopped olives for a savory loaf.
- Honey – Replace the sugar with honey.
- Dutch Oven – Use a classic Dutch oven for excellent results.
- Overnight – Let the first rise happen slowly in the refrigerator for deeper flavor.
- Smaller Loaves – Divide the dough into two smaller pots.
- Cinnamon Raisin – Add cinnamon and raisins for a sweet version.
- Freezer-Friendly – Bake, cool completely, wrap well, and freeze.
- No-Pot Method – Bake in a regular loaf pan (results will be less steamy).
- Extra Crusty – Place a pan of water on the lower rack for added steam.
Make It Healthier
Use a portion of whole wheat flour, reduce the salt slightly if needed, and enjoy sensible slices. Homemade bread lets you control every ingredient.
Meal Prep Guide
Bake a loaf (or two) on the weekend. Cool completely, slice, and store for easy toast and sandwiches throughout the week. The dough can also be started in the morning for fresh bread by dinner.
Storage
Cool completely, then store in a bread bag or airtight container at room temperature for 2–3 days. For longer storage, refrigerate or freeze.
Freezing
Wrap the cooled loaf tightly in plastic wrap and foil or place in a freezer bag. Freeze for up to 3 months. Thaw at room temperature or toast slices directly from frozen.
Reheating
Warm slices in a toaster or toaster oven. To refresh a whole loaf, wrap in foil and heat in a 350°F oven for 10–15 minutes.
What to Serve With It
Excellent with butter, jam, soup, stews, eggs, sandwiches, or alongside any dinner. Toast it for breakfast or serve warm with olive oil and balsamic for a simple appetizer.
Beverage Pairings
Coffee, tea, milk, or a simple glass of water. It also pairs well with soup and a glass of wine at dinner.
Frequently Asked Questions
Do I really not have to knead?
Correct — the long rise develops the gluten for you.
Why is my dough so sticky?
That is normal and desirable for this style of bread.
Can I use instant yeast?
Yes. Mix it directly with the flour and proceed.
What pot should I use?
Any oven-safe pot or casserole with a tight-fitting lid. A Dutch oven is ideal.
Why didn’t my yeast foam?
The water may have been too hot or the yeast may be expired.
Can I let it rise longer?
Yes. A longer rise (even overnight in the fridge) develops more flavor.
How do I know when it’s done?
The top should be deeply golden and the loaf should sound hollow when tapped on the bottom.
Can I make it without a lid?
You can, but the covered stage produces better oven spring and a more tender crumb.
Who else is done buying bread when it’s this easy to make?
Once you try this method, store-bought often loses its appeal.
Can I add mix-ins?
Yes — herbs, cheese, olives, or seeds work well.
Why is the crust soft?
This recipe produces a softer, more tender crust than high-hydration artisan loaves.
How should I slice it?
Use a serrated bread knife and gentle sawing motions.
Can I double the recipe?
Only if you have a large enough pot; otherwise make two separate loaves.
Is this good for sandwiches?
Yes — it slices well once cooled and makes excellent toast and sandwiches.
What if I don’t have a warm place for rising?
Place the bowl in a turned-off oven with the light on, or near a warm appliance.
Nutrition Information
Approximate nutrition will vary based on slice size. This bread provides carbohydrates from the flour and is free of preservatives. Values are estimates only and should not be considered professional nutritional advice.
Final Thoughts
This easy no-knead bread proves that homemade can be simpler than a store run. Soft inside, golden on top, and filled with that irreplaceable just-baked aroma, it turns basic pantry ingredients into something that feels like home.
I hope you make it the next time the bread bag is empty. I hope the dough rises high, the crust turns deep golden, and the first warm slice with butter makes you pause for a second. If you try it, I’d love to know how quickly the loaf disappeared. From my kitchen to yours — simple, reliable, and completely worth it.
Easy No-Knead Bread
Ingredients
Equipment
Method
- Mix warm water, sugar, and yeast; let sit 5 minutes until foamy.
- Stir in flour and salt until a shaggy dough forms. Cover and rise 2 hours until doubled.
- Gently transfer dough to a greased lidded oven-safe pot. Rest 30 minutes.
- Preheat oven to 450°F. Bake covered 30 minutes, then uncovered 10–15 minutes until deeply golden.
- Cool at least 10 minutes before slicing.
Notes