
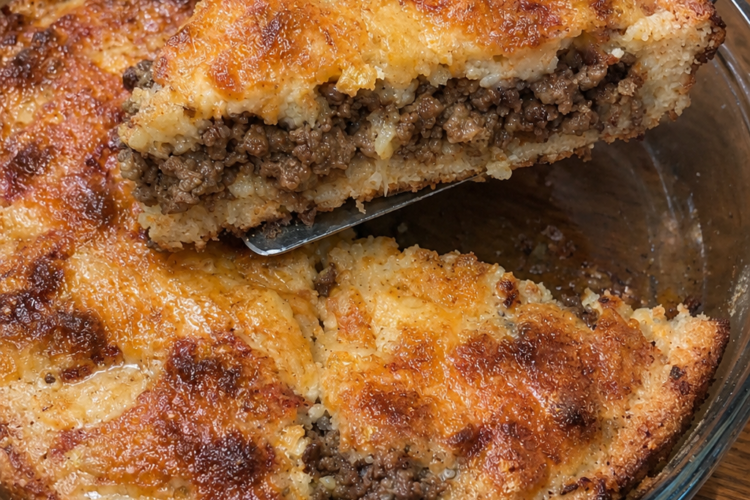
Impossible Cheeseburger Pie: The 5-Ingredient Retro Dinner That Bakes Its Own Crust
My neighbor clipped this impossible cheeseburger pie out of a magazine back in 1976 and never stopped making it, and it's still the first thing requested at family reunions. That kind of staying power doesn't happen by accident. With just a handful of basic ingredients and almost no fuss, it turns browned beef and a simple batter into a hearty baked main dish that feels equal parts casserole and savory pie, which is exactly the kind of dependable, unfussy cooking that kept midwestern dinner tables running for decades. If you've never made what old cookbooks call an "impossible pie," the magic is in the batter. You spread seasoned browned beef and onion in a pie plate, pour a thin milk-and-egg batter over the top, and slide it in the oven. The batter doesn't stay on top and it doesn't sink to the bottom — it settles around the filling and, as it bakes, forms its own soft crust on top and a light, custardy layer underneath. That's the trick that earned the name, because it seems impossible that a single poured batter could become a crust without anyone rolling out dough, and yet it does, every time. The result tastes like a cheeseburger you can slice with a fork. There's the deep, savory beef, the sweet softened onion, the melted cheddar going golden and bubbly across the top, and that tender baked crust tying it all together into one warm, cozy wedge. It's not fancy, it's not trendy, and it doesn't pretend to be either — it's just the kind of dinner that gets finished and then requested again next week. It also costs about a dollar fifty a serving and comes together with a skillet and a bowl, which is a big part of why it's survived for almost fifty years. A few honest notes, since I'd rather you know than be surprised. As written it's not gluten-free, because Bisquick is a wheat-based baking mix — though there is a real gluten-free Bisquick, which is a genuine swap rather than a fake one, and I cover it below. It's also not low-carb or keto, and I won't pretend a milk-and-baking-mix batter is — this is comfort food, full stop. It brings about 22 grams of protein per serving from the beef, eggs, and cheese, which I state as a number rather than a claim. Sodium runs about 450 milligrams per serving, mostly from the cheddar and the baking mix, and the single most important step in the whole recipe is draining the beef thoroughly, because grease is what keeps the crust from setting. And since it's ground beef, it must reach 160°F. Let's bake one.Why You'll Love This Impossible Cheeseburger Pie
- Five core ingredients plus an onion — no rolling, no crust-making, no fuss.
- The batter makes its own crust as it bakes. Genuinely a little magical.
- All the flavors of a cheeseburger in a warm, sliceable wedge.
- One skillet and one bowl, so cleanup is genuinely easy.
- About $1.50 per serving — serious budget-dinner territory.
- A retro 1970s classic that's been a family-reunion staple for decades.
- Kid-friendly, crowd-pleasing, and endlessly adaptable with toppings.
- Comfort food that tastes like it took more effort than it did.
Why This Impossible Cheeseburger Pie Recipe Works
This recipe works because of a genuinely clever bit of kitchen chemistry. The batter is just baking mix, milk, and eggs, whisked to a thin, pourable consistency and poured over the beef. Because it's thin, it flows down into every gap in the filling rather than sitting on top like a thick dough would. Then, in the oven, the baking mix and eggs set around the meat, and the mixture that rose above the beef forms a tender, golden top crust while the portion below turns into a soft, savory custard layer that holds the whole pie together. That's the "impossible" part, and it's less of a trick than it is simple physics: pour a thin, self-setting batter over a filling and it becomes its own crust as it bakes. The beef and onion lay the flavorful foundation. Browning the beef develops that deep, savory, almost caramelized meat flavor, and cooking the onion in with it softens the onion into sweetness and tames its bite, so you get a mellow, burger-like base rather than raw, sharp onion. Draining that mixture is the crucial handoff, and I'll repeat it throughout this post because it's the difference between success and a heavy, greasy pie: the custard crust needs a reasonably dry filling to set against, and excess fat interferes with that. Get the beef dry and the rest of the recipe rewards you. Then the cheese finishes the job. Adding the cheddar only in the last few minutes of baking — rather than at the start — is the detail that matters most for texture. If it goes in early, it sinks into the batter and disappears; added near the end, it melts into a golden, gooey, slightly blistered topping that stretches and pulls with every slice. The final rest of five minutes is the quiet closer: it lets the custard finish setting and the wedges firm up so they slice cleanly instead of sliding apart into a mess on the plate. Follow those two steps and you get clean, sturdy, cheesy wedges every single time.Ingredient Breakdown
| Ingredient | What it does | Notes |
|---|---|---|
| 1 lb ground beef | The savory, burger-flavored heart of the pie | 80/20 gives great flavor; leaner works too. Must reach 160°F. Drain it thoroughly — the #1 step. |
| 1 small onion, finely chopped | Sweetness and depth, cooked right into the beef | Fine dice so it softens completely. Cook until translucent, not browned and bitter. |
| 1 cup shredded cheddar cheese | The gooey, golden, bubbling topping | Sharp cheddar for the classic taste. Add in the last few minutes so it doesn't sink. Main sodium source. |
| 1/2 cup baking mix (Bisquick) | The self-crusting power in the batter | Contains wheat. There's a genuine gluten-free Bisquick swap — see substitutions. Don't substitute all-purpose flour. |
| 1 cup milk | Thins the batter so it flows and sets into a crust | Whole milk gives the richest custard; 2% works fine. Avoid skim if you can. |
| 2 large eggs | Bind and set the custard that becomes the crust | Room temperature whisk up smoothest. They're what gives the batter its structure. |
| Cooking spray or butter | Keeps the pie from sticking to the plate | Grease the pie plate well, including up the sides, for clean wedges. |
| Salt and black pepper | Seasons the beef so the whole pie isn't flat | Season the beef lightly while it browns. Go easy — the cheese and baking mix are already salty. |
The one thing to get right: drain the browned beef and onion thoroughly — press it with a spoon or tilt the pan off the heat. Excess grease is what keeps the custardy crust from setting and makes the whole pie heavy and soggy.
Kitchen Equipment You Actually Need
- 9-inch glass pie plate — the recipe is written for it, and glass lets you see the crust set on the bottom.
- Large skillet — for browning the beef and onion.
- Colander or slotted spoon — for draining the beef really well.
- Medium mixing bowl — for whisking the batter.
- Whisk — to get the batter completely smooth, no lumps.
- Instant-read thermometer (optional) — to confirm the beef reaches 160°F.
- Knife or toothpick — the classic doneness test for the center.
- Spatula — for serving clean wedges.
Step-by-Step Instructions
- Preheat and grease. Preheat the oven to 400°F. Lightly grease a 9-inch glass pie plate and set it aside.
- Brown the beef and onion. In a skillet over medium heat, cook the ground beef and chopped onion until the beef is browned and the onion is softened. Season lightly with salt and black pepper, then drain the mixture very well.
- Spread the filling. Spread the drained beef mixture evenly in the prepared pie plate.
- Whisk the batter. In a medium bowl, whisk together the baking mix, milk, and eggs until smooth.
- Pour it over. Pour the batter evenly over the beef in the pie plate. It will settle around the filling and create its own crust as it bakes.
- Bake. Bake 25–30 minutes, until the center is nearly set and a knife inserted comes out clean.
- Add the cheese. Sprinkle the shredded cheddar over the top during the last few minutes of baking and return the pie to the oven until the cheese is melted and lightly browned.
- Rest and slice. Let the pie rest for 5 minutes before slicing and serving.
Ground beef doneness, eggs, and leftovers, stated plainly. Ground beef must be cooked to a safe internal temperature of 160°F and browned with no pink remaining. The batter contains raw eggs, so the pie must be baked until the center is fully set before serving — a knife inserted in the center should come out clean, with no wet custard. The hot pie plate and bubbly cheese are very hot straight from the oven, so rest 5 minutes before slicing. Cool leftovers within two hours, refrigerate, and eat within 3 to 4 days, reheating until steaming hot. Never leave a beef-and-egg dish at room temperature for more than two hours.
Expert Tips
Drain the beef like you mean it. This is the tip that decides your whole result. Tip the skillet and spoon off the fat, or dump the mixture into a colander and press it lightly. A dry filling sets into a clean, sliceable pie; a greasy one turns heavy and won't firm up.
Use 80/20 for flavor, lean if you prefer. Eighty-twenty ground beef gives the most burger-like flavor, but it also sheds the most fat, so leaner beef is a valid choice if draining is ever a struggle. Either way, drain well.
Cook the onion fully soft. You want translucent, sweet, mellow onion, not crunchy raw pieces. Give it the time in the skillet alongside the beef — it's only a few extra minutes and it makes the filling taste finished.
Whisk the batter completely smooth. Any lumps of baking mix will show up as dry pockets in the finished pie. Whisk until it's uniform and pourable, and let it sit a moment so it hydrates evenly.
Don't stir the batter into the beef. Pour it evenly over the top and let it find its own way down. The whole point is that it settles on its own and forms the crust — stirring turns it into a loose scramble.
Cheese goes on late. Add it only in the last few minutes. Early and it sinks into the batter; late and it melts into a golden, bubbly, stretchy topping.
Test the center, not the edges. The edges always set first. The pie is done with a knife inserted in the center comes out clean, or with just a few moist crumbs — not wet batter.
Rest the full five minutes. The custard keeps firming as it cools, so resting is what gives you clean wedges that hold together on the plate. Cut too early and it slumps.
Grease the pie plate up the sides. The custard crust can weld to the plate. A thorough grease, sides included, is the difference between a clean lift and a mangled slice.
Season the beef, but lightly. The cheddar and the baking mix carry plenty of salt on their own. A light pinch on the beef while it browns is right — heavy hands make the whole pie salty.
Common Mistakes
Not draining the beef well enough. The most common failure by far. Grease keeps the batter from setting and makes the pie heavy and greasy. Drain thoroughly, every time.
Using the wrong pan. The recipe is written for a 9-inch glass pie plate. A much larger dish spreads the filling too thin and the batter sets differently, while a smaller one overflows or stays wet in the middle.
Adding the cheese at the start. It sinks into the batter and disappears instead of becoming a golden topping. Always add it in the last few minutes.
Stirring the batter into the beef. Don't. Pour it over and let it settle on its own so it can form the crust.
Lumpy batter. Unwhisked baking mix leaves dry pockets. Whisk until it's completely smooth before pouring.
Pulling it out too early. A center that's still wet means an eggy, runny pie. Bake until a knife in the center comes out clean, adding a couple of minutes if needed.
Skipping the rest. Cutting immediately gives sloppy, falling-apart wedges. Five minutes is all it asks.
Overloading it with add-ins. Piling in lots of mushrooms, extra onion, or wet vegetables can keep the custard from setting. Keep additions modest and cooked dry.
Underseasoning the beef. A completely unseasoned filling tastes flat no matter how good the crust is. A light pinch of salt and pepper goes a long way.
Not checking for GF baking mix if it matters. Standard Bisquick is wheat. If you need gluten-free, use the gluten-free Bisquick or a GF baking mix — not all-purpose flour.
Ingredient Substitutions
| If you don't have… | Use… | Watch out for… |
|---|---|---|
| Bisquick baking mix | Another self-rising baking mix, or gluten-free Bisquick | These are the real swaps. Don't use plain all-purpose flour — it won't self-rise the same way and the crust won't form properly. |
| Ground beef | Ground turkey, ground chicken, or plant-based crumbles | All work; leaner meats shed less fat but can taste milder, so season a touch more. Vegetarian crumbles make it meatless. |
| Cheddar cheese | Monterey Jack, Colby, a cheddar blend, or American | All melt nicely. American gives a diner-burger vibe but is saltier and softer; sharper cheeses give more flavor per ounce. |
| Whole milk | 2% milk, or a mix of milk and a little cream | 2% works well and lightens it slightly. Skim makes a thinner, less rich custard. Plant milks work but choose unsweetened. |
| Onion | Dried minced onion (about 2 Tbsp), or shallot | Dried onion rehydrates in the beef; shallot is milder and sweeter. Add either to taste. |
| Cooking spray | Softened butter or a light brush of oil | Butter adds flavor and browning. Coat the plate thoroughly, including the sides. |
Variations
- Classic cheeseburger upgrade. Serve each slice with dill pickle slices, a little ketchup and mustard, or a drizzle of burger sauce on the side. That's the diner-style finish.
- Bacon cheeseburger. Fold in a few crumbles of cooked bacon, or scatter them over the cheese at the end for a smoky, salty twist.
- Mushroom swiss. Sauté sliced mushrooms with the onion and swap the cheddar for Gruyère or Swiss for a mushroom-swiss burger flavor.
- Bacon-cheddar jalapeño. Add diced jalapeños to the beef and use pepper jack for a spicy version that still slices clean.
- Extra-cheesy. Stir a little shredded cheddar into the batter as well as sprinkling it on top for cheese in every single bite.
- Taco twist. Season the beef with taco seasoning and top with cheddar, then serve with salsa and sour cream — a Tex-Mex spin on the same technique.
- Big-batch sheet version. Double everything into a 9x13 pan for a crowd, adding a few minutes to the bake and checking the center for doneness.
- Make-ahead version. Brown and drain the beef and onion a day ahead and refrigerate it, then assemble and bake on the night — dinner comes together in minutes.
Make It Healthier
Let me be straight with you: this is comfort food, and the batter-and-cheese formula is not health food. I'd rather say that plainly than dress it up. That said, there are honest ways to lighten it without wrecking it. The biggest lever is the beef — swapping 80/20 for 90/10 or 93/7 ground beef, or using ground turkey or chicken, cuts a meaningful amount of fat and calories, and since you're draining thoroughly anyway, you barely notice the difference in the final pie. Drain it even more aggressively than usual to remove every bit of extra fat, which helps both the nutrition and the texture. Beyond the meat, you can trim by using 2% milk instead of whole, reducing the cheddar from a full cup to three-quarters of a cup (or using a sharper cheese so less goes further), and skipping extra salt since the cheese and baking mix already carry plenty. Portion is the honest final lever: a single wedge with a big pile of steamed green beans or a crisp salad is a reasonable dinner, whereas two or three wedges with potato wedges on the side turns it into a heavy plate. If you want to add nutrition rather than just subtract, fold in some finely diced bell pepper or spinach cooked dry, and serve it with a large salad or roasted vegetables so the meal is genuinely balanced. It won't ever be a light dish, and it isn't supposed to be — but a leaner beef and a smarter plate still taste like the same cozy retro dinner, which is exactly the point.Meal Prep
This is a genuinely handy recipe to prep ahead, and the source's make-ahead tip is the one I lean on most. Brown the beef and onion, drain it thoroughly, and refrigerate it a day ahead, so on the night you're cooking, dinner is just spreading the filling in the plate, whisking the batter, pouring, and baking. That turns a thirty-minute-plus dinner into a fifteen-minute one, which is exactly the kind of breathing room a weeknight needs. You can even season the beef the day before, since the flavors only improve as it sits. For leftovers and lunches, the baked pie holds and reheats well. Let it cool completely, portion it into containers, and refrigerate; a wedge reheated gently in the oven or air fryer comes back nearly as good as fresh, and even the microwave does a decent job with a covered plate. It's the kind of thing I'm happy to eat for lunch two days running, and it packs well because the custard crust firms up cold and slices neatly. Just follow the rules for cooked beef and eggs — cool within two hours, refrigerate promptly, eat within three to four days. It's also a good candidate for baking a double batch in a 9x13 on a Sunday, especially since a busy week is exactly when a self-crusting pie earns its keep.Storage
Store leftover impossible cheeseburger pie in an airtight container in the refrigerator for 3 to 4 days. Because it contains cooked ground beef and baked eggs, cool it within two hours of baking and refrigerate promptly — don't leave it sitting out while you clean the kitchen. Keep it covered so the top crust and cheese don't dry out and crack, and separate wedges with a little parchment if you're stacking them so they don't glue together into one slab. The pie actually firms up further as it chills, which makes cold leftovers slice beautifully and reheat into clean, sturdy wedges. It doesn't get better with extra time, though — the crust softens and the beef-and-egg filling loses a little of its appeal after a few days — so plan to finish it within four days and discard anything older. If you're storing it in the pie plate, cover it tightly with plastic wrap pressed gently against the surface or a lid that fits, and if it's ever been left out for more than two hours, treat it as spoiled and throw it out. That's the honest rule with cooked meat and eggs, and it's not worth bending.Freezing
You can freeze this pie, and it's worth doing for the nights when a ready-made dinner saves you. Bake it fully, let it cool completely, then wrap the whole pie tightly in plastic wrap and foil, or portion individual wedges and wrap them separately so you can reheat exactly what you need. It keeps for up to 2 to 3 months. Thaw overnight in the refrigerator rather than on the counter, then reheat in a 325°F oven until hot through and the cheese is bubbling again. You can also freeze it unbaked for a true make-ahead meal. Assemble the pie — drained beef in the plate, batter poured over — cover tightly in a freezer-safe plate with a layer of plastic wrap against the surface, and freeze for up to a month. Thaw fully in the refrigerator, then bake as directed, adding a few extra minutes since it starts cold, and always verify the center is set with a clean knife and the beef reaches 160°F. One caution: because the crust is a delicate egg custard, freezing can make it slightly softer once thawed, so it's best reheated in the oven rather than the microwave. Done right, you've got a retro family-reunion dinner waiting in your freezer, and that's a very good thing to have on a busy night.Reheating and Serving Leftovers
The oven is the best way back for this pie. Arrange wedges in a baking dish, cover loosely with foil, and warm at 325°F for about 15 minutes, then uncover for the last few minutes so the top crisps and the cheese re-bubbles. An air fryer at 350°F for 6 to 8 minutes does the same job faster and gives you a nicely re-crisped top, which is especially satisfying on a leftover wedge. A covered plate in the microwave is perfectly fine when you're in a hurry — the custard stays soft, but it reheats evenly and tastes just as good, just without the crisp top. Leftovers are versatile, which is another reason this is worth making extra of. A wedge alongside a green salad and some sliced tomatoes makes a fast, satisfying lunch, and it pairs especially well with anything pickley or acidic to cut the richness — dill pickles are the classic move for good reason. You can crumble a wedge over a baked potato, tuck a slice into a toasted bun as a sort of loose cheeseburger sandwich, or serve a wedge with roasted vegetables for a fuller dinner plate. However you bring it back, a little extra ketchup, mustard, or burger sauce wakes it right up, and if you reheat it in the oven you'll barely be able to tell it's a leftover at all.What to Serve With It
The right sides for this pie are simple, familiar ones that balance its richness rather than compete with it. A crisp green salad is the classic pairing — the cool, acidic crunch is exactly what cuts through a cheesy, beefy wedge — and steamed green beans, roasted broccoli, or sliced tomatoes all do the same job with almost no work. If you want to lean fully into the diner-style cheeseburger vibe, set out dill pickles, ketchup, mustard, and a little burger sauce on the side, and let everyone finish their own plate. That's the version that makes it feel unmistakably like a cheeseburger, just able to be eaten with a fork. On the heartier end, potato wedges, baked beans, corn on the cob, or a simple coleslaw round it into a full diner plate, and a basket of warm rolls or cornbread soaks up any juices left on the plate. Because the pie already brings beef, cheese, and a rich custard crust, I'd resist piling on more heavy starches and instead lead with something bright or green, then let people add a starch if they want. To finish the meal, a fruit salad, a scoop of something cool, or a simple dessert works beautifully after a plate this cozy. Honestly, whatever you'd serve next to a burger or a good casserole works here — the pie is forgiving and friendly, and it's happiest on a plate with something fresh beside it.Beverage Pairings
Because this is essentially a fork-and-knife cheeseburger, the drinks that pair with a good burger pair beautifully here. A cold lager or pilsner is the natural choice — crisp, clean, and refreshing against the rich beef and cheese — and a classic American amber ale or a root beer for the kids round out the diner feel. If you like a little more character, an IPA's citrusy bitterness loves melted cheddar, and a dry cider works nicely too. Honestly, if you're going for the full retro diner experience, an ice-cold root beer or a glass of sweet tea is about as right as it gets. For wine, keep it approachable and fruit-forward rather than big and tannic. A fruity Zinfandel, a jammy red blend, or a soft Merlot all stand up to the beef and cheddar without fighting them, and a dry rosé is a lovely, versatile pick that handles the richness with a little acidity. On the nonalcoholic side, sweet tea, lemonade, and sparkling water with lime are all easy crowd-pleasers and feel properly American alongside this dish. Whatever you pour, keep it cold and simple — this is unfussy, nostalgic, family-table food, and it's happiest with a drink that matches that spirit rather than trying to impress anyone.Frequently Asked Questions
What is impossible cheeseburger pie, and why is it called "impossible"?
It's a retro 1970s casserole-style dinner — browned, seasoned ground beef and onion spread in a pie plate, covered with a thin batter of baking mix, milk, and eggs, then baked until the batter sets around the filling and forms its own crust. It's called "impossible" because you pour in one simple batter and it separates during baking into a soft top crust and a light custard layer beneath the beef, with no dough-rolling required. The "cheeseburger" comes from the beef, onion, and melted cheddar coming together to taste like a burger you can slice.Can I make this gluten-free?
Not with standard Bisquick, which is a wheat-based baking mix, but there's a genuine fix: use gluten-free Bisquick or another certified gluten-free self-rising baking mix in the same amount. The batter behaves essentially the same way, so the pie still forms its own crust. Do not try to substitute plain all-purpose flour, and if you go GF, double-check that your baking mix is actually certified gluten-free, since this is a case where the swap is real but the label matters.Is impossible cheeseburger pie low-carb or keto?
Honestly, no — and I won't pretend otherwise. It contains a baking-mix batter and a full cup of milk, so it isn't low-carb or keto, and any version that claims to be is stretching the definition. This is comfort food, full stop, and it's happiest when you enjoy it as such. If you're eating low-carb, this is an occasional indulgence rather than a staple, and it's better to serve it with a big pile of green vegetables and eat a single wedge than to try to transform it into something it isn't.Can I use something other than Bisquick?
Yes, but stay in the self-rising baking mix family. Another store-brand self-rising baking mix works, and gluten-free Bisquick is the best swap if you need GF. What you should not do is substitute plain all-purpose flour — it lacks the leavening and the specific blend that lets the batter puff and set into a crust, and the pie will come out dense and flat. The baking mix is genuinely doing the structural work here, so it's not the place to improvise.Why did mine come out greasy or not set in the middle?
Almost always the beef wasn't drained thoroughly enough. Excess fat keeps the egg custard from setting and makes the whole pie heavy, so tip the skillet and spoon off the fat, or dump the mixture into a colander and press it lightly before it goes in the plate. The other culprits are an underbaked center — the pie is done only when a knife inserted in the center comes out clean — and overloading it with wet add-ins like lots of mushrooms, which release moisture and prevent setting. Drain well, bake until the center is set, and keep additions modest.Can I add pickles, bacon, or extra cheese for a real cheeseburger flavor?
Yes, and this is where the recipe really shines. The classic move is to serve each slice with dill pickle slices and a little ketchup, mustard, or burger sauce on the side — that's the diner-style finish. For a bacon cheeseburger, fold in some cooked bacon crumbles or scatter them on with the cheese at the end. You can stir a little extra shredded cheddar into the batter for cheese throughout, or pile more on top. Just keep wet or heavy additions modest so the custard still sets around the filling.Can I make it ahead of time or freeze it?
Both work well. For make-ahead, brown and drain the beef and onion up to a day in advance and refrigerate, then assemble, whisk the batter, pour, and bake on the night — dinner takes about fifteen minutes to get in the oven. For freezing, bake the pie fully, cool it completely, wrap it tightly, and freeze for up to two to three months, then thaw overnight in the fridge and reheat in a 325°F oven until hot and bubbling. You can also freeze it unbaked for up to a month and bake from thawed, adding a few minutes.How do I know it's done, and can I bake it in a different pan?
It's done when the center is nearly set and a knife inserted into the middle comes out clean, with no wet custard clinging to it — the edges always set first, so test the center, not the rim. Then rest five minutes before slicing so the wedges firm up. As for the pan, the recipe is written for a 9-inch glass pie plate, which gives the right depth for the filling and batter; a larger dish spreads everything too thin and a smaller one risks overflow. If you want a big batch, double the recipe into a 9x13 pan and add a few minutes, checking the center for doneness.Nutrition Facts (Estimated)
| Per serving (1 of 6) | Amount |
|---|---|
| Calories | ~340 |
| Total Fat | ~23 g |
| Saturated Fat | ~10 g |
| Carbohydrates | ~9 g |
| Fiber | ~0 g |
| Sugars | ~2 g |
| Protein | ~22 g |
| Sodium | ~450 mg |
Final Thoughts
Impossible cheeseburger pie is the kind of recipe that survives fifty years for a reason. It's five core ingredients plus an onion, one skillet and one bowl, and a batter that turns itself into a crust while you're not even looking — and it comes out tasting like a warm, sliceable cheeseburger with golden, stretchy cheddar on top. It's about a dollar fifty a plate, it's endlessly forgiving, and it's the sort of dependable midwestern dinner that keeps showing up at family reunions and busy weeknights alike, which is exactly the company it deserves to keep. The one thing I'll leave you with is the draining. Every version of this recipe that's ever gone wrong went wrong because the beef wasn't dry enough, so drain it thoroughly, bake it until the center is truly set, and let it rest the full five minutes. Do those three things and you'll get clean, sturdy wedges every time. Then make it yours — dill pickles and burger sauce for the full diner treatment, bacon for a smoky twist, mushrooms and Swiss for something a little fancier, or a leaner beef for a lighter plate. Serve it with something crisp and green, keep a little ketchup and mustard on the table, and get ready for the same thing my neighbor's family has been hearing since 1976: somebody asking when you're making it again.Impossible Cheeseburger Pie
A retro 1970s Bisquick dinner — seasoned ground beef and onion under a self-crusting milk-and-egg batter, topped with melted cheddar, for about $1.50 a servingIngredients
Directions
- Preheat the oven to 400°F. Lightly grease a 9-inch glass pie plate and set it aside.
- In a skillet over medium heat, cook the ground beef and chopped onion until the beef is browned and the onion is softened. Season lightly with salt and black pepper, then drain the mixture very well.
- Spread the drained beef mixture evenly in the prepared pie plate.
- In a medium bowl, whisk together the baking mix, milk, and eggs until smooth.
- Pour the batter evenly over the beef in the pie plate. It will settle around the filling and create its own crust as it bakes.
- Bake 25–30 minutes, until the center is nearly set and a knife inserted comes out clean.
- Sprinkle the shredded cheddar over the top during the last few minutes of baking and return the pie to the oven until the cheese is melted and lightly browned.
- Let the pie rest for 5 minutes before slicing and serving.
Cost: about $9.00 per pie — roughly $1.50 per serving (6 servings).
Keyword tips: targets "impossible cheeseburger pie," "Bisquick cheeseburger pie," and "easy cheeseburger pie recipe." Lean into the retro 1970s impossible-pie angle and the self-crusting batter in the intro.
Don't-skip steps: drain the beef thoroughly (grease stops the crust setting), add the cheese only in the last few minutes, and rest 5 minutes before slicing.
Safety: ground beef must reach 160°F, and the center must be fully set (knife comes out clean) since the batter contains raw eggs. Cool leftovers within 2 hours; refrigerate and use in 3–4 days.
Gluten-free: not as written (Bisquick is wheat). Use gluten-free Bisquick or a certified GF self-rising baking mix — do not substitute plain flour.
Sodium note: ~450 mg per serving from the cheddar and baking mix. Less cheese or a reduced-sodium cheese trims it. Not low-carb or keto.
Nutrition (estimated per serving)
340Calories
22 gProtein
23 gFat
9 gCarbs
2 gSugar
450 mgSodium
Estimates only — not medical or dietary advice. Based on 6 servings. Not low-carb or keto; not gluten-free as written (GF baking mix is the swap). Contains wheat, milk, and eggs.