
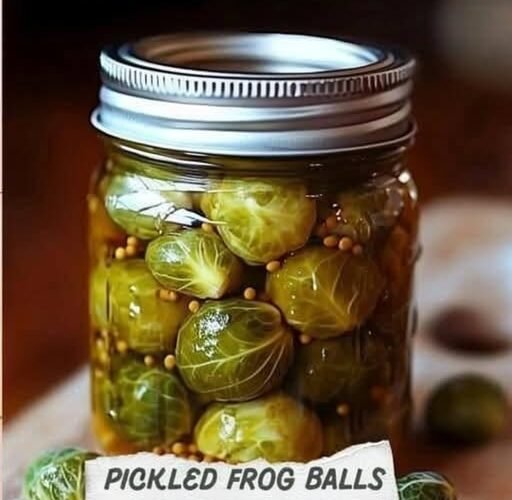
Keto Pickled Brussels Sprouts: Crunchiest Thing in Your Fridge
Last week I was doing that thing where you open the fridge with no plan and just start auditing. There was a half-used bag of sour cream, a block of cheddar I was clearly ignoring, and tucked in the back, in a bag I had genuinely forgotten buying, a whole lot of Brussels sprouts. They were fine, honestly. A little wrinkly at the edges. Not remotely bad. But they were sitting there about to become one of those quietly composted things, and I felt guilty. Then I had a flash of my aunt's kitchen, where every summer the counters were lined with canning jars and she pickled absolutely anything that came out of the garden. Beans. Beets. Okra. A very aggressive amount of zucchini. If she had had Brussels sprouts, she would have put them up without hesitating for a second. So I made these keto pickled brussels sprouts, and I have to be honest with you: I have made this recipe maybe six times now and it has never once lasted the full month. My husband took the jar out of the fridge three times in one day. Three. I counted because I was sitting on the couch pretending not to watch him do it. He eats them cold, straight over the sink, with his hands, and he will not be told otherwise. What you are looking at is a refrigerator pickle, which is the easiest possible version of this. No water-bath canner, no boiling jars, no thermometer, no six hours of standing in a hot kitchen in July. You blanch the sprouts for three minutes, you pour a hot sweet-and-sour brine over them, and you put the jar in the fridge. Twenty-five minutes of actual work for something that keeps for weeks and quietly solves the "I need a snack but I have nothing in the house" problem that hits me about four nights a week. They are good on a cheese board, which is where I like to pretend I planned them. They are good chopped into a salad for a little bitter crunch. They are good on a sandwich, tucked into a bun with something sharp. And they are completely, unapologetically good straight out of the jar at eleven at night, which is honestly most of how they get eaten in this house. If you want the long version with every swap, safety note, and mistake I made first, keep reading. If you just want to make them tonight, the recipe card is at the bottom.Why You'll Love These Keto Pickled Brussels Sprouts
- They are about 5 grams of net carbs a serving. I did the actual math on the sugar and the sprouts, and I am showing you every number further down so you can check me. A quarter of the jar is roughly 5 g net, which leaves plenty of room in a day.
- Naturally gluten-free, no special shopping required. Every single item in the jar is gluten-free as long as you use distilled white vinegar and not malt vinegar. That one swap is the whole difference, and I explain it below.
- Twenty-five minutes of work for three weeks of pickles. This is the easiest pickling method that exists. No canning, no processing, no risk of a ruined flat.
- They genuinely stay crunchy. The three-minute blanch plus the ice bath is the trick. They come out with a snap that survives a week in the brine, which most pickled vegetables do not manage.
- Cheap enough to make two jars. About $5.00 all in, or under $4 if you already own a mason jar and the spices. Brussels sprouts are one of the best values in the produce aisle when they are in season.
- They make you look like you have a plan. A jar of something you made, sitting in the fridge, quietly doing work. It is a small domestic flex and I am not going to pretend otherwise.
Why These Keto Pickled Brussels Sprouts Stay Crunchy
Let me explain the mechanics, because every step in this recipe exists for a reason and skipping one of them is how you end up with sad, soggy, half-pickled sprouts sitting in cloudy liquid. First, the cut. You want to halve the sprouts lengthwise, straight down through the core, and if you have any larger ones, quarter them. The reason is surface area and access. The brine needs to reach the center of the sprout, and the core is the densest, most stubborn part of it. Halving exposes a flat face to the liquid, and the brine works its way inward from there. If you just cut the stem off and drop the whole little ball in, the outside gets picky and the middle stays stubbornly cabbage-flavored. Second, the blanch. Three minutes in heavily salted boiling water does three things at once. It softens the cell walls just enough that the brine can penetrate instead of sitting on a waxy surface. It sets the chlorophyll so the sprouts stay bright green instead of going olive-drab, which matters because a jar of brown pickles looks and tastes tired. And it cooks out some of the bitterness that raw Brussels sprouts carry, which is the flavor people associate with the vegetable and usually do not want in a snack. Third, and this is the part people skip, the ice bath. The moment those sprouts hit the boiling water, they start cooking. If you drain them and let them sit, the residual heat keeps cooking them, and you have lost the crunch before the brine ever arrives. Plunging them into ice water stops the cooking instantly and locks in that set. You can tell it worked: they come out of the bath bright, firm, and snapping when you bite one. Fourth, the hot brine. Pouring it boiling over the sprouts is what makes this a pickle rather than a salted vegetable. The heat drives the vinegar and sugar into the flesh quickly, and the sugar does two jobs at once. It balances the sharp acid so the result tastes like a condiment instead of a chemistry experiment, and it pulls water out of the cells, which is exactly the mechanism that makes something crisp become crunchy. And fifth, the salt. One tablespoon of salt in a quart jar sounds like a lot, and it is. That is not an accident and I am not going to pretend it is a health food. Salt is what preserves, what seasons, and what keeps the texture crisp in the brine. If sodium is a concern for you, drop it to two-thirds of a tablespoon and the pickles will still work, just with a slightly softer bite. I will give you the honest sodium number in the nutrition section rather than hiding it.Ingredient Breakdown
This is a ten-item list, which sounds like more than it is. Seven of those items are spices you almost certainly already own in a jar in the back of the cabinet. Prices are typical US grocery range prices for a budget shop in 2026 and will vary by store and season, but Brussels sprouts get genuinely cheap in late summer and fall.- 2 cups Brussels sprouts, trimmed and halved — about $2.49. That is roughly three quarters of a pound, or about 24 to 28 sprouts depending on size. This is the only real fresh expense in the recipe, which is why it costs so little.
- 1 cup white vinegar — about $0.35 by the cup. Use distilled white vinegar. This is a flavor difference and a gluten question at the same time, and both are covered below.
- 1 cup water — free, tap is fine. The water stretches the vinegar so the pickles are sharp rather than aggressive, and so a whole cup of vinegar is not an alarming pour.
- 2 tablespoons sugar — about $0.10. This is the only thing keeping this from being a strict keto recipe, and I have a swap for you if you need one.
- 1 tablespoon salt — about $0.04. Kosher or fine sea salt both work. Do not use iodized if you are sensitive to it, because the iodine can taste a little harsh in a brine this concentrated.
- 3 cloves garlic, smashed — about $0.30. Smash them, do not mince them. A smashed clove releases its oils into the brine slowly; minced garlic turns the whole jar aggressively garlicky within a day.
- 1 tablespoon mustard seeds — about $0.08. This is the ingredient that made my husband lose his mind. Mustard seeds swell in the brine and pop in your mouth, and they are the single thing I would not leave out.
- 1 teaspoon black peppercorns — about $0.05. Whole peppercorns, not ground. Ground pepper turns the brine murky and gives up its flavor in a day.
- 1 teaspoon red pepper flakes (optional) — about $0.05. A little warmth, not heat. You should still taste the vinegar clearly.
- 2 bay leaves — about $0.05, and probably free if you have ever dried herbs. One jar, two leaves is plenty.
Kitchen Equipment
Nothing specialized. If you own a pot, a jar, and a saucepan, you can do this tonight.- A small saucepan for the brine. The same one you use for pasta works.
- A second pot or your pasta pot for blanching, or you can blanch in a microwave-safe bowl. Either is fine.
- A colander plus a large bowl of ice water. The ice bath is not optional, so plan for real ice, not a couple of cubes.
- A quart mason jar with a two-piece lid. Regular wide-mouth or standard-mouth canning jars both work. You do not need a special pickling jar.
- A pair of tongs or a slotted spoon for moving the blanched sprouts without bruising them.
- A funnel if you have one. Pouring brine into a jar full of sprouts without one is how you get a sticky counter.
Step-by-Step Instructions
Step 1: Prep the sprouts. Pull the outer leaves off the Brussels sprouts, cut the tough stem end off flat, and cut each one in half lengthwise, right down through the core. If you have a few big ones, quarter those. Halve the small ones. Toss them into a bowl of ice water while you keep working so they stay crisp and bright while you cut the rest. Step 2: Bring a pot of salted water to a rolling boil. It needs to be a real boil, not a lazy simmer, or you will not get the color and the set you are after. Salt it until it tastes like the sea, about a tablespoon per quart. Step 3: Blanch for three minutes. Drop the halved sprouts in, and stir once so none of them are sitting on the bottom. Three minutes for halved, four for quarters. They are done when a knife tip slides into the stem with almost no resistance but the sprouts still hold their shape. Do not go past that, or you are cooking them and not pickling them. Step 4: Ice bath, immediately. Have the bowl of ice water ready before you start blanching, because this needs to happen within seconds. Dump the hot sprouts straight into the ice water and swirl them for about thirty seconds. They will go from dull olive to bright green right in front of you. Drain them well. Step 5: Load the jar. Pack the drained sprouts into a clean quart mason jar with the smashed garlic cloves, mustard seeds, peppercorns, red pepper flakes, and bay leaves. Pack them snugly, because the tighter they sit the less floating they do, and floating sprouts in cloudy brine is not a good look. A few inches of headspace at the top is what you want. Step 6: Boil the brine. In a saucepan, combine the vinegar, water, sugar, and salt. Bring it to a full boil, stirring, until the sugar and salt have completely dissolved. If you can still see salt crystals in the bottom of the pan, keep going. It should be a clear liquid with nothing sitting in it. Step 7: Pour the hot brine over the sprouts. Set the jar in a bowl of cold water in the sink first, as a shock absorber, because pouring boiling liquid into a cold mason jar is how you crack glass. Then pour the brine in slowly, working around the edges, until everything is completely submerged. Push the sprouts down with a clean spoon if a few are floating up, and make sure there is a thin layer of brine over the top. If there is not, add a splash of extra vinegar. Step 8: Cool, seal, refrigerate. Let the jar sit on the counter until it comes to room temperature, which is usually one to two hours. Then wipe the rim clean, put the lid and ring on, and tighten just until snug. Refrigerate it. Do not put the jar in the fridge while it is still hot, because a rapid temperature drop in a closed jar can crack it and can also trap condensation. Step 9: Wait, then eat. They are genuinely good after twenty-four hours. They are noticeably better at three days, which is when the brine has worked all the way through and the sugar has fully softened the acid. That is when my husband starts appearing in the kitchen at odd hours.Expert Tips
- Use distilled white vinegar, and never malt vinegar. Distilled white is clean, sharp, and gluten-free. Malt vinegar is made from barley and is not. This is the single most important label check in the recipe, and it is easy to miss because malt vinegar is what people reach for out of habit.
- For maximum crunch, you can skip the blanch entirely. Raw pickled Brussels sprouts are crunchier, which is a matter of taste rather than correctness. You lose the bright green color and a little of the bitterness goes up, but the texture is noticeably snappier. Many of my pickling purists do it this way.
- Do not mince the garlic. Smash the cloves. Minced garlic disperses and turns the entire jar aggressively sharp within a day, while smashed cloves give you a slow, rounded garlic note that keeps building.
- Do not skip the ice bath thinking it is optional. This is the step that decides whether your pickles crunch or sag. Residual heat keeps cooking the sprouts after you drain them, and the ice bath stops that instantly.
- Keep everything under the brine. Any sprout poking above the liquid is exposed to air and will discolor and go soft. Push them down, and if they keep floating, wedge a small piece of clean bread or a folded parchment weight on top. Some people use a clean glass weight, which works nicely.
- Use a sharp vinegar, not a mild one. Distilled white is stronger than you think once it is diluted, and it is what balances the sugar. Rice vinegar is a gentler option if you find white vinegar sharp, and it is also gluten-free as long as it is not seasoned with soy sauce.
- Taste the brine before you pour it. It should taste aggressively salty and sharply sweet. If it tastes mild, it will taste flat on the sprouts, because the sprouts dilute it.
- Let it go three days before you judge it. The day-one pickles are good. The day-three pickles are the ones that make a jar disappear in two days.
Common Mistakes to Avoid
- Boiling brine into a cold jar. Mason glass can and does crack from thermal shock. Set the jar in a bowl of cold water first, or let the brine cool for five minutes before pouring.
- Rinsing the sprouts after blanching. You want the blanch water gone, but you do not want to rinse the sprouts, and you definitely do not want to dry them with a towel. Set them in a colander and let them drain for a minute or two.
- Leaving headspace empty. Every sprout needs to be under liquid. Air pockets are where brine gets left behind and goes cloudy and dull.
- Not cleaning the jar rim. A sticky rim means the lid will not seal properly, and a jar that does not seal properly is a jar that goes flat. Wipe it with a damp paper towel before you put the ring on.
- Over-blanching. Four minutes is the ceiling for halved sprouts. Longer and you have cooked them into the sauce, and the pickles will be soft no matter what the brine does.
- Using ground pepper instead of whole. Ground pepper goes bitter and cloudy almost immediately, and it flavors the brine in a day instead of a month.
- Using malt vinegar. It will make the recipe gluten-ful, and it is also much heavier in flavor, which can make a small batch taste unbalanced.
- Trying to pantry store these. More on this below, and this is the one that actually matters for safety.
Ingredient Substitutions
-
-
- Vinegar: Distilled white is the best choice and the safest for gluten-free. Distilled white wine vinegar is also fine and slightly softer. Rice vinegar is milder and works if white feels too sharp. Avoid malt vinegar entirely if gluten matters, and avoid any seasoned or flavored vinegar, because a lot of them are built on soy sauce or malt and carry gluten with them. Apple cider vinegar is gluten-free but will push this toward a sweet, chow-chow flavor rather than a sharp pickle.
- Sugar: This is the swap that turns these into a stricter keto pickle. Use monk fruit sweetener, allulose, or erythritol, all one for one by measure, and the pickles come out noticeably more sour. Reduce to a tablespoon if you want to be conservative, or go sugar-free and let the vinegar stand on its own, which is a legitimate and very sharp pickle. Honey is not keto and adds a floral note, which is lovely if you are not counting carbs.
- Salt: Two-thirds of a tablespoon still pickles well and lowers the sodium per serving noticeably. Do not go below half a tablespoon, or the texture suffers.
- Mustard seed: Yellow, brown, or black all work. Dijon-style mustard seed is the same thing and is not a problem. You can also use a tablespoon of whole-grain mustard, though you will get less of that distinct popping texture.
- Garlic: Four to five cloves is fine, and you can add a few raw cloves in the jar for a second layer of flavor that mellows over time. Peeled and left whole is better than smashed if you are sensitive to strong garlic.
- Vegetables: This brine and method work identically for cauliflower florets, sliced carrots, pearl onions, green beans, sliced radish, or cucumber. The three-minute blanch is right for cauliflower and carrots, lighter vegetables need less or none, and pearl onions can go in raw. Same cost math, different jar.
-
Variations
-
-
- Hot Honey Pickles: Swap half the sugar for hot honey and add a second teaspoon of red pepper flakes. Sweet, warm, and genuinely spicy enough that people ask about it.
- Dill Pickles: Add three or four fresh dill heads, or a tablespoon of dried dill weed. This is the version that tastes the most like a classic pickle and the one most people end up preferring.
- Smoky Pickles: Add a teaspoon of liquid smoke or a chipotle in adobo, minced. Same technique, a completely different dish, and it is outstanding on a chopped sandwich.
- Ginger Pickles: Add four or five thick coin slices of fresh ginger. The ginger and the mustard seeds together are an outstanding combination, and it makes the whole jar smell incredible the moment you open the fridge.
- Sweet and Sour Spicy: Add a tablespoon of rice vinegar to the brine, drop the sugar to a tablespoon and a half, and double the red pepper flakes. Tighter, tangier, closer to a restaurant quick pickle.
- Apple Chutney Pickles: Chop two Granny Smith apples and stir them in raw with the sprouts. You get a relish rather than a pickle, and it is genuinely excellent with sharp cheddar on crackers.
- Whole Sprouts: If your sprouts are small, skip the halving and pickle them whole. They take a little longer to fully pickle, so give them the full three days.
-
Make It Healthier
These are real adjustments and I want to be straight about what they are. This is a pickled vegetable, and pickled vegetables are salty by nature. That is not a flaw to be engineered away, it is what preserves them. Nothing here is a weight-loss plan and nothing here is a medical claim.-
-
- Cut the sugar to one tablespoon, or go sugar-free. This is the single biggest change and the one most worth making. It is also what takes these from a nice everyday keto pickle to a strict one, and the sharper flavor is a genuine improvement rather than a compromise.
- Drop the salt to two-thirds of a tablespoon. Still enough to pickle, noticeably less sodium per serving.
- Add a second cup of vinegar and a quarter cup less water. More acid, less dilution, and it leans harder into the pickle flavor.
- Add more vegetables to the jar. Cauliflower, carrot, and radish all pickle at the same time in the same brine, so you get more volume and more fiber per serving for almost nothing extra.
- Skip the red pepper flakes if spice bothers your stomach. They are entirely optional and they do not define the recipe.
-
Meal Prep Tips
This is one of the best things you can make ahead, because the making ahead is the whole point.-
-
- Make a double batch. Two jars, same total active time except for a few extra minutes, and you have a snack for three weeks. The ingredient cost barely moves, which makes the per-serving cost better the more you make.
- The sprouts can be blanched a day ahead. Cut and blanch them, store submerged in ice water in the fridge, and drain when you are ready to pack the jars. Do not blanch and refrigerate them dry, or they will go dull and soft.
- Keep a second jar in the back of the fridge. I am not going to pretend my husband has never found the back jar. Label the lids with a Sharpie and date them, and put the freshest jar in the front.
- Chop the finished pickles for salads on the weekend. A small jar of pre-chopped pickled Brussels sprouts turns weekday salad assembly into a thirty-second operation, and the chopped bits soak up dressing better than whole ones.
- Save the brine. Do not pour it out. A spoonful of that brine in a pan of anything, or in a vinaigrette, is a real flavor upgrade and it is free.
-
Storage
These are refrigerator pickles, so they live in the fridge and nowhere else. Store them sealed in the fridge for up to one month, and get them in there within two hours of the brine going in. Realistically, the flavor is best in the first two weeks, and honestly you are not going to have to think about it after day four. Please do not attempt to pantry store these. Home canning has specific safety rules that depend on an acidified brine being processed in a tested recipe at a tested temperature for a tested time, and this is not one. A vinegar pickle poured over vegetables at home, sealed with a canning lid, and put in a pantry is a botulism risk, and it is the reason so many old cookbooks full of "sealed and stored for a year" recipes are quietly dangerous. A standard mason jar and a refrigerator is the whole method. If you want shelf-stable pickles, use a tested canning recipe from your county extension office or the Ball brand's own site, and follow it exactly. Also worth knowing: the brine will cloud over a little in the first few days, and sometimes a fine white sediment settles at the bottom. That is normal, and it is not mold. Mold looks fuzzy, greenish, or pink, and if you see any of that, throw the whole jar out without tasting it.Freezing
Do not freeze these. This is the one place I will tell you to skip a section, and here is the honest reason. Freezing destroys the cell walls of anything crisp, and the entire appeal of a pickled Brussels sprout is that it is crisp. Thaw one and you get a limp, watery, sad little cabbage, and no amount of reheating brings the snap back. Pickling already drives water out of those cells, and the freezer finishes the job. What you can do instead is make a bigger batch. The recipe scales almost indefinitely because the brine ratio is forgiving, though I would not go past four jars in one go unless you are pickling for a holiday. If you genuinely need to preserve them longer, your answer is the canning route, not the freezer. If you want to preserve the sprouts themselves, blanch the extras and freeze them plain with no brine, then use them later in a soup or a stir-fry, which they are excellent in.Reheating
Never, and I mean that as a genuine instruction rather than a stylistic one. Reheating pickled Brussels sprouts is a genuinely bad idea. The vinegar smell gets stronger and sharper as it heats, the texture goes from crisp to soft, and you lose the exact thing that makes them worth eating. They are a refrigerator food, eaten cold, straight from the jar. There is one exception, and it is the only way I ever warm them. If you are finishing a dish and you want their bite, toss a handful of cold pickles in at the very end, off the heat, as a garnish. Wilted greens, a slice of pork, a rich stew, a baked potato with sour cream and cheese, all of those take cold pickles scattered over the top right before they hit the table, and the temperature contrast is genuinely good. Warming them in a pan, in a microwave, or in the oven is not. Cold, always cold, and off the heat.What to Serve With It
Pickles are a supporting actor, so what you pair them with decides whether they are a snack or an actual course. The rule is to pair them with rich, fatty, or salty things that can stand up to the acid.-
-
- A sharp cheddar or a good cracker. This is the classic and it is the right answer more often than anything else. Sharp cheese and sharp pickles, no competition.
- A full cheese board. These are made for it. Cheddar, a soft washed-rind, some blue, a few nuts, a smear of mustard, and a bowl of these pickles. It looks like you tried.
- A chopped-dog or burger topping. Put them on a hot dog with mustard, or on a burger with mayo and a sharp pickle slice, and you get a restaurant-quality result with no work.
- A chopped salad. Two cups of greens, a quarter cup of these chopped up, and a sharp vinaigrette. The bitterness in the raw sprouts plays off the acid, and it is much more interesting than plain pickles on a salad.
- Grilled or roasted meat. Pork, ribs, roast chicken, a whole roasted cauliflower with these scattered over the top. Fatty meat plus sharp pickle is a pairing that never fails.
- Olive oil and bread. A plate of good oil and crusty bread with a few pickles alongside for dipping is an embarrassingly good lunch.
-
Beverage Pairings
Pickled anything wants cold, dry, and slightly bitter, for the same reason cheeseburger and beer work. Nothing sweet, nothing warm.-
-
- A crisp lager or a pilsner is the default and it is correct. The carbonation actually cuts through the acid, which is why pickles and beer are a genuinely old pairing and not a coincidence.
- A dry sparkling wine or Champagne is the fancy answer and it is not a stretch at all. The bubbles scrub the vinegar off your palate and the acidity mirrors the pickle.
- Brut cider, dry, not semi-dry. The tartness plays right against the brine.
- Ginger beer or ginger ale for a non-alcoholic option, and the ginger is genuinely good with these rather than just neutral.
- Cold brew or a shot of espresso afterward, because a jar of pickles pairs with dessert and you should plan for that.
- Skip anything sweet. Sweet tea, soda, sweet wine, and flavored malt drinks all make the vinegar taste sharper rather than nicer.
-
Are Keto Pickled Brussels Sprouts Actually Keto?
Short answer: yes, at a normal serving, and I will show you the math instead of asking you to trust me. One quarter of the jar is roughly six to seven sprouts plus the brine that comes with them. Those sprouts contribute about 2 grams of carbs and 1 gram of fiber. The 2 tablespoons of sugar in the whole recipe spread across six servings comes to about 4 grams of carbs in that quarter. So a serving lands at roughly 6 grams total carbs, 5 grams net, and 35 calories. That fits comfortably in a day that allows 20 to 30 grams of net carbs. The honest caveat is that the sugar is the thing doing the work, and if you are strict about it, swap the sugar one for one for monk fruit, allulose, or erythritol and drop to a tablespoon, which gets you to about 4 grams net. That version is also sharper and, I think, better. What these are not is a freebie: they are low carb, but they are also pickled, so watch the sodium.Are Pickled Brussels Sprouts Gluten-Free?
Yes, naturally, but with one check you have to make. Distilled white vinegar, water, sugar, salt, garlic, mustard seed, black peppercorns, red pepper flakes, and bay leaves are all gluten-free as they come. The one thing that breaks it is the vinegar choice, and this is where people make the mistake. Malt vinegar is made from barley and contains gluten, so if you are avoiding gluten, use distilled white vinegar and read the label. It is also worth avoiding pre-seasoned or flavored vinegars, because a lot of them are built on soy sauce or malt vinegar and will carry gluten with them even when the label looks fancy. If you buy plain distilled white vinegar from the shelf, this whole recipe is gluten-free, and it is a good pantry staple to keep around for exactly that reason.Do I Have to Water-Bath Can These, or Can I Just Leave Them in the Fridge?
Leave them in the fridge, and this recipe is a refrigerator pickle, not a canned one. There is no water bath, no processing time, no thermometer, and that is genuinely the reason this method is so popular. But the flip side is that they do not go in a pantry, ever. Do not seal a jar of these and store it on a shelf. Home canning safety depends on a tested recipe, a tested temperature, and a tested processing time, and improvising that with a home vinegar pickle is a botulism risk. Refrigeration, a standard mason jar, and a firm lid is the entire method here.How Long Do Pickled Brussels Sprouts Last?
In the fridge, sealed, they are good for up to a month, and the flavor is genuinely at its best somewhere between day three and day two weeks. How long they last in your house is a different question. In this house it has never been a month. If the brine goes cloudy that is normal, and a fine sediment at the bottom is normal. If you see anything fuzzy, greenish, or pink, discard the whole jar without tasting it. You can also freeze plain blanched sprouts with no brine for later soup or stir-fry use, but do not freeze the pickles themselves, because they come out limp and lose the entire reason you made them.Why Are My Pickled Brussels Sprouts Not Crunchy?
Five things cause this and they are all fixable. You over-blanched, which cooks the crunch out, and three minutes is the ceiling for halved sprouts. You skipped the ice bath, so residual heat kept cooking them in the colander. You let them drain dry and air out for too long before packing. You did not push them fully under the brine, so the parts above the line went soft and dull. Or you poured the brine on cool instead of hot, so the pickling never penetrated properly. If you are starting over, fix any one of those and you will get the snap back. The mustard seeds are also worth keeping precisely because of this, since the popping texture is a big part of why these stay interesting.How Long Do the Sprouts Need to Pickle Before I Eat Them?
Twenty-four hours is genuinely enough, and if you are impatient you can eat them that night and they will already taste like pickles. Three days is when they cross over from good to the thing people cannot stop eating, which is when the brine has worked all the way to the center and the sugar has settled the sharpness down. A week is where they plateau, and a month is the outer limit in the fridge, though I would not expect your jar to get that far.Can I Skip Blanching, or Use Canned Brussels Sprouts?
You can absolutely skip the blanch, and a lot of my pickling-obsessed friends do, because raw pickled sprouts are crunchier. You trade the bright green color and a little of that raw bitterness, and you get noticeably more snap. Canned or jarred cooked sprouts work too, and you can pickle them straight from the jar with no cooking at all, but they are softer to begin with, so drain them well and do not bother blanching. Just remember that the blanch is also what drives out the bitterness, so if you are pickling already-cooked sprouts, give them a slightly longer soak before you judge the flavor.What Can I Add to a Jar of Pickled Brussels Sprouts?
Almost anything in the same brine family, and this is where a plain jar gets interesting. Fresh dill heads are the single best addition. Thick coins of fresh ginger pair beautifully with the mustard seeds. Whole cloves, star anise, or a cinnamon stick add warmth. Thinly sliced carrot, cauliflower florets, pearl onions, green beans, and radish all pickle happily alongside, and a mixed jar looks beautiful in the fridge. A few extra raw garlic cloves give you a second, sharper layer of garlic that mellows as it sits. Just remember everything you add needs to stay submerged, and if you are adding something delicate like fresh dill, tuck it in near the top so it stays bright.Nutrition Information
These figures are estimates for about one quarter of the jar, which is roughly six to seven pickled sprouts along with the brine that comes with them. They are calculated from standard values for raw Brussels sprouts, distilled white vinegar, and the sugar and salt in the brine, and they are not laboratory-tested, so treat them as a guide rather than a precise record. Per serving, approximately 35 calories, 6 g carbohydrate, 1 g fiber, about 5 g net carbs, 1 g protein, 0 g fat, and 500 mg sodium. The jar yields about 6 servings. If you use a zero-calorie sweetener instead of sugar and two-thirds of a tablespoon of salt, net carbs drop to roughly 4 g and sodium drops by about a third. Two things I want to be straight about. The sodium figure is genuinely high, and that is inherent to pickling rather than a flaw in this particular recipe, which is why the low-salt variation is written the way it is. And there are no live probiotics in here. This is a vinegar pickle, which means it is acid-preserved, not fermented. It is a genuinely good low-carb, high-fiber, naturally gluten-free snack, and it is not a health food any more than a pickle is. Eat it because it is crunchy and delicious, which is a perfectly good reason.Final Thoughts
I love a recipe that solves a problem I did not know I had. That was the case with this one. I had a bag of Brussels sprouts slowly turning into something I would feel guilty about, and I ended up with a jar I use four or five times a week. It went on sandwiches, it went into salads, it went straight into my husband's hands over the sink, and twice it did not survive long enough to make it into anything more ambitious. A recipe that takes a quarter of an hour and produces three weeks of something the people you feed actually ask for is a very good return on a very small investment. So I will ask you the question my husband never stops answering for me. Do you eat your pickles straight from the jar standing at the counter, or do you consider that a lack of manners and insist on a proper plate? Because I have clearly been feeding myself an unsanctioned lifestyle, and I would love to know what the correct version of this looks like in your kitchen. And if you have tried pickling the other vegetables, tell me what is in your jar right now, because I am always looking for the next thing to put up.Keto · Naturally Gluten-Free · No Canning
Keto Pickled Brussels Sprouts
The crunchiest refrigerator pickle in about 25 minutes of work. Blanched, shocked in ice water, and packed with garlic and mustard seed, then poured over with a hot sweet-and-sour brine.
Ingredients
Method
- Trim and halve the sprouts. Pull the outer leaves, cut the stem end flat, and halve each sprout lengthwise straight through the core. Quarter the large ones. Hold them in ice water as you work.
- Bring salted water to a full rolling boil. About one tablespoon of salt per quart. It needs to be a real boil, not a simmer.
- Blanch three minutes. Add the sprouts, stir once, and cook exactly three minutes for halved, four for quarters. Slide a knife tip into the stem: almost no resistance, but they still hold their shape.
- Ice bath, right away. Have the ice water waiting before you start. Dump the hot sprouts in, swirl thirty seconds, and drain. They turn bright green and firm right in front of you.
- Pack the jar. Layer the sprouts, garlic, mustard seeds, peppercorns, red pepper flakes, and bay leaves into a clean quart mason jar. Pack snugly, leave a couple inches of headspace.
- Boil the brine. Combine vinegar, water, sugar, and salt in a saucepan. Bring to a full boil, stirring, until nothing is left sitting in the bottom. Taste it: it should be sharply sweet and salty.
- Pour hot, with the jar in cold water. Set the jar in a bowl of cold water in the sink so the glass does not crack, then pour the brine in slowly until everything is fully submerged. Push any floaters down.
- Cool to room temperature, then seal and refrigerate. One to two hours on the counter. Wipe the rim clean, lid and ring on snug, into the fridge. Never pantry store these.
- Wait a day, or better yet three. Good at 24 hours, genuinely great at three days, when the brine has worked all the way through.
Notes, Cost & Tips
- $5.00Estimated total
- $0.85Cost per serving
- 5 gNet carbs per serving
- 1 monthFridge life
- Keto math, shown not claimed: a quarter of the jar is about 6 g carbs and 1 g fiber, so 5 g net and roughly 35 calories. Swap the sugar 1:1 for monk fruit, allulose, or erythritol and drop to a tablespoon and you are at about 4 g net, plus a sharper pickle.
- Gluten-free, one label check: distilled white vinegar is gluten-free, malt vinegar is not. Use plain distilled white, and skip pre-seasoned vinegars, which are often built on soy sauce or malt.
- Fridge only, never the pantry. This is a refrigerator pickle. Home canning safety depends on tested recipes and tested processing times, and improvising that is a botulism risk. Jar, lid, refrigerator. That is the whole method.
- Not fermented, so no probiotics. There are no live cultures in a vinegar pickle. It is acid-preserved, it is delicious, and it is not a probiotic food.
Estimated Nutrition (per serving)
35Calories
5 gNet carbs
1 gFiber
1 gProtein
0 gFat
500 mgSodium
Nutrition values are estimates for about one quarter of the jar, roughly six to seven sprouts plus brine, calculated from standard values for raw Brussels sprouts, distilled white vinegar, sugar, and salt. They are not laboratory-tested and will vary slightly with your ingredients. Sodium is genuinely high, which is inherent to pickling; using two-thirds of a tablespoon of salt and a zero-calorie sweetener lowers both noticeably. No medical or weight-loss claims are made for this recipe.